

The June reveal up for My Creative Scrapbook - to view please see end of this post and for kit content images, and for more inspiration and details, please click 'HERE', and scroll down the page for each 'kits' reveal. The design team have done an amazing job in bringing some wonderful inspiration, techniques and tutorial's and these will be hosted throughout the month, on the My Creative Scrapbook Blog.
For June, I worked with the Limited Edition Kit, totally full of awesome products.
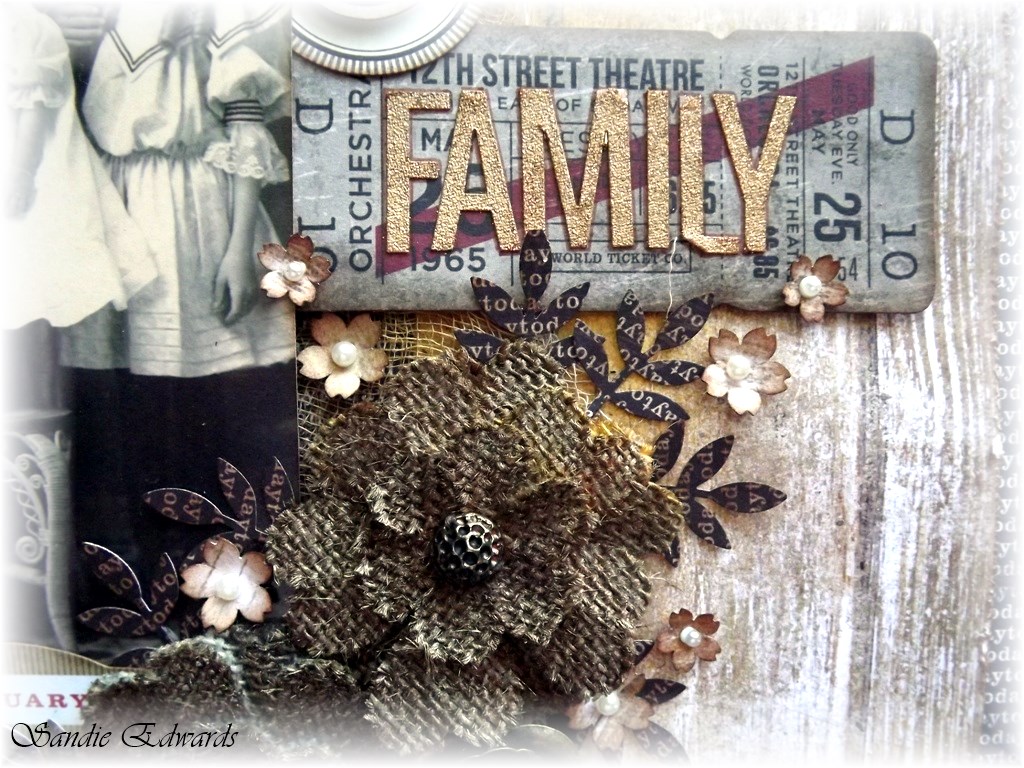
The flowers were misted with Lindy's Stamp Gang Sprays, and I also added in some small punched flowers, stamens and leaves to highlight the arrangement.

I tried to use up all the various elements of my kit in the below layout... a re-creation of the 1800s, with four beautiful woman, no doubt all family. Not really sure the view-finder really matches, but I loved the look of it in the layout. :-)

This month I have completed a few techniques to share on the My Creative Scrapbook Blog, including how I highlighted flowers, paper creases and edges, and more with Gold paint.

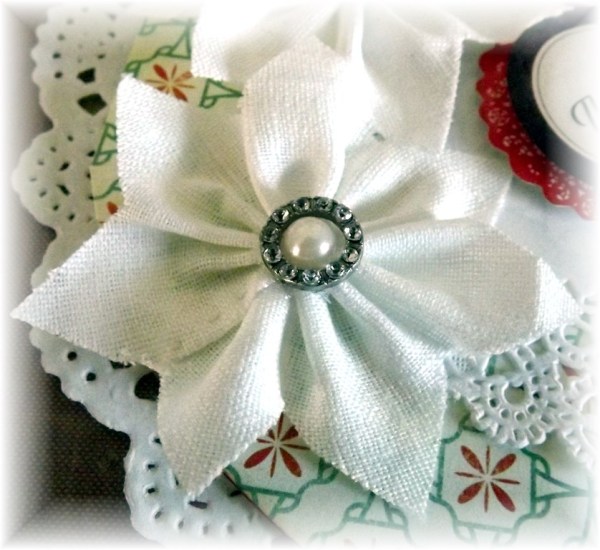
Also, I have completed a tutorial on the ribbon flowers below and how simple they are to create. I will link back 'HERE' with the tutorial, once it is up on the My Creative Scrapbook Blog.
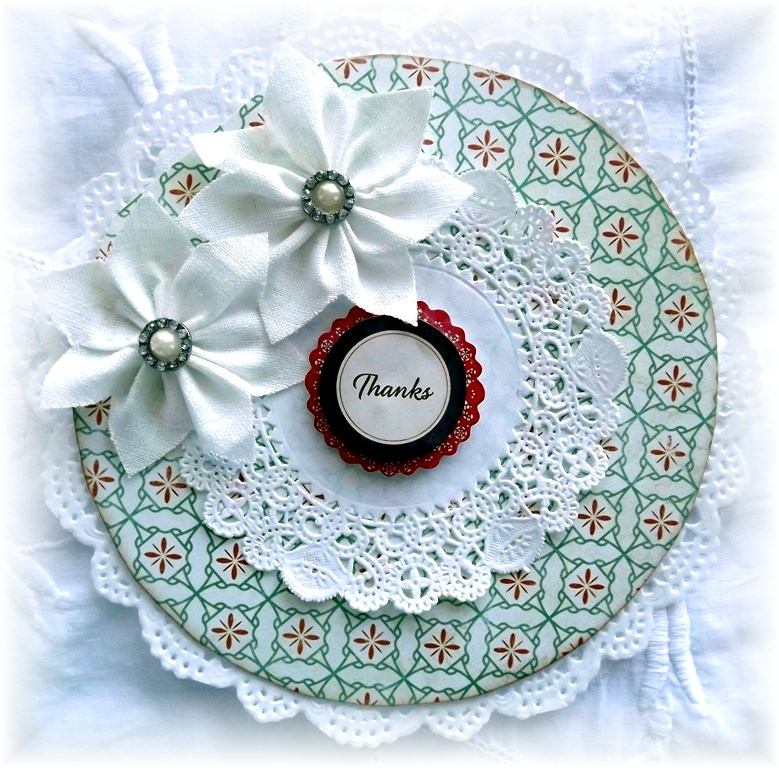


I added in a few paper doily's from my stash to create the above card, with left over elements from the LE kit..and decorated the hand-crafted flowers using buttons from my stash.

I will be back next month with the July reveal and am eagerly awaiting my package to arrive!!!
Happy Creating
Sandie
Sandie
Kits available:
 |
| Album Kit |
 |
| Creative Kit |
 |
| Limited Edition Kit |
 |
| Main Kit |
How to create a flower from trims
 |
| Photograph 5 |
1. Using the larger of the two trims in the June Kit, cut off a piece which
has 7 points. Double thread a needle with strong quilting cotton, and tie off
end well.

2. Run small gathering stitches along the non-pointed edge, as shown in
Photograph 2.
 |
| Photograph 2 |
3. Pull threads tightly as pictured in Photograph 3, to form flower shape,
tie off well on back of flower. Please Noter: Tiny stitches aids in getting a
nice gather in the flower and it will sit a lot lower, and be less bulky. AND,
adding a touch of glue to your knots will keep flowers from unravelling.
 |
| Photograph 3 |
4. Use metal elements as shown in Photograph 4 from June’s kit, to create a
flower centre. Any embellishment can be used, including buttons, beads, pearls,
jewels, etc. for the centre part of flower.
 |
| Photograph 4 |
5. Apply to your crafting project (Photograph 5).
Please Note: The colour of your flower can be change easily, by using
spray mist. You can create flowers which will match ‘any’ craft project.
WOW!! A wonderful creations Sandie. Gorgeous designs and beautiful detailing.
ReplyDeleteYour flowers look amazing, thank you for the tutorial, I will definitely be having a go at making some.
Sue xx
WOW..........Sandie, your pages are phenomenal!!!! Such stunning floral arrangements and other embellishments....beautiful handmade fabric flowers!I love the stunning layouts and priceless photos.
ReplyDeletewow! amazing!! I love your flower tutorial!! so very clever. I will be sure to try that one out!! Also love your LOs!! I so wish I had access to such amazing vintage photos too!
ReplyDeletewow your creations are just sensational Sandie. love love love all of these x
ReplyDeleteThe white flowers are great and the heritage layouts are always lovely!
ReplyDeleteWow fantastic projects. And amazing flower tutorial.
ReplyDeleteOh wow. These are amazing Sandie.
ReplyDeleteThanks for the bloom tutorial.:)
Wow!! Sandie, you have been busy. Gorgeous, gorgeous creations. Love them all. I'm definitely going to have a try at making those flowers, they are so pretty. ox
ReplyDeleteYour layouts are all very beautiful. I wish I can reach out and touch them. I love your ribbon flower tutorial...am going to try and make it as well.
ReplyDeleteLOVE those flowers, thanks for the tut...so easy, too:):) And that top LO....just got some of those FABBO burlap flowers...can't wait to use them...the colorful LO is really great, too - I'm a colour gal!!! And those cards, especially the round shaped one....wow! You've really, really done a magnificent job here Sandie:):):)
ReplyDeleteThese are all so gorgeous, you have such an eye for vintage, and love those flowers too!!
ReplyDeleteWow...you have been a busy lady! Love your projects, especially your first layout! Gorgeous texture and love your blooms! Fabulous!
ReplyDeleteWOW!!!!!!!!!!!!!!!!!!! Your creations are just absolutely amazing!!!!!!!!!!!! Love the had made flowers as well!
ReplyDeleteJust look at all your amazing work. I always love to see what you have created..
ReplyDeleteHugs~
amazing love this greetings janneke
ReplyDeletewow gorgeous design;s Luv the tutorial
ReplyDeletehugs carla
Love the flower tutorial and love the yoyo on the page. I often mix fabric and paper on my projects and like all the mix of textures
ReplyDeleteWonderful work with the kit Sandie & you are so clever to have made those flowers from the trim - really great idea!!
ReplyDeleteBeautiful work with stunning details .
ReplyDeletebyebye,lean
Wow! Stunning work! The details you add to your projects are so fun to look at! Thanks for sharing the flower tutorial!
ReplyDeleteGorgeous work with this kit Sandie!! I'm in love with your first vintage page...Awesome!!!
ReplyDeleteWow Sandie! Amazing projects and I love the mini tut you shared. Hugs
ReplyDelete