Showing posts with label Fairy. Show all posts

Thursday, July 18, 2013

Once Upon a Time - Enchanted Garden, and Sweet Pea Cards - Kaisercraft


 My first layout as part of the Kaisercraft Design Team using the Enchanted Garden Paper Collection.
Lots of fussy-cutting involved in this layout...
The collection is gorgeous, full of whimsical fairies, and butterflies, through to mushrooms which are wonderful to create a fairy scene.  The photograph is of me as a little girl ...


 and two cards, created with the Gorgeous Sweet Pea paper collection...I adore the colour hues of this collection, so pretty.


For a full list of Kaisercraft products used, and further inspiration from the DT, pop on over to the Kaisercraft Blog...
Sandie

Monday, May 20, 2013

Whimsical Tag, and Travel Mini Album - Imaginarium Designs

Hi Everyone,
For Imaginarium Designs this month I have created two projects - the first a whimsical tag which could be used for many occasions, including a wedding.  Plenty of space on the back of the tag for special quotes or writing of any kind.

The chipboard elements were coloured using several aqua hues and gold, pounced lightly over the chipboard and then sealed using a spray sealer.  This colour theme was used on each chipboard piece.
 The image is one I purchased many years ago on a vintage image CD, it is so adorable.
The Monarch Butterfly was cut into two after colouring, and placed on the image where I removed the original wings from. 
Guipure laces, beaded trim, and fancy braid lay beneath the title - and the below photograph shows the close up detail of the painted wings...
The Embellishment 4 was used in a double layer, to the top of the tag, just to add a little different dimension, as seen in the below image.
Imaginarium Designs Chipboard Used In My Whimsical Tag:
Wishing You Happy Days IDS0070

Monarch Butterfly IDS0059

Embellishment 4 (IDS0013)
Materials:
Kaisercraft - 365 Days - Organise
Prima Marketing - Tag Pad
Misc: Fussy Cut Image, Guipure Lace, Beaded Trim, Fancy Braid
Lindy's Stamp Gang - Starburst Spray - Sea Grass Green
Vintage Photo - Tim Holtz - Distress Ink
Adirondack Acrylic Paint Dabber - Juniper, Pool, and Gold
450 Adhesive

...and my 2nd project is a 'Travel' Mini Album.  I created this mini album using the Mini Book 6 Sheets.  It won't be too long and it should be full of memories as John, Jesse and myself are soon taking a nice long, extended holiday.

The album measures approx 5.5" square, and consists of 6 pages. I have given each page (on both sides) a pocket which holds a further larger tag for photographs and journaling.
Being an avid collector of bits and pieces, I had a nice stash of charms to add to the handle!  Tiny brads where attached to the leather look straps which also comes in the album kit.
I kept the title and chipboard elements within the mini plain and simply coloured using distress stain.  Various corner chipboard elements, were used throughout as photo-holders (or for more tags), and are only half adhered to the page so elements and photographs can be slipped beneath.
I did not include every page, as they all tend to look the same, but here I added a few to show as examples.  Perhaps when I'm ready to place in the photographs, I'll add a few more chipboard elements :-)

Imaginarium Designs chipboard used in my Travel Mini
Mini Book 6 Sheets IDBK0002
Compass With Travel Words in Board IDW0019
James Corner IDC0010
Edward Relief Small 4 per board IDT0032
Tulip Flourish IDFL0008
Embellishment 4 (IDS0013)
Materials
Prima Marketing - Botanical Paper Collection
Vintage Photo - Tim Holtz - Distress Ink, and Distress Stain
Cream - Seam Binding, and Tulle 
Misc: Charms, and Brass Lamp
Gold Brads, Album Rings
Kaisercraft - Check In - Clear Stamps
Paper Chic - Stamps
Scotch ATG and Tape
450 Adhesive

Do not forget to leave a comment on the Imaginarium Designs Blog, to be in the chance to win a chipboard pack....
Till Next Month

Thursday, January 31, 2013

Vintage Images/Fairy Tutorial

I received an email and comment recently from followers letting me know my 'Vintage Fairy Tutorial' was not working.  So, even though it is an old tutorial, obviously it was well liked as I found it on Pinterest on more than one occasion :-)

Here is the revamped version for those looking for it.

Vintage Images/Fairy Tutorial

Copyright 2011, Sandie Edwards
For personal use only!

***Before attempting this tutorial, please read through all instructions first***

These little winged girls/boys are easy and simple to make, and look delightful in scrapbook layouts, cards and even tags.  There is a multitude of wonderful 'royalty free' vintage images out there on the internet, so do a search in Google and see what else you can find.


Requirements:

Wing Template ‘HERE
Vintage Image ‘HERE
Page from an old book
Glimmer Mist
Pencil
Scissors and a Craft Knife
Copic Pens/Water Colour Pencils/Chalks
Kaisercraft Ink Pad in Sepia or Brown OR Distress Ink Vintage Photo, Walnut Stain)
 OR – Tim Holtz Distress Ink “Walnut Stain”.
Glitter – Any type works wonders
3mm Silk Ribbon
Charm or two
Mod Podge OR Glossy Accents
Ribbon (optional)
Scrap of Lace


How To...

Download 'Wing Template'.  The wing template can be made smaller or larger using WORD.  To do this, download the wing template onto your computer.  Open image in your photo program, then copy and paste into a WORD document.  You can click on the image when in WORD, and adjust the size to your own personal requirements.  Alternatively, if you are not WORD savvy, you can use your scanner to adjust the size of the template/images.

1. Download wing template, which can be found 'HERE'.
2. Once you have your wing template, using the old paper from an old book, trace the outline onto cardstock or cardboard. Carefully cute out.
3. Using Kaisercraft ink, or Distress Ink, ink all edges.  A cotton bud can be used to get into any small areas that an ink pad or dauber will not reach.
4. Lightly spray your wings with Glimmer Mist. 
5. Run a small beading of adhesive (Mod Podge) around wing edges, and apply glitter to edges.  A much easier method (now I am re-writing this) is to use Stickles Glitter Glue. 
6. Allow to dry, and iron with no steam when completely dry if paper curls.

7. Using your choice of vintage image carefully cut out using scissors.  Downloadable examples can be found 'HERE'.
8. Use a craft knife, on a cutting mat and get into any small areas that need removing. 
9. Ink edges of image.
OPTIONAL:  You can colour your images using copic pens, water colour pencils, inks, or chalks.  I lightly used a water colour pencil and blended by gently rubbing my finger gently across the image.  If you are a little more adventurous, there are a huge variety of mediums that can be used to colour.
10. Add Mod Podge or Glossy Accents over the shoes to give depth and dimension to the image - but only the shoe areas!  Allow to dry.
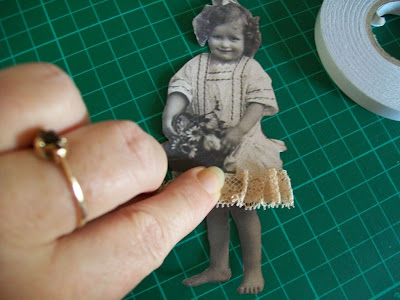
11. Add a length of double sides tape to the lower edge (dress) of your vintage image. Using a fine, small piece of lace, fold over a small hem, and place on edge to start - then add tiny pleats, pressing down onto the double-sided tape as you go.  To achieve a neat finish, remember to fold lace under at other edge before adhering.
12. Small pieces of lace can be added to the sleeves, but I personally thought my image looked fine without it.

OPTIONAL:  Apply a touch of blush (make-up) to a cotton-bud and lightly add some colour to her cheeks, gives a nice glow.
13. Place your image onto the wings and find the placement you are happy with.  Apply small amount of Mod Podge or Glossy Accents to front side of wings, and adhere to your image.  You may need to hold briefly while adhesive dries.
HANDY HINT: If you are not confident with the placement, turn image over and trace a line with pencil on the back of image to know where to adhere.
14. Create a small bow from the 3mm silk ribbon and attach to central area of pleated lace.
15. Charms can be added, as in photographs below.


Have Fun!!
Sandie

Tuesday, November 20, 2012

Shabby Chic Mini Album and Large Tea Tag - Imaginarium Designs

This month for Imaginarium Designs I have created a mini album from the Book 3 Sheets in a Shabby Chic style.  The album consists of 3 pages, which vary in size - fantastic for decorating the very edges as you can see in the photographs.
 The title of the album Every Picture has a Story to Tell is perfect for albums, and the Tiny Vine Flourishes really complete the floral arrangement.  All the chipboard elements in the album have been spray painted with white spray paint, and little hot-fix crystals affixed, to decorate.  
  I really loved the 'Love' word on its own from the Love You, so carefully snipped the two words apart to use on its own.  The 'You' I have put away for a later project.  

 Butterflies and bling go hand in hand, well for me anyhow!  :-)  I only adhered half the butterfly wings to the album page, this allowed for tags to be neatly tucked beneath the other wing. 
The 2nd page, with the 3rd showing beneath.

Love, Cherish, Adore scatter over pages and various tag elements, and are a brilliant way to decorate, an already busy page.

 The very back album page is actually a pocket, to hold further photographs or memorabilia. The Tulip Flourishes are place holders for further photographs.
 4 Small Butterflies IDT0014
Love, Cherish, Adore Small IDW0036
Tulip Flourish IDC0005
Oval Flourish IDFL0002
Vine Flourish Tiny IDT0027
Book 3 Sheets IDBK0001
Love You ID0026
Remember, Forever, Together Small IDW0030
Every Picture has a Story to Tell IDP0045
Love You (cut in half)
Oval Flourish (cut in half)
Other:
Papers: FabScraps 'Marie Antoinette' Collection - Pink Carriage, Pink Lady and Children, Garden, Perfumes, and Tag Collection.
Flowers: I am Roses - Roses, Leaves, Small Flowers - Other: Silk Ribbon Roses
Lace: Guipure, Beaded Lace, Tulle
Ribbons: Silk Bias, Seam Binding, Tulle, Fancy Glitter, RicRac
Crystals: I Paper - Crystal Art Deco Piece and Round - HotFix Crystals Various Sizes
Paints/Mediums: Adirondack Snow Cap Paint Dauber,  White Knight Flat Quick Dry Enamel, Ranger Distress Ink - Walnut Stain, and Helmar Adhesives
 Misc: Eyelets, String Pearl, Silk Threads, Tags, German Scrap, Prima Marketing Pearl Butterfly, and Hand-Created Crystal Stick-Pins

Angel Tag


 and my second project is a Large Tea Tag.  The image is an actual photograph I have cut out, and adhered the Large Butterfly to the back, giving her angel wings.

The chipboard pieces, were spray painted white, and then a light brush with Walnut Stain, Distress Ink applied just to age the chipboard slightly. 

 Adore, is from the Love, Cherish, Adore Small, I could use these small sayings in every project, they are perfect for everything!!       

 Imaginarium Designs chipboard elements can be purchased worldwide through Seriously Scrapbooking.
Large Butterfly IDS0002
Love, Cherish, Adore Small (IDW0036)
Till my next creation..
Sandie
xxx


Materials:
Imaginarium Designs:
Large Butterfly (IDS0002)
Love, Cherish, Adore Small (IDW0036)
Flowers, I am Roses, Small Filler Flowers, Rose, Small Leaves
Daisies, Wild Orchid Crafts, Small White Daisies
Delish, Tea Tag
Misc: Gauze, Guipure Lace, Netting Lace, Pink Silk Ribbon, Net Ribbon, Beaded Braid, and Hand-Made Pins
Walnut Stain, Tim Holtz Distress Inks
Helmar Adhesives