Showing posts with label altered project. Show all posts

Saturday, August 18, 2018

Altered Diary - The Scrapbook Store


I used left over product from my DT kit for July, to create a revamped, or altered diary cover.  Mum and I found some fabric covered note books in k-mart some time ago and this one was perfect for my creation.  These also make wonderful gifts, so nice to have a stash on hand for the un-expected gift 'need'!  

The Mintay, 7th Heaven paper collection is stunning, and was such nice papers to work with.  However, I always find it difficult which paper side to use the most, as all are so pretty. 

All materials, can be found below....which are available through The Scrapbook Store..


Materials:
Blue Fern Studios - Romance, History, Fiction Chipboard
Charms - Key, Butterfly and Clock
Tassel from Stash
Pin with Beads from Stash


Wednesday, October 9, 2013

Do More with Less - Guest Design - Altered Mouse Trap Tutorial and Challenge

Hello Everyone,

I am guest designer for ‘Do More With Less’ this month. Thank you Yvonne for inviting me.  

Today, I want to share with you a quick, and easy tutorial on how to create a note or photo holder fridge magnet, using a mouse trap. Now, I do not think I need to stress how important it is to use new mouse-traps (LOL).  Recycling is wonderful, but perhaps not with mouse-traps!  These little note holders would be perfect little gifts with Christmas around the corner, and are something unique and certainly an entertaining, conversation piece. 


Altered Mouse Trap
Materials: Mouse Trap, Pliers, Paint, Misc. Paper Scraps, Quick Dry Adhesive, Lace Remnants, Silk Ribbon, Small Roses, Buds and Leaves, Distress Ink, Magnetic Strip, and Wording.

1. Remove wire catch with pliers.

2. Paint trap white as in Photograph 1.  I find it best to use spray paint, as this adheres to the metal elements of the trap perfectly, and gets into all grooves and crevices.
Photograph 1


3. Insert a small paper piece as shown in Photograph 2. This eliminates a gap of white in the centre when completed. I find it best to use a quick dry adhesive rather than tape, as glue allows for manipulation to get the paper into the correct position.

Photograph 2
4. Measure and cut 2 pieces of pattern paper to fit both the top and bottom portion of the trap, as shown in Photograph 3. Ink paper edges, and adhere into place on the trap.

Photograph 3

5. Affix wording of some sort across the top part of the trap - part without latch across it.
 6. Arrange flowers, buds and leaves and adhere into place, around wording.  Use Photograph 4  as a guide for placement.

Photograph 4

7. Create a bow from ribbon, and adhere to middle trap mechanism.

8. To complete, affix lace to outer edge, on back of trap, and adhere magnetic strip.  
See Photograph 5.
Photograph 5
I do hope that my tutorial has been inspiring and an appealing idea to some of you to make simple, adorable gifts for Christmas.  My challenge for you, is to get creative with something unusual laying around the house.  Examples:  Coffee jars, boxes, containers, old tins, plant pot, paper towel cylinder, paint brush (all the rage at the moment), chipped tea cup, anything that you can revamp, that would normally end up in the bin.  Bring new life to the piece you have picked, create up a storm and give the item a new place in your home..... I cannot wait to see what you come up with!
Upload your project to the correct post at the Do More With Less Blog to be in the running to win a RAK of a Shadow Box from Imaginarium Designs

Saturday, April 20, 2013

The Fairies Shadow Box and a Match Box Mini Album - Imaginarium Designs

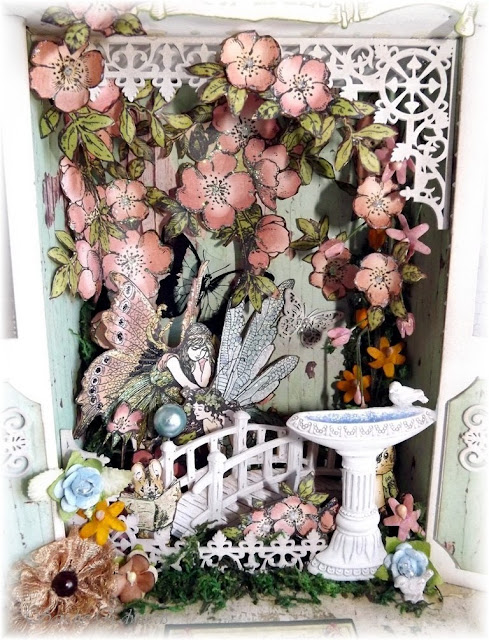
Hello Everyone,  I have had a wonderful time creating with Imaginarium Designs chipboard this month, and created a shadow box using the Jane's Shadow Box, and built a fairy-tale image within, using Graphic 45 'Once Upon a Springtime' papers, and the Basecoat collection from Kaisercraft.
Jesse is fascinated by it, and watched the stages of it coming together :-)
I used a variety of chipboard pieces, including the gorgeous Edward Relief Border, cutting the piece down in size to fit perfectly at the top and bottom of the shadow box - this brings back memories of those gorgeous ornate veranda, wrought iron pieces once seen in beautiful old homes.  Love it! The windows were covered using printed acetate to replicate real windows, and then decorated using Embellishment 4, and Embellishment 8
I kept the chipboard plain in colour, so that all the details would show - spray painting each piece before assembling the shadow box.
Hidden on the back wall, peeking out is the Small Butterfly, hiding amongst the foliage and Green Tara flowers.
I had so much fun putting this together...
Jane's Shadow Box (IDS0024)
4 Small Butterflies (IDT0014)
Edward Relief Border (IDB0010)
Embellishment 4 (IDS0013)
Embellishment 8 IDS0014

...and my next piece, is a miniature matchbox, with mini album.  The matchbox itself measures 7cms X 5.5cms - so it is not the really tiny one's that are available in the supermarket. 

The square frame (from 2 Frames on a board) was decorated using a variety of paints, to give it an aged appearance - just simply by stippling the paint on with a hard bristled brush.  The image was one I picked up on Etsy some time ago now (sorry cannot remember name) - Mod Podge was added to the inside of the frame.
The  Embellishment 8, was adhered to the front as a draw front, and a brad (minus stems) added.  It really is only decoration, as you push the back of the box, to open.  
The Vine Flourish Tiny, was painted using a gold paint dauber, pouncing the paint to add texture - doing this almost gives a metal appearance.  These intricate flourishes were cut into smaller segments with sharp scissors and added to the floral arrangement on both the matchbox and the mini album.
Of course, I had to add a tiny butterfly - they are so sweet, highlighted with miniature pearls.
Visit the = Imaginarium Designs Blog for further inspiration, and don't forget to leave a comment to be in the running for a fabulous chipboard pack...

Back next month with more Imaginarium Designs creations...


4 Small Butterflies (IDT0014)
Embellishment 8 IDS0014
Vine Flourish Tiny (IDT0027)
2 Frames on a board (IDT0006)

Friday, December 14, 2012

Shabby Chic Mouse Trap Note Pad Holder - Cheery Lynn Designs

This week for Cheery Lynn Designs, I have revamped a mouse-trap into a note holder, using a range of dies.  I have spied these on many social media outlets and just had to try one.  These would make wonderful last minute Christmas presents!

Do not forget my Christmas Blog Candy Give-Away, details can be found 'HERE'. 

 On the back of the 'trap' are 3 flat magnets, so the note holder can be placed on the fridge.
Firstly, I spray painted the mouse-trap in white, then started decorating.  The base below the mouse-trap is the Swedish Spring Oval Frame, which was cut from chipboard, and spray painted white.  Along each side of the mouse-trap the Lace Light Deco Border was used to decorate.  To create the main focal rose, I used the Miniature, Medium, and Large rose die's, just building the rose in layers. Beneath the rose, I created a doily by cutting the Lace Corner Deco D 4 times, and adhered all four edges together to form a miniature doily.  You may need to enlarge the photographs to see this detail. 
Foliage was created in and round the rose using the smallest leaf from the Small Leaves 2Wreath Strip, and Olive Branches which were cut into smaller segments. 

The 'today' sentiment was stamped onto the Sentiment Frame, and mounted on foam tape for dimension.  
I will be back early in the new year (4th Jan) with more Cheery Lynn Designs.  Bj, Mike and Sandy have given the design team some time off over Christmas to spend with family (very spoilt).  AND, in the new year (mid January) the design team will be revealing all the CHA release dies.  I seriously cannot wait to show you the new release, they are fabulous!!  

The Cheery Lynn Designs Challenge Blog, will still be hosting challenges, so do call on over and check each challenge out, and of course enter for a chance to win a $20 shopping voucher.

xxx

Materials
Medium Rose (B154)
Large Rose (B155)
Wreath Strip (B216)
Chipboard
Foam Tape
Adhesive
Sentiment Stamp
Mouse Trap
Glitz 'French Kiss' 6 X 6 Paper Pad

Friday, November 23, 2012

Christmas Tree, Oh Christmas Tree - Cheery Lynn Designs

For Cheery Lynn Designs this week, I have created a Christmas tree, table decoration.  The base of the tree is a hot chocolate container, which is covered with cardstock, and then the Snowflake Edger border was added to decorate.  
Cheery Lynn Designs have an amazing range of Christmas dies, you can find them 'HERE'.

 I have a love of snowflakes, probably due to being an Australian, and only ever seeing snow once in my life.  Even though I was only very young, I can remember every single detail of our trip to the snow, and how cold 'that' snow was!

My Christmas Tree has been totally decorated with snowflakes, including the negative die-cuts from the Snowflake Edger.  The list of dies used can be found below.
The challenge over on the Cheery Lynn Designs Challenge Blog is 'Tags'.  You only need to add one Cheery Lynn Designs die to enter, and have the chance to win a $20 voucher to the store.  For further inspiration from the rest of the Design Team, visit the Cheery Lynn Designs Inspirational Blog.
Have a wonderful day
Sandie
x
Materials:
Available from Cheery Lynn Designs
Stardust, Ranger Stickles
White, Bazzill Textured Cardstock
Kaisercraft, Crystal Bling Pieces
Fancy Braid, and Matching Trim


Wednesday, August 22, 2012

A New Best Friend, Besides Hot Chocolate - Decoupage with Helmar

This week for Helmar, I have been playing around with Decoupage and Craft Paste, and created a pencil/brush holder from an empty Hot Chocolate container.  I look at items around the house with a new light of re-purposing the empty containers, or packages.

Firstly, I painted my container, as I knew I was going to use tissue paper, which is quite transparent.  I applied the Decoupage and Craft Paste with a paintbrush to the actual container, having previously cut the tissue paper to size.  The process of adding the paper was simple, and a wipe with a damp cloth afterwards, eliminated any wrinkles or creases... you cannot even tell where the join is!
The printed image, I sprayed with Crystal Kote Fixative, just to seal the image - especially as I had printed it myself, and was not sure of the inks stability.  Spraying with the fixative, seals the paper and is a fast process with quick drying time.  I applied the Decoupage and Craft Paste to the area where I wanted the image and added the image, wiping any excess adhesive away with a damp cloth.  No wrinkles, no creases, and no lengthy time to dry.  I did have the help with a heat gun though!
The embellishing of my container was completed using the 450 Quick Dry adhesive.  I also added lace to the inside of the container, so the items sitting inside would not be damaged by the metal rim. 
Also, his month you have a chance to win a great prize with the Helmar Challenge, just upload your challenge entry into the Helmar Flickr Group before the end of the month.  So get creative and come and join in with the fun!
Happy Creating!
Products List:
Helmar: Decoupage and Craft Paste, Crystal Kote Fixative, and 450 Quick Dry
Hot Chocolate Tin
Hand-Made Hat Pins
Tim Holtz Tissue Paper
Braid, Hand-Dyed Laces, Flowers, Ribbon
Computer Generated Image

Wednesday, August 1, 2012

Creative Inspirations - Mini Toilet Roll Album

Creative Inspirations Paint is celebrating their birthday, and there will be a SALE, with 10% off all products for the whole of August.  If you need to re-stock some of your paints, or try them for the first time, now is the time to do so....
This week for Creative Inspirations Paint I have created a mini album from toilet roll holders.  The mini album fits neatly into a soap box which I altered, and can be viewed at the bottom of this post. 
Flower and leaf elements were coloured using Creative Inspirations Paint, in the colours of Olive Green, Antique Gold, Blush, and TuTu Pink. 
The shimmer of the paints is just beautiful, and even more so in 'real'.
The main cover flower, has been painted using TuTu Pink and brushed with Blush, then further highlighted with Resplendence Angel Dust.  My gosh, the glimmer of the paint and Angel Dust is just beautiful...
The box (old soap box originally), hosts 3 hand-made pencils created from kitchen skewers and painted with Creative Inspirations Paint - Green Olive, TuTu Pink and Gold.
 The paints worked so well in creating real pencils - not that they draw!!


Materials List:
Creative Inspirations Paint: Tutu Pink, Blush, Green Olive, Antique Gold, Gold, and Resplendence -
Angel Dust
Old Recycled Soap Box
Acetate
Imaginarium Designs Chipboard: 'Mum'
Kaisercraft Papers: 'The Lake House'
Helmar: Premium Craft Glue, and 450 Quick Dry
Prima Marketing Flowers: Charme Rose 'Meadow Lark', Mountain Lilly 'Cotton Candy', and Cradle Robin
Vintage Velvet Flowers
Misc: Pink Braid, Velum Butterflies, Silk Ribbon, Computer Generated Sentiment, Toilet Rolls, Skewers, Pearls, Charms, Silk Ribbon
Cheery Lynn Designs: Olive Branches, Oval and Rectangle Stacker Series
Spellbinders: Foliage
Ranger: Distress Ink 'Walnut'
Tattered Angels: Glimmer Glam 'Espresso Bean'

Wednesday, June 20, 2012

Memory Book 'Page' - Creative Inspirations Paint

This fortnight for Creative Inspirations Paint, I thought I would show my 'work in progress' on my Memory Album.  This is one of the pages inside where the torn/distressed edges were painted with 'Gold', allowing for a really aged appearance. 

I'm not the best stamper (learning the art), so I tried to attempt to create an embossed image, which was not really sucessful, but practice will make perfect.  Sadly, I cannot tell you which colours in the 'Deliquesce' range I used, as I packed them up before writing them down (with the thought of throwing my tag out).  I played around a little with using the Denium and Sky Blue Creative Inspirations Paints on the background, trying to meld one into the other. The more I played, the more I liked it, so thus, my tag did not end up in the bin.

The silk ribbon was painted with straight Denium, and here and there a touch of Blush.  

The Imaginarium Designs chipboard butterfly was painted using the Sky Blue, then touched (while still wet) with Denium, blending the two together.  I am unsure what the green spot is, must be something spilled onto the chipboard before painting.  It does not show in real, only in the photographs!
I used a lone Prima Marketing flower in white, painting it in the same colours as the tag - Denium and Sky Blue. A light touch of the paintbrush to the edges of each layer of the flower with the Denium paint, gave more definition and character.  Before the paint totally dried (you have to work quick as it does dry fairly quickly) I rolled the flower in Resplendence 'Angel Dust' - my new favourite in the Creative Inspirations Range.  Oh my goodness, it is sooooo delightful, the colours are beyond amazing and a little, goes a very long way.
Applying Gold to the edges of the actual book, and then the torn/distressed edges gave a beautiful shimmer, and replicates an older era of 'book'. 
Supplies:
Creative Inspiration Paints: Denium, Sky Blue, Gold, Blush, Resplendence 'Angel Dust'
Tag
Helmar Adhesives
Prima Marketing: White Flower
Kaisercraft: Pearls
Silk Ribbon: Hand-Dyed with Blush & Denium Creative Inspiration Paints