Showing posts with label Sandie Louise. Show all posts

Friday, December 14, 2012

Shabby Chic Mouse Trap Note Pad Holder - Cheery Lynn Designs

This week for Cheery Lynn Designs, I have revamped a mouse-trap into a note holder, using a range of dies.  I have spied these on many social media outlets and just had to try one.  These would make wonderful last minute Christmas presents!

Do not forget my Christmas Blog Candy Give-Away, details can be found 'HERE'. 

 On the back of the 'trap' are 3 flat magnets, so the note holder can be placed on the fridge.
Firstly, I spray painted the mouse-trap in white, then started decorating.  The base below the mouse-trap is the Swedish Spring Oval Frame, which was cut from chipboard, and spray painted white.  Along each side of the mouse-trap the Lace Light Deco Border was used to decorate.  To create the main focal rose, I used the Miniature, Medium, and Large rose die's, just building the rose in layers. Beneath the rose, I created a doily by cutting the Lace Corner Deco D 4 times, and adhered all four edges together to form a miniature doily.  You may need to enlarge the photographs to see this detail. 
Foliage was created in and round the rose using the smallest leaf from the Small Leaves 2Wreath Strip, and Olive Branches which were cut into smaller segments. 

The 'today' sentiment was stamped onto the Sentiment Frame, and mounted on foam tape for dimension.  
I will be back early in the new year (4th Jan) with more Cheery Lynn Designs.  Bj, Mike and Sandy have given the design team some time off over Christmas to spend with family (very spoilt).  AND, in the new year (mid January) the design team will be revealing all the CHA release dies.  I seriously cannot wait to show you the new release, they are fabulous!!  

The Cheery Lynn Designs Challenge Blog, will still be hosting challenges, so do call on over and check each challenge out, and of course enter for a chance to win a $20 shopping voucher.

xxx

Materials
Medium Rose (B154)
Large Rose (B155)
Wreath Strip (B216)
Chipboard
Foam Tape
Adhesive
Sentiment Stamp
Mouse Trap
Glitz 'French Kiss' 6 X 6 Paper Pad

Friday, November 23, 2012

Christmas Tree, Oh Christmas Tree - Cheery Lynn Designs

For Cheery Lynn Designs this week, I have created a Christmas tree, table decoration.  The base of the tree is a hot chocolate container, which is covered with cardstock, and then the Snowflake Edger border was added to decorate.  
Cheery Lynn Designs have an amazing range of Christmas dies, you can find them 'HERE'.

 I have a love of snowflakes, probably due to being an Australian, and only ever seeing snow once in my life.  Even though I was only very young, I can remember every single detail of our trip to the snow, and how cold 'that' snow was!

My Christmas Tree has been totally decorated with snowflakes, including the negative die-cuts from the Snowflake Edger.  The list of dies used can be found below.
The challenge over on the Cheery Lynn Designs Challenge Blog is 'Tags'.  You only need to add one Cheery Lynn Designs die to enter, and have the chance to win a $20 voucher to the store.  For further inspiration from the rest of the Design Team, visit the Cheery Lynn Designs Inspirational Blog.
Have a wonderful day
Sandie
x
Materials:
Available from Cheery Lynn Designs
Stardust, Ranger Stickles
White, Bazzill Textured Cardstock
Kaisercraft, Crystal Bling Pieces
Fancy Braid, and Matching Trim


Friday, November 16, 2012

Thankful for Family - Cheery Lynn Designs

Hi Everyone,
This week for Cheery Lynn Designs, I have created a layout on my family.  The photograph is of my Mother (right of photograph) with her siblings, and my Grandmother in the middle.  One of my Aunts is missing from the photograph, as she passed away from Breast Cancer at a very young age.  I love this photograph as it is one of the very few I have of all my Aunts and Uncles together.  My family are situated all over Australia, and overseas, so we do not get to see each other often.... but I treasure the memories I do have of them.

This week, I really wanted to showcase how wonderful the Honeycomb Frame die is, a high favourite of mine that I have been wanting to use for some time.  I cut the Honeycomb from chipboard, and spray painted in white, using both the negative and positive pieces of the die in the layout.  I have a feeling this die is going to be used in 'many' upcoming projects, I love it so much!  In Australia, you can purchase the Honeycomb Frame 'HERE' at The Scrapbook Store.
 The Thankful title, is one from the new release, and I added 'for family' using the Delicate Lace Script - both were cut from chipboard, and again spray painted white. 
 A wide range of flowers were assembled using various dies including Build A Flower #2Judy's Blooms, Cheery Blossom, and also the centre from the Manon's Wedding Garland.  A complete list of the dies I used for the foliage are below in the material's list.  The tiny leaves poking from some of the medium sized flowers were created using the Cuties 4 die, they really do make perfect leaves.
 The challenge this week on the Cheery Lynn Designs Challenge Blog is 'Autumn Colours', do pop on over and view all the details and enter.  You have a chance to win a $20 shopping voucher each week, and only have to use one die on a project to be in the running to win!
 Till next week
Sandie
xxx
Materials Used:
Cuties 4 (B156) Used as Leaves
Bazzill Textured Cardstock


Tuesday, March 27, 2012

Floral Ornament & Goodbye Cheery Lynn Designs


My blog post today is my last one for Cheery Lynn Designs.  I will miss creating for such a lovely company, though will enjoy my visits back to the blog. Cheery Lynn Designs is a fantastic company to design for, and for me personally, it has been a wonderful learning experience, and one I will always be truly grateful for. I want to thank Mike and Bj Dwyan (owners of Cheery Lynn Designs) for their hospitality in having me as part of their 2011/2012 design team!!

...and a BIG thank you to Sandy, our DT coordinator who has been an amazing source of information, inspiration and help to the whole team...You really do an amazing job!

To the other design members, it has been so much fun working with you, and I am really looking forwards to what the new Design Team members will bring to the team - welcome aboard!

Cheery Lynn Designs has some exciting news coming up soon, so please stay tuned on the Cheery Lynn Designs blog for further information, which will be posted around the 1st of April!
It is 'must not miss' news!


Anyhow......I have created something a little different - two lace and rose ornaments.  I placed ribbon on the back of mine, but these could also be used to decorate tags or layouts.  


To create the base of the ornament, I used the Frills and Hearts Border for the first ornament, and the Anastasia Border for the second.  The photo below shows how I constructed the base. I used the Eazi Score board by Diamond Card Craft, scoring evenly along the length of the die cut, and then fan folded each border.  You can find the Eazi-Score Board/s "HERE". 

Thank you to Phillis Gullick, who provided the score board, embossing tool and book to all the design team members.  I am enjoying my creating with your products! 

I cut several Scalloped Window Stacker circles (smallest, and next size up).  The larger circle out of the two was used to adhere the borders upon.  The smallest circle was used on top of the lace base, to adhere the flower upon so I had an even surface to work upon.


The photograph below is a close up of the Frills and Heart Border ornament.  The flower was created using the Cuties 2.  For this flower I curled each of the petal tips outwards using a quilling tool, and lightly inked the edges with Aged Mahogany distress ink. 

The foliage consists of Olive Branches, and the Cuties 4.  The Cuties 4 makes the perfect sized leaves for this sized flower.  All you do is remove the petals from the die cut!

Both projects were constructed using strong adhesive glue dots. Larger glue dots were used to adhere flower, and the Scalloped Window Stacker circles.  Tiny glue dots were used for the foliage. 


The rose in the below photograph was created using the Miniature Rose and Medium Rose. As I was constructing the rose (especially the outer layers) I used a quilling tool to curl the petals under or upwards 'slightly' to give the petals a more realistic appearance.

The leaves (above photograph) I used the Small Dimensional Leaves 2. Again, I rolled the edges of the leaves upwards and outwards, to create realism.

Dies Used:


This week on the Cheery Lynn Designs blog, the challenge theme is 'Things with Wings' - please come and join in the fun of the challenge, you can create anything at all - layout, card, off the page project, etc. as long as there is at least one Cheery Lynn Designs die used in your creation (of course, more is better).  You have the chance of winning a $20 voucher to spend in store with Cheery Lynn Designs.

Have a fantastic, creative week ...
Sandie

Thursday, March 15, 2012

Blog Hop, Win an Easter Die - Cheery Lynn Designs


Today we have a treat for you, our design team has been busy creating with the newly released Easter dies from Cheery Lynn Designs and we are doing a blog hop.  Visit each of the team members blogs and leave a comment. One lucky person from each blog will win the Lace Egg that member used in her post.  Also be sure to leave a comment on the Cheery Lynn Designs blog for a chance to win the Nesting Egg dies. Winners will be announced on the 19th along with this week's challenge winner. Good luck and have fun hopping. 

Bonnie Brown
 Celeste Glover
  Donna Smith
  Jeannie DeGruccio
  Jodi Baune
Kianel
Sandie Louise


 The Lace Easter egg die I have used in my card is called 'Lace Egg Six' (pictured above). The cute little rabbit comes from the 'Spring Basket 2'.  The Spring Basket 2 comes with a gorgeous basket as well, which could be used for many wonderful projects (pictured below in die form). This particular die measures 3" X 4.5" and there is also a smaller version available 'HERE'.  The Lace Egg Six was backed using the Nesting Eggs, after being coloured slightly with distress inks.


On my Easter card, I used the Bunny and Chick Border (pictured below).  To decorate a little more, I used the tiny cut-outs of the rabbit and chickens, colouring them with distress inks and adhering them with dimensional foam, adhesive squares (tiny ones) back onto the border.


Hope everyone enjoys doing the "Easter Hop" with Cheery Lynn Designs.

Tuesday, March 13, 2012

Once Upon A Time - Cheery Lynn Designs

12 X 12
This week for Cheery Lynn Designs I decided on a story book theme layout.  My daughter Tayla, was very young in this photograph and she used to pretend all the time she was a princess, or a teapot (long story the teapot, but I must scrap it soon).  The little hound to the side of Tayla, is a Maltese Terrier 'Crystal', she was my shadow years ago - I still miss her terribly.

The layout consists of 'We are Memory Keepers' dimensional sticker series called 'Once Upon a Time', and Bazill cardstock.  

The Francesca Border was used to highlight beneath the photograph, and also frame the whole layout.  Very lacy and pretty!

I used the Sophia's Heart to decorate behind the photograph.  The Sophia's Heart is a stunning die, with very intricate detail and measures 5 1/4" X 5".  There are several very pretty elements within the die cut that could be cut out and used in a variety of ways. I did not want to cover the centre of the Sophia's Heart die cut piece, so I cut the centre piece out as it would not be seen anyhow.  This cut out element was used on the tab for the hidden journaling (on the right of photograph). 

The small cat and tree that sit upon the castle are from the Scare Me die set.  I have been wanting to incorporate the die set for some time - both die cuts are very fine and detailed.  I used the Victorian Picket Fence in my 'scene'.


In the above photograph, I used a piece cut from the centre of the Sophia's Heart die centre (which would not be seen under the photograph) to decorate the princess element.  The sweet little leaves curl around so beautifully, it was almost like it was made for this piece!

 The Enchanted Forest Stacker Frame (largest size) was used to frame around the photograph - this is a very fine die cut with beautiful detail.  Click on the photograph to see a larger image.

 Dies Used:

This week the challenge at the Cheery Lynn Designs blog is "Add A Flourish", to find out all the details, click "HERE", for your chance to win a $20 Cheery Lynn Designs voucher.  Also do not forget there is only a few days left of the Design Team Call taking place, details can be found "HERE".  

Have a wonderful and creative week
Sandie

Tuesday, March 6, 2012

Every Time You Smile Card - Cheery Lynn Designs


 Hi Everyone,
The new Reflections Boutique Series of dies by Cheery Lynn Designs allow so much scope in creativity.  The system of each set allows for the user to determine the length of the die cuts and of course the set comes in a variety of sizes, and numerous patterns.  The Reflection Boutique Series I have used on my card is the Royal Coved Rectangle Mega Doily. The whole series can be found "HERE".

For card-makers the dies can be placed on smaller machines, with cardstock folded in half to create decorative edged card bases, in varying sizes.  Another use is for making tags, which I will show you in a future post. Or, they can be used for making frames for photographs on layouts or on cards as I have done so above. 

Mike has completed several videos on these wonderful die sets.  The Reflection Boutique Series can be viewed "HERE", and the workshop video can be seen "HERE".


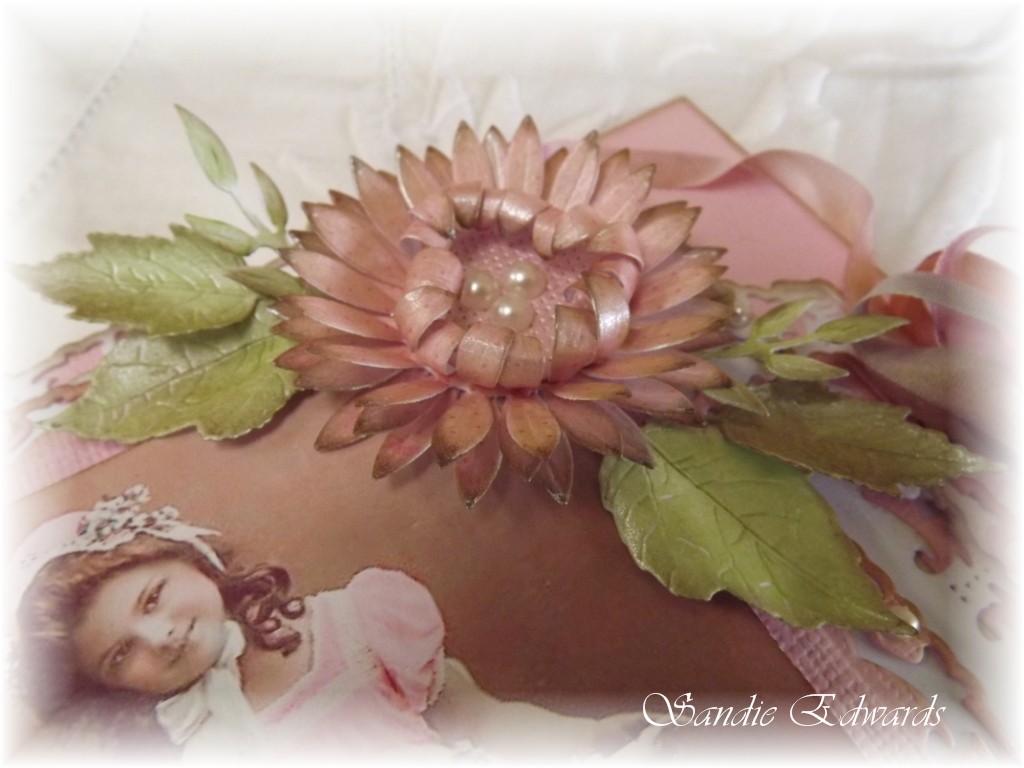
For this weeks card, I have also completed a tutorial (which can be found "HERE") on the Darling Daisies flower (above and below), and also a different way of creating leaves using the Cuties 4.


The flower (above and below) was created using the Sunflower die.  Five layers were cut from the actual Sunflower die.  Each of the flower bases I painted with Creative Inspirations Paint to leave a beautiful shimmer.  Creative Inspirations Paint is sheer, so applying a light coat allows for the beautiful paper beneath to still be seen.  If you wish to cover the paper beneath, just add a few more coats of paint.  The best part is the paint dries quickly, so there is no major waiting times!  I was able to ink my edges straight after painting all my flower pieces.

The Sunflower was constructed with 4 layers for the base.  I used glossy accents (very small portion) to adhere each layer together - making sure each leave is staggered from the one beneath.  The remaining Sunflower die cut was turned upside down and the petals rolled inwards using a skewer (the petals are rolled inwards, from being upside down, so that the painted side shows when petals are rolled in).  Adhere to base of Sunflower, then adhere the centre of Sunflower to the middle (this hides the inside of the paper as your flower is upside down).  I placed several pearl pieces to the centre of my flower, but this isn't really necessary as the die cut centre piece is embossed.


The Dimensional Leaves and the tips of the Olive Branches were used to complete my flower.  The Dimensional Leaves were also painted with Creative Inspirations Paint, then curled using a skewer to add a more realistic appearance. If you click on the photograph, it will enlarge so you can see the detail more of how I have rolled the leaves around the skewer.  Edges were inked with 'Walnut Stain' distress ink.  The paint seeps into the fine detail of the leaves, showing off the veins of the leaves ... is very pretty. 


Inside of the card I used the Royal Coved Rectangle Mega Doily again to create a frame for the sentiment.  The foliage of the Japanese Garden Lace Oval die was used to decorate.  I added a hand-dyed silk ribbon to decorate.

This weeks challenge of the Cheery Lynn Designs Blog is 'Doilies', with a chance to win a $20 voucher to spend at Cheery Lynn Designs.  You can find the challenge details "HERE". Also, we are in the last few days of the Design Team call, you can see all the information "HERE".

Hope everyone has a fantastic week!!
Dies Used:
DL136 Japanese Garden Lace Oval (inside branches used)
DL192 Royal Coved Rectangle Mega Doily (Reflections Boutique Series)

Tuesday, February 28, 2012

Decorative Purse Container - Cheery Lynn Designs

Hi Everyone,  this weeks Cheery Lynn Designs project is a creation I can use on my work desk for all my pens, rulers, and odds and ends.  The purse is a wood kit  made by Kaisercraft, and stands at 6 inches tall.  I adhered gorgeous My Minds Eye papers to the inside and outside.   As this project is going to be used I did not decorate any of the sides or back - just highlighted the front.   

I have many favourite Cheery Lynn Design dies.... but the Lace Rose and Flourish has the most adorable swirls, leaves and curls.  This die can be cut into smaller pieces to decorate, or used in one long flourish.  As you can see with my project I cut my pieces to 'fit' my project.

The flowers were created from tissue paper, and the Scalloped Window Stackers. You can create a variety of flower sizes using the Scalloped Window Stacker dies and various paper mediums.  All I did to create the two on my project was cut multiple layers of tissue paper, from the varying sizes of each die.  Each layer was crunched up in my hands to 'crinkle' and a brad put through the middle to hold each layer together.  I separated some of the layers to give a little more dimension.  On the smaller flower, I wet a few petal edges with water lightly and curled the edges in slightly.

The leaves I used for this project are the Judy's Blooms die set, which comes with the flower and leaves. Also, Pine Branches were added to give a little more character to the flower.  AND, I just had to place a Small Exotic Butterfly onto the project .... I so love them!

To complete the project, a small amount of stickles was applied to highlight the die cuts.

Dies Used:

This weeks challenge at the Cheery Lynn Designs Blog is "Lots of Layers" - call on over to see what Bonnie and Sandy have created as examples for the challenge, they are both cute!  You can find all the challenge information "HERE".

Till next week
Sandie

Tuesday, February 21, 2012

My Daughters, "All Grown Up" - Cheery Lynn Designs


Hi Everyone,  this week for Cheery Lynn Designs I have created a mini canvas (6" X 6").  The photograph is a recent photograph of my two grown up daughters, Amanda and Tayla at Aldinga Beach, in South Australia. Amanda (on the left) is the Mother to my beautiful Grandson, Tyeson.  As for Tayla, I cannot believe how much she has grown since we left S.A in November, 2010. Oh, and apparently it is the in thing to have your photograph taken with your tongue out (insert groan 'here') - and here I was thinking what a lovely gesture to lick your big sister!! LOL 


The base of the canvas is corrugated cardboard, which I gessoed, and distress inked (Black Soot) to achieve a corrugated iron appearance.  Maybe I should have added some silver, but I'm happy with the results.  The photograph base was cut from the French Flair Classic Stacker Series. Beneath the photograph is the Spiderweb which I brushed lightly with stickles to give a shimmery appearance. 

The flower and flower buds were created using the Judy's Blooms die.  I cut two die-cuts of each die, misted lightly the petals with water, and curled the leaves using a kitchen skewer.  After assembling the flower, the curled edges were inked using Victorian Velvet distress ink, and a pearl added to the centre.  The flower buds were created using single cut petals from the Judy's Blooms larger flower die cut - the green bud casing was created using the leaves from the Pair of Ferns.  The foliage consists of the Fanciful Flourish, and Olive Branches.

I used Imaginarium Designs "All Grown Up" (#IDP0027) chipboard phrase, which can be purchased from Seriously Scrapbooking.  The chipboard element had a liberal amount of texture paste applied, and then inked using Victorian Velvet distress ink (several layers of ink as it does soak into the texture paste).


Several brass charms were used from my stash.  I adore the detail in the bee and spider!  Stickles was applied to the outer edges of the flower petals, buds, and butterfly - just enough to highlight the applied distress ink.  Stickles tends to really draw out the colour of distress inks.


..and one of my very favourite dies - it is one that introduced me into Cheery Lynn Designs, the Exotic Butterfly Small.


 Before I sign out, this weeks challenge theme on the Cheery Lynn Designs blog is 'Frame It' - all the details can be found "HERE". You have a chance of winning a $20 shopping voucher to spend in-store.

Have a wonderful week...
Sandie

Dies Used:


Saturday, February 18, 2012

Vintage Memory Book - Meg's Garden


All products for this project can be purchased from 

This month Meg gave the DT members a challenge for February, to create something either Vintage, Victorian or Parisian.

“Vintage Memory Book”
Created using a Kaisercraft wood album, painted with Gesso, and aged using various mediums. I have left the pages blank to show the gorgeous detail in each of the papers. The papers used come from several different card makers, paper packs, available through Meg's Garden. Envelopes were added, which would be perfect for holding memorabilia, photographs or journaling. Paper doilies were used to decorate, as well as, beautiful guipure laces and fussy cut elements from various Meg’s Garden papers. A range of flowers were used, and other trinkets. 


The envelopes I used in this album, are a heavy duty and a high quality so they will stand up to the test of 'time' (sorry there was no brand as they have been in my stash for some time).  The envelopes were perfect to create journal/memorabilia pockets throughout the album, or even to hold extra photographs.  Eyelets are important, so the envelopes do not tear over time.

Megs Garden Products Used:
Various Papers from Card Makers Sets
Several Laces
Various Ribbons
Tassels
Chipboard Frame (aged via crackle medium, paint and inks)
Vintage Images
Transparency
Paper Doilies
Tim Holts Tickets
Pearl Strand

Other Products:
Friskas Punch
Hand-dyed variegated silk ribbon
Cheery Lynn Designs dies
Distress Ink
Crackle Medium
Gesso
Various Paints
Brads