Tuesday, October 25, 2011

"Special" Card - Cheery Lynn Designs


This week I have been busy making a variety of cards.  Card making is a creative venture all on its own, with so many wonderful tutorials out there in the ‘cyber world’.  The template I used, I discovered on Splitcoast Stampers and just had to try it out. 

The new release “Flower Stackers” are amazing, with so many uses and ways to create with them.  Combined with the “Classic Window Stackers” allows for endless combinations of flowers to be created.


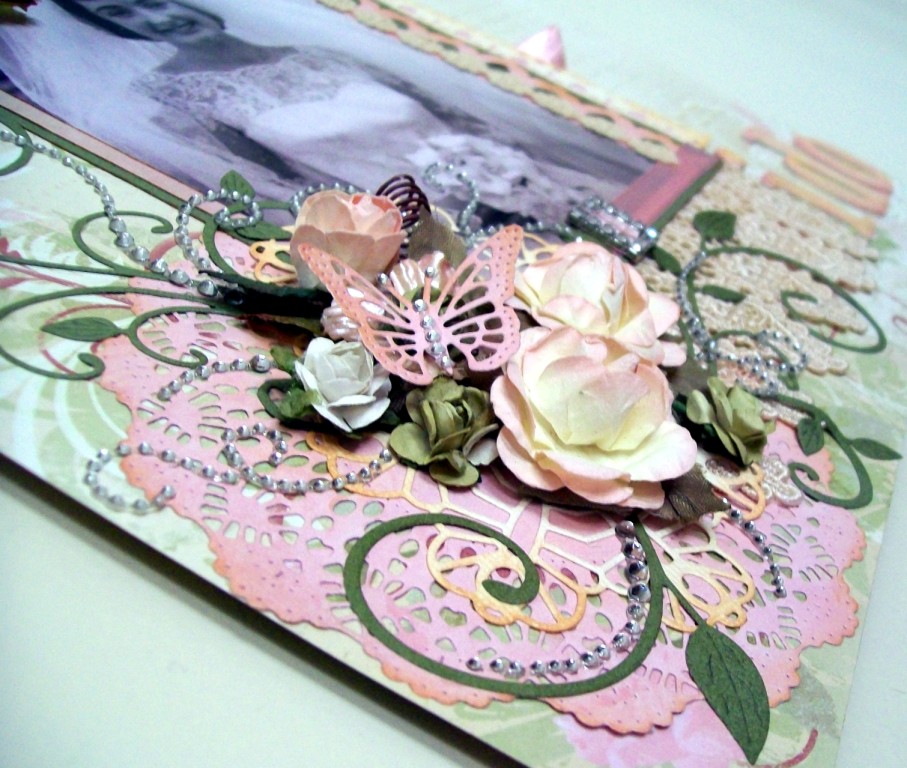
The flower I created for this particular card is from using a selection of different dies.  Firstly, I used the Stacker Flower #6, lightly turning under the petals using a drinking straw.  The second layer is formed using the Stacker Flower #5, rolling the petals inwards using a skewer.  The third layer is the Sweet Williams die, using the smaller of the two flowers in the set – again, rolling the petals inwards slightly.  The leaves are from the Frangipani with Leaves set, they are actually upside down, but they are soooo real in shape, I could not resist in using them for this flower.  I just adore the Exotic Butterfly Mini and placed one on the card, they are so perfect for so many projects, and are available in a larger size too – the larger butterflies can be found “here”.

Also, to complete the card, I used the beautiful Anastasia Border which looks just like real lace. 

Do not forget to watch the video on the Stacker Flowers, which can be found “Here” (scroll down towards bottom of page).


Now its time to get stuck into some much needed "me time" (to create) before my little darling son pokes his head out from under his 'blankie'....


Monday, October 24, 2011

Megs Garden Gate-Fold Christmas Book


When my parcel from Meg’s Garden arrived, I was so amazed at all the beautiful papers and products.  After several days of procrastination (I could seriously win a procrastination award) I opted to create a “gate-fold” Christmas book.   The Christmas book was a wonderful way to showcase the many gorgeous products.
The Meg’s Garden website has a massive array, of truly unique and gorgeous products.  The website is well worth investigating, you’ll get lost in a maze of wonderful products that will literally have you drooling in creativity.
With my Christmas book creation, I went on an amazing journey.  I will admit the book itself was a bit of a brain teaser, but once together ‘every’ little detail, and product used just fell into place without an effort.

“Pins of Jewels” – each piece is amazing, and include the most delicious crystals.  Meg’s Garden has a range of “Pins of Jewels” in a variety of sizes, including different elements – all just totally eye-catching and the highest of quality.


The smaller vintage pictures within the ‘papers’ I used in nearly all the tags. I ‘fussy cut’ finer details such as the roses or intricate pattern pieces and used these portions throughout the book pages and tags.   


The lace in my package, I hand-dyed myself and lightly inked the edges with Tim Holtz “Walnut” Distress Ink. 


Stickles was used throughout the book and tags, to add a Christmas-y sparkle!!


“Meg’sGarden” products used are:
The papers used in this project are all 12 X 12 – “Compliments of the Season”, “Vintage Santa’s”, “Red & Cream Lace”, “Victorian Santa’s”, “Santa’s Garden”, and “Christmas Morning”.
Green Holly
Lace (L29220)
Lace (L28970)
Lace (L2920)
German Scrap: European Flourish (g8610) & Corner Decorative (g64)
Jingle Bells
German Flitter (Gold Leaf Flakes)
Pins of Jewels
Other Products Used:
 chipboard “Merry Christmas”
Miscellaneous Laces from personal collection
Tags
Hand-dyed silk ribbon (no brand) & other
Tim Holtz “Walnut” Distress Ink
Stickles
Cardstock
Prima Flower


For further inspiration of Meg’s Garden products, please call on over to the blog which can be found “here” and don’t forget to visit the other Design Team ladies blogs to see some truly amazing works of art!


I seriously had so much fun creating this book, but somehow have to also give credit to the ‘products’, which were certainly my inspiration.  I am so looking forwards to seeing what arrives from Meg’s Garden next and ‘what’ my next creation will be ....
Hope this has inspired those that read my blog ..... till tomorrow,
Sandie

Tuesday, October 18, 2011

And then she said "I do", Layout


My layout this week for Cheery Lynn Designs is inspired by the beautiful spring weather we have in Australia at the moment.  This layout is of my Mother on her wedding day and isn’t she just the most beautiful bride!!??


A lot of my layouts often have hidden journaling areas, and in this layout I opted to use the Scandinavian Hearts die as a large tag to journal upon.  It sits slightly out from the photograph, just enough to show off the beautiful, intricate details of the die.  The inside doily/lace pieces of the Scandinavian Hearts were used in the main floral cluster (bottom left), along with the English Tea Party Doily & Fanciful Flourish.


The Frills & Hearts border (right hand side of photograph) is on the Clearance Sale, so if you like it, please call on over using the link to purchase.  It is 12.5” long, and so perfect for scrapbooking layouts, with no need to join/match patterns. 

Of course, I had to add one of my very favourites, the Exotic Butterfly Mini, they are the perfect size to sit amongst the flowering blooms!!


Till next week, enjoy your creative time...


Cheery Lynn Designs dies used in this project:

Sunday, October 16, 2011

Megs Garden Parcel Arrived


My first DT package arrived from Meg's Garden, and all I can say is ‘wow, wow, wow’! I have been pondering over what I will create for several weeks now, knowing what I was receiving. However, the brain is even more ‘a buzz’ with the "Christmas" package now in front of me, and I can sit back, touch and oogle the most beautiful papers and all the amazing embellishments.

Now to put the ball into motion … cannot wait to show you what I come up with...

Keep an eye on the Meg's Garden Blog for all the wonderful creations from the Design Team members..and don't forget to join up for the newsletter from the Megs Garden by emailing "Here".

P.S  This is a re-post, as I messed the original post, sorry to Adriana who commented!!

Saturday, October 15, 2011

Cheery Lynn Designs, October New Release Dies


Cheery Lynn Designs has released some gorgeous dies for October in preparation for all your Christmas paper-projects, and can be viewed "here".  I cannot believe it’s only 10 weeks and we’ll be celebrating our sons 2nd Christmas!!  Seriously, where has the time gone!?

My photographs of Christmas 2010 were not the best, as we had just moved to Western Australia, and were living in amongst a million and one packing boxes. For the life of me I couldn’t find ANY camera.  Sadly, I lost my digital camera on the flight over (later returned, thank goodness) and only had the camera in my phone to use. Thus, the lacking of good quality photographs to scrap… but to me, the ones I do have, are very precious…


For the October new release dies from Cheery Lynn Designs, I created a scrapbooking layout of Jesse’s first Christmas.  I framed the photograph using the Christmas Sleigh Border (B140).  The “Santa’s Sleigh” die (DL173), Snowflake #2 (DL166) and Large Snowflake #3 (DL172) I adhered to cardstock and fussy cut, to enhance all the wonderful intricate details of the dies.  The snowflakes made gorgeous decorations!

There are so many beautiful designs in the October release dies, well worth investigating, so pop on over to Cheery Lynn DesignsNew Releases” and see for yourself.  Also, do not forget to visit the Cheery Lynn Designs Blog, and see what the other Design Team members have been creating with the new release dies.

Till Tuesday (if not before) ….. happy creating!!

Wednesday, October 12, 2011

I won the Sassy Cheryl "think pink" challenge...


A few days ago, I wrote about the Sassy Cheryl “think pink” Challenge (breast cancer awareness). Well, I won the challenge – how exciting! It was such a wonderful surprise to see my name up on the blog as a winner.

Sassy Cheryl has weekly challenges, and I encourage everyone to jump on in and ‘have a go’. This week’s challenge is “Think Pink with a die cut” – how easy and simple is that!

I even spied a Cheery Lynn Designs die on one of the beautiful cards made by "Dawn".

The prize is a $5 Sassy Cheryl’s Digi Stamp voucher, from Sassy Cheryl's Digi Stamps. I must admit, I have never used digi stamps, but after seeing some of the beautiful digi stamps on the website, as well as the gorgeous creations other individuals have come up with …… digi stamps are now on my list to ‘try’. I will soon have my ‘prize’ and certainly will put the digi stamps to good use!!!!

On another note, I am very excited tonight, as my Mother arrives tomorrow, from South Australia. It is nearly a year since we last saw her, and I cannot wait for her to see her beautiful grandson, and how much he has grown.


Tuesday, October 11, 2011

Cathedral Lace Frame, Scrapbooking Layout...


Howdy All, Sandie here with a scrap-booking layout to share with you this week. For some time now, I have wanted to scrap my partner John’s baby photo.  It is an aged photo, and sadly has not been well cared for – I wanted to preserve a copy of it, and this layout is what I created to do just that! 


I just totally adore all the intricate details in the Cathedral Lace Frame die, by Cheery LynnDesigns – the amount of possibilities in creating with this die is amazing – my mind seriously boggles with ideas!! 
To create the layered background I cut 6 Cathedral Lace Frame – four were placed ‘carefully’ (vertically) together - forming the bottom layer.  I measured two Cathedral Lace Frames  and added a ½” border to create the cardstock base, before adhering the two remaining Cathedral Lace Frames  to the cardstock (horizontally). This base can be used with  photographs of various sizes.


The flowers were created using the Judy’s Blooms die from matching shades of cardstock/paper.  The petals were inked, then shaped using a wooden skewer, some forwards, some backwards, and placed in random sizes to form various shaped/sized flowers.  Simply attach a brad or pearl ‘bling’ to the centre of flower to complete, then adhere to your layout as desired. 


I especially like the dimension of the flowers when created in this manner.


I highly recommend watching the “Detailed Die Cutting Workshop” video – it not only aids in die cutting intricate dies, and assists in achieving perfect results, but also reveals nifty little tricks that are definitely worth learning, when using the intricate dies from Cheery Lynn Designs.


Wishing everyone a happy & creative week...

Friday, October 7, 2011

Sassy Cheryl's Challenge "think pink"

Sassy Cheryl’s Challenge Blog has a “think pink” challenge on at the moment.  The challenges ends in 3 days time, so if you have something creative and ‘pink’, do call on over and enter...have a browse at all the fantastic challenges while there.  I’ve never used digi stamps, but hope to give it a try ‘one day’ soon...
I found the delightful ‘image’ over at “VintageCatnip” and thought it was most appropriate for this post.  Vintage Catnip has some gorgeous images which can be used for personal use, well worth calling in for a visit, but be prepared to spend several hours browsing!  

Wednesday, October 5, 2011

Cheery Lynn Designs Give Away Winner... #6

For the life of me, I could not work out how to copy and paste the random.org widget *thingy-ma-jig* onto my blog, and when I did attempt to do so, it was BLANK, and then could not be used.  Frustrating is not exactly the right word, but I’ve spent way too long trying to work it out L
The number drawn was #6!!!
Congratulations Shelly, from Shellysland, you are the winner of the Cheery Lynn Designs “Give Away”!!  I will contact you to get your details ... and I’m sure you’ll love this gorgeous die...

Tuesday, October 4, 2011

Memory Album...

Hello everyone, its Sandie here from Australia. I'm very excited to be here doing my first blog post for Cheery Lynn Designs, as part of their Design Team.  I opted to create a "Memory Album" using a variety of Cheery Lynn Designs dies, which certainly complimented the beautiful Australian designed papers by Megs Garden.

This was certainly an enjoyable project to complete – using a assortment of dies, and various paper mediums, including chipboard, to bring the album to life!
Album front cover includes  Exotic ButterflySmall &  Fanciful Flourish.

On each page presented there are various hidden journaling areas, pockets, photo areas, and so much more. Sadly, I cannot photograph all, as this post would be too graphic intensive.


The 2nd page includes: (New Release)  PolynesianSails Oval (insert) &  Exotic butterfly mini.


Throughout the album I have used a mixture of different mediums on each of the Cheery Lynn Design die cuts – Glimmer Mist, Stickles, Distress Inks, and Lumiere Paints.   


4th page: French Pasty Doily.


To create the flowers, I cut several of Judy’s Blooms and curled each petal before layering together for a realistic appearance.


I hope everyone has a brilliant and creative week...
Sandie