Showing posts with label Charms. Show all posts

Friday, June 1, 2018

Beautiful Memories Album...

Just popping in to share a paper bag mini album I created recently, using some papers from way back when (many years ago from the ScrapCake).  Most of the items and products used in this album are years old - I'm on a venture to use up some of my older stash.  My older stash is dwindling, but not sure my family would agree with that .. considering they think my studio looks more like a shop. 

I haven't showed off all the pages, but several and I just adore the flowers, most are from Prima Marketing.  All pages include flip pages, with magnets, which enables so much more room to add photographs or journal areas.  

Enjoy the weekend ...
♥


Tuesday, January 7, 2014

Life is Beautiful with You in it – Mini Album - Guest Designing for Meg's Garden

Hi everyone,

Long time no 'see' ..... I will still be quiet for now, till my creative side bounces back into gear.  Life has had a few hurdles..(too many obviously), but the road is smoothing out again 'now'. Just know I have thought of everyone and miss you all very much .....and in time, I will be back...

Love to all
Sandie

It was a pleasure to do some guest design work for Meg’s Garden back in Sept.  I worked with the beautiful paper collection called ‘Dreaming in the Meadows’, and due to the size of my project, included some card papers from previous collections of when I was a DT member.  The papers all matched perfectly.  

Did you know that Meg's Garden is an Australian business, located in Adelaide with an online store?  The papers are designed by Denise Ann, an Australian designer. 


I have been pondering over Christmas gifts for my family, (this was written back in Sept) and know my Mother just loves my Mini Albums.  I was inspired with this album, by two clever individuals – Kathy Orta, and Ginger from My Sisters Scrapper on YouTube.  Both make the most stunning of albums, and I have been itching to make one for some time.  Kathy Orta has created the hidden hinge system which I applied to this particular album, and I used Kathy’s tutorial for the album.
You can find Ginger’s YouTube Chanel 'HERE'...
and Kathy Orta’s Chanel 'HERE'...
These albums do make perfect gifts, and Meg’s Garden stocks the perfect paper sets, and embellishments for such creations.
The album itself has many hidden pockets, including side opening panels, which are held in place via magnets – ample room for photographs, and journaling and even mementos.  The photographs do not do the album justice, and do not show enough of the details, but certainly gives a good indication of what can be made. 
I also used the Leafy Foliage die throughout the album for all my foliage requirements, it was perfect and a leaf shape to match each flower size.  I so love that die, and it is available at Meg’s Garden!!!


Materials:
Chipboard
Cardstock
Dusty Attic Chipboard
Prima Flowers
Vintage Blooms from my own personal collection
Seam Binding
Butterfly Printables
Diamond Stickles
Tim Holtz Knobs- Idea-Ology
White Paint
Bling Pieces
Silk Ribbon
Kaisercraft Mini Alphas
Metal Frame
Eyelets & Crop-O-Dile
Silhouette Cameo and SVG Files
Imaginarium Designs Chipboard ‘You’
Score Board
Adhesives

Tuesday, February 26, 2013

My Creative Scrapbook - True Love LO

 I was such a cute baby!  Look at that hair-style.... I even continued this tradition with my own children, little mo-hawks.   This is my last layout/project for the My Creative Scrapbook, Limited Edition Kit for February.  What a wonderful feast of products I got to play with this month.  You can find all kit information 'HERE', and the Limited Edition Kit information 'HERE'. 

My Mother waited a long time for my arrival, she had many losses and often said to me, it was 'true love' when I arrived. 
 The background paper was just too pretty to cut into, so I opted to use it as my base, doing a little mixed media with paints and texture paste - a few splatters of Glimmer Mists, and ink to complete.
The trinket does have words inside, though very hard to photograph with the domed glass. 
 I used some small glass beads to highlight in 'trails' - almost resembling a bead spill, over the whole layout.  I absolutely love this 'look' and you'll no doubt be seeing it a lot more in my work in time to come.  My bead collection is calling my name!  LOL

 Fussy cut elements from other papers in the kit, became flowers - again filled with tiny glass beads.
 Corrugated board and me are best friends, and I adore teaming it with beautiful patterned papers - paint works wonderfully, ink just loves soaking into the edges giving an aged appearance without much effort.  I have more ideas for cardboard.....mmmm

Well that is it for me for this month in my projects/creations for My Creative Scrapbook.  Soon another month will be here, and another kit or two to highlight. 
Happy Creating
Sandie

Thursday, January 31, 2013

'Forget Me Not' Accordian Album - Meg's Garden - Aust Scrapbooking Creations Magazine

 Hi Everyone,

Today, I want to share with you a project I completed for Meg's Garden back in April, 2012.  It was published in Australian Scrapbooking Creations several months ago now, in Issue #95. 

For April my challenge from Meg's Garden was to create an accordion album.  I have wanted to create one of these for quite some time.  Now I have made one, I am 'seriously' hooked. What a fantastic way to hold keepsakes and memories!!  There is a lot of creative scope with an accordion album.  

For this album I wanted to showcase the gorgeous paper collection, 'Forget Me Not', designed by Denise Ann.  The papers are truly beautiful, gorgeous colour hues, with dainty flowers, garden settings, birds, nests and gorgeous vintage pictures of children. You can find the paper collection 'HERE'.
Meg's Garden has a beautiful range of paper roses, the above picture shows off a small portion.  Also, there is a new range also available which no doubt you will see in upcoming creations!

I aged the box board frame by using Gesso, crackle medium, and ink. The lace beneath the frame is several pieces of a German Scrap border, which was gold.  I was not too keen on the brightness of the gold, so I turned the German Scrap upside down and lightly inked the pattern.  Very pleased with how it turned out, considering it is reversed.
Each page of my accordion album hosts one of the papers from the 'Forget Me Not' cardmakers paper collection.  The first page, I placed a velum saying, the rest I have left blank for photographs, and/or journaling.

The reversed side of the album I used the 12 X 12 'Shades of Blue' paper, die cutting elements for either photographs or journaling.  Enhanced with little ornate flower corners.  
The wire flower curls are the stems of the flowers - I just wind them around a skewer to create the swirls.
Meg's  Garden hosts an amazing collection of charms, they are the most highest of quality and really are 'all' gorgeous! I used one of the many key's available, and attached to the album through an eyelet hole, and chain.

Meg's Garden Products:
'Forget Me Not' Paper Collection - Cardmakers Pack
Forget Me Not Collection - 'Shades of Blue' 12 X 12 
Accordion Book Kit
Ribbon
Key Charm
Box board Frame
Paper Roses, Buds and Misc Flowers
German Scrap Border and Keyhole

Other:
Cardboard,Gesso,Crackle Medium, Walnut Stain Distress Ink,  Chain and Link, Eyelet, Crop-O-Dile, Pearl Pieces, Vellum, Cheery Lynn Designs 'Olive Branch' Die, MPress Nesting Dies 'Peaked Squares'.


Vintage Images/Fairy Tutorial

I received an email and comment recently from followers letting me know my 'Vintage Fairy Tutorial' was not working.  So, even though it is an old tutorial, obviously it was well liked as I found it on Pinterest on more than one occasion :-)

Here is the revamped version for those looking for it.

Vintage Images/Fairy Tutorial

Copyright 2011, Sandie Edwards
For personal use only!

***Before attempting this tutorial, please read through all instructions first***

These little winged girls/boys are easy and simple to make, and look delightful in scrapbook layouts, cards and even tags.  There is a multitude of wonderful 'royalty free' vintage images out there on the internet, so do a search in Google and see what else you can find.


Requirements:

Wing Template ‘HERE’
Vintage Image ‘HERE’
Page from an old book
Glimmer Mist
Pencil
Scissors and a Craft Knife
Copic Pens/Water Colour Pencils/Chalks
Kaisercraft Ink Pad in Sepia or Brown OR Distress Ink Vintage Photo, Walnut Stain)
 OR – Tim Holtz Distress Ink “Walnut Stain”.
Glitter – Any type works wonders
3mm Silk Ribbon
Charm or two
Mod Podge OR Glossy Accents
Ribbon (optional)
Scrap of Lace


How To...

Download 'Wing Template'.  The wing template can be made smaller or larger using WORD.  To do this, download the wing template onto your computer.  Open image in your photo program, then copy and paste into a WORD document.  You can click on the image when in WORD, and adjust the size to your own personal requirements.  Alternatively, if you are not WORD savvy, you can use your scanner to adjust the size of the template/images.

1. Download wing template, which can be found 'HERE'.
2. Once you have your wing template, using the old paper from an old book, trace the outline onto cardstock or cardboard. Carefully cute out.
3. Using Kaisercraft ink, or Distress Ink, ink all edges.  A cotton bud can be used to get into any small areas that an ink pad or dauber will not reach.
4. Lightly spray your wings with Glimmer Mist. 
5. Run a small beading of adhesive (Mod Podge) around wing edges, and apply glitter to edges.  A much easier method (now I am re-writing this) is to use Stickles Glitter Glue. 
6. Allow to dry, and iron with no steam when completely dry if paper curls.

7. Using your choice of vintage image carefully cut out using scissors.  Downloadable examples can be found 'HERE'.
8. Use a craft knife, on a cutting mat and get into any small areas that need removing. 
9. Ink edges of image.
OPTIONAL:  You can colour your images using copic pens, water colour pencils, inks, or chalks.  I lightly used a water colour pencil and blended by gently rubbing my finger gently across the image.  If you are a little more adventurous, there are a huge variety of mediums that can be used to colour.
10. Add Mod Podge or Glossy Accents over the shoes to give depth and dimension to the image - but only the shoe areas!  Allow to dry.
11. Add a length of double sides tape to the lower edge (dress) of your vintage image. Using a fine, small piece of lace, fold over a small hem, and place on edge to start - then add tiny pleats, pressing down onto the double-sided tape as you go.  To achieve a neat finish, remember to fold lace under at other edge before adhering.
12. Small pieces of lace can be added to the sleeves, but I personally thought my image looked fine without it.

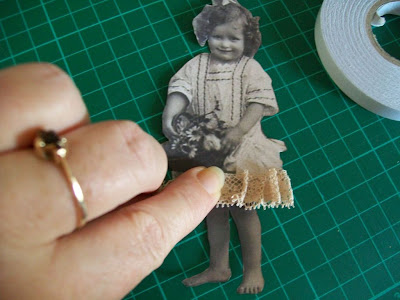
OPTIONAL:  Apply a touch of blush (make-up) to a cotton-bud and lightly add some colour to her cheeks, gives a nice glow.
13. Place your image onto the wings and find the placement you are happy with.  Apply small amount of Mod Podge or Glossy Accents to front side of wings, and adhere to your image.  You may need to hold briefly while adhesive dries.
HANDY HINT: If you are not confident with the placement, turn image over and trace a line with pencil on the back of image to know where to adhere.
14. Create a small bow from the 3mm silk ribbon and attach to central area of pleated lace.
15. Charms can be added, as in photographs below.


Have Fun!!
Sandie