Showing posts with label Template. Show all posts

Thursday, August 8, 2013

Together LO - The Scrapbook Store - Scrap Around the World Challenge

 ...loving my DT pack from The Scrapbook Store, with the Melissa Frances, Classic Elegance papers and elements. Lots of texture in this layout, using the Kaisercraft 'Bubbles' Template, along with texture paste - coloured using a mixture of Perfect Pearls, and Mists from Lindy's Stamp Gang.

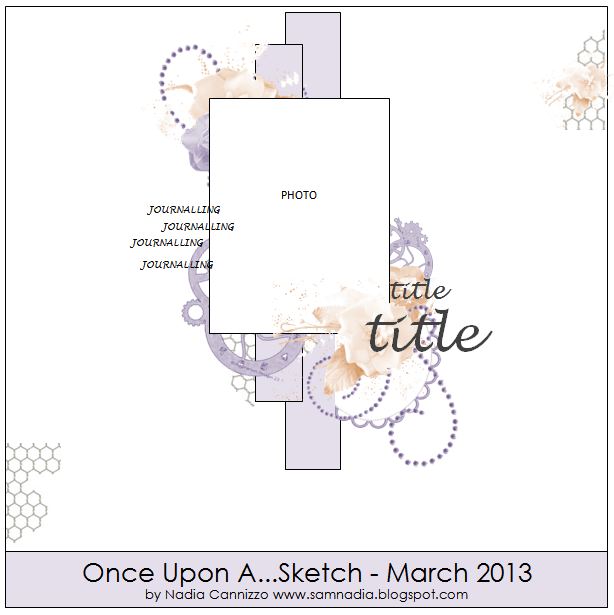
Also this month, I have joined in the new challenge site, Scrap Around the World - I have been itching to join in with the fun of this new challenge sit,e and finally 'completed' a layout using the Inspirational Mood board and Sketch below. You can find the current challenge 'HERE'.  I adore the sketch, by Julianne!!

I was inspired by the top two images in Eila's Mood board, the softness of the gold/white/pink colour hue's. I love charms of all types, so added in a key which is available in TSS 'HERE' ...
These photographs are just precious!  Three best friends, having the time of their life (no doubt) on the beach - where I have no idea, who they are .... no idea sadly, but are in my photo collection.  Hopefully one day I will find out the story behind these photographs.
Cheery Lynn Design dies were used behind each of the photographs and also mini dies beneath the other flowers. A complete list of dies with links can be found below in the materials list. I grouped together flowers in an arrangement - some flowers were from my stash basket and others from TSS.
Of course, I embossed the title 'Together'...... using Stampendous embossing powder - Aged Silver - which really looks like a light golden colour, beautiful actually.
Well, that is it for me today ... thanks for visiting!!
Sandie

Materials:

Tuesday, March 12, 2013

Guest Designer Berry71Bleu and Zeus and Zoe Challenge Piece

Hello Everyone and welcome to my first post, as a Zeus and Zoe DT member, and also my March, guest designer spot for Berry 71Bleu.
This month for Zeus and Zoe, Dana has picked our challenge theme of 'New Beginnings', all the information on the challenge can be found 'HERE'. An image of the fabulous prize pack, can be found at the bottom of this post - well worth checking out!  

For me personally, this year I have started a 'new beginning' by researching my family ancestors - and what a journey it has been so far, I am amazed at where my family origins come from and find this part of 'life' fascinating.  The information, and photographs I have stumbled upon, has 'coloured my world', in ways I did not think possible.

So, today I share a layout of a photograph of my relatives from my Maternal side of the family.

This month we are sponsored by Deco Art, and below is information in regards to the product and information.  We were sent some amazing products to play with, including paint and stencils. I had a wonderful time playing with these fabulous products, and will look forwards to using a lot more of them in the future.
Product Overview

DecoArt has one of the widest selection of paints and finishes for arts, crafts, and home decorating. DecoArt has a full product line which includes over 25 brands of paint and finishes.
Our products are sold in all major craft chain stores in the United States, as well as having a strong market presence internationally in over 75 countries abroad.

Our Commitment to Quality

DecoArt assures its loyal and new customers that they can use our products with confidence.
All DecoArt products are non-toxic and user- and enviromently-friendly.

We make safe products. Our paints and specialty products are made in the USA to federally-mandated and industry-wide safety and quality standards as established by the Art & Creative Materials Institute (ACMI). ACMI employs one of the nation's top independent toxicology groups at 

Duke University. All of our formulas are reviewed and have been certified as non-toxic by this group.

To create my stencil background, I mixed Deco Art gold paint in with the texture medium forming a muted gold colour - and applied a textural background using the Deco Art Jacobean Floral stencil.  When completely dry, I applied a light brush of straight gold paint onto the textured surface, highlighting some of the pattern. 

As I am a GD over at the Berry71Bleu for March, I used one of Marivic's gorgeous hand-made tags.  The detail in this tag is amazing, and the photographs really do not do it justice.  To purchase tags - visit 'HERE'.  Also, I used a variety of vintage delights from the Zeus and Zoe Etsy Shop.  Marivic puts together the most amazing kits, full of vintage and beyond goodness. If you have something in mind colour wise or content wise, Marivic is also happy to create a kit especially to your own personal requirements.
I layered the many vintage elements from my DT kit - including writing paper, note paper, receipt, a post card, old doily, pattern paper, buttons, lace, and a large key charm. My kit contained an old pearl necklace, which I (reluctantly) pulled apart, and adhered along with other beads as a highlight to my layout. 
I do hope you can join in with our challenge theme this month, and really look forwards to seeing the entries and all the 'New Beginnings' emerge.  Shall certainly be some wonderful talking points.
Enjoy your creative journey,
Sandie

Prizes to be won for the 'New Beginnings' Challenge
Main Prize

Random Prize

Friday, March 8, 2013

It's A Girl Thing LO - The Scrapbook Store - Once Upon A Sketch

 I have not joined a challenge for a few months, so joined in with Once Upon A Sketch, with a gorgeous sketch by Nadia.  You can find the March Challenge details 'HERE'.  The theme, is 'Its the Weekend' and the sketch is below. 
For March, The Scrapbook Store sent two gorgeous collections to work with.  I used the Prima Marketing - Hello Pastel paper collection, teamed with a few elements from  Bo Bunny, including the scripted cardstock stickers, and a medium paper lace doily.     
I applied texture by adding some embossing using the Bo Bunny,  Distressed Textures rubber stamp, and further enhancement by applying texture paste, using the Prima Dots stencil.
My daughter loved the weekends, up early and ready to go - unlike school days.  Her favourite past-time for weekend activities was spending time riding, or roaming about the paddocks and Pine Tree's in eager search for porcupines, and Goanna's.  
 I have some lovely large blooms in my stash and rarely use them, but this one teamed perfectly with the large Hello Pastel flower. Hanging from the photograph is one of the gorgeous Vintage Trinkets - quiet heavy I must add!  Various areas I highlighted using the Say It In Crystals.
I used Imaginarium Designs chipboard elements to follow the theme of the sketch, painting each element in Snow Cap acrylic paint, and then sealing for a nice shine with Glossy Accents.
Materials:
Prima Marketing - Hello Pastel - Pastry Shoppe - Sugar Cube - Parfait - Powdered Petals
Imaginarium Designs - Steam Punk Clock, and It's A Girl Thing
Snow Cap and Shell Pink - Adirondack Acrylic Paint Dauber
Misc: PC Generated Journaling, Large Petals, Butterflies, Embossing Powder, and Heat Gun

Friday, February 22, 2013

My Creative Scrapbook - Limited Edition Kit - 'Love' LO and Mini Album

 My Creative Scrapbook has some utterly gorgeous kits, they are super amazing in content and I have a totally wonderful time in creating with them!  This layout was created using the Limited Edition Kit, for February.  You can find all kit information 'HERE', and the Limited Edition Kit information 'HERE'. 
 The photograph is of John and myself, not long before Jesse came onto the scene :-)  
 So many cute little elements that really helped complete the page, including adorable little brads and buttons. I added in some texture, gauze, beaded texture paste, threads, stamping, and paint - 
I love exploring mediums.
and below.... another project, a quick Mini Album I created using left over papers and embellishments, from the Limited Edition Kit....due to the length of this post, I am not showing all the pages, only a few of my favourites.

I will be back in a few days, to show you my final two layouts that I created with this fabulous kit!

Sandie

Thursday, January 31, 2013

Vintage Images/Fairy Tutorial

I received an email and comment recently from followers letting me know my 'Vintage Fairy Tutorial' was not working.  So, even though it is an old tutorial, obviously it was well liked as I found it on Pinterest on more than one occasion :-)

Here is the revamped version for those looking for it.

Vintage Images/Fairy Tutorial

Copyright 2011, Sandie Edwards
For personal use only!

***Before attempting this tutorial, please read through all instructions first***

These little winged girls/boys are easy and simple to make, and look delightful in scrapbook layouts, cards and even tags.  There is a multitude of wonderful 'royalty free' vintage images out there on the internet, so do a search in Google and see what else you can find.


Requirements:

Wing Template ‘HERE
Vintage Image ‘HERE
Page from an old book
Glimmer Mist
Pencil
Scissors and a Craft Knife
Copic Pens/Water Colour Pencils/Chalks
Kaisercraft Ink Pad in Sepia or Brown OR Distress Ink Vintage Photo, Walnut Stain)
 OR – Tim Holtz Distress Ink “Walnut Stain”.
Glitter – Any type works wonders
3mm Silk Ribbon
Charm or two
Mod Podge OR Glossy Accents
Ribbon (optional)
Scrap of Lace


How To...

Download 'Wing Template'.  The wing template can be made smaller or larger using WORD.  To do this, download the wing template onto your computer.  Open image in your photo program, then copy and paste into a WORD document.  You can click on the image when in WORD, and adjust the size to your own personal requirements.  Alternatively, if you are not WORD savvy, you can use your scanner to adjust the size of the template/images.

1. Download wing template, which can be found 'HERE'.
2. Once you have your wing template, using the old paper from an old book, trace the outline onto cardstock or cardboard. Carefully cute out.
3. Using Kaisercraft ink, or Distress Ink, ink all edges.  A cotton bud can be used to get into any small areas that an ink pad or dauber will not reach.
4. Lightly spray your wings with Glimmer Mist. 
5. Run a small beading of adhesive (Mod Podge) around wing edges, and apply glitter to edges.  A much easier method (now I am re-writing this) is to use Stickles Glitter Glue. 
6. Allow to dry, and iron with no steam when completely dry if paper curls.

7. Using your choice of vintage image carefully cut out using scissors.  Downloadable examples can be found 'HERE'.
8. Use a craft knife, on a cutting mat and get into any small areas that need removing. 
9. Ink edges of image.
OPTIONAL:  You can colour your images using copic pens, water colour pencils, inks, or chalks.  I lightly used a water colour pencil and blended by gently rubbing my finger gently across the image.  If you are a little more adventurous, there are a huge variety of mediums that can be used to colour.
10. Add Mod Podge or Glossy Accents over the shoes to give depth and dimension to the image - but only the shoe areas!  Allow to dry.
11. Add a length of double sides tape to the lower edge (dress) of your vintage image. Using a fine, small piece of lace, fold over a small hem, and place on edge to start - then add tiny pleats, pressing down onto the double-sided tape as you go.  To achieve a neat finish, remember to fold lace under at other edge before adhering.
12. Small pieces of lace can be added to the sleeves, but I personally thought my image looked fine without it.

OPTIONAL:  Apply a touch of blush (make-up) to a cotton-bud and lightly add some colour to her cheeks, gives a nice glow.
13. Place your image onto the wings and find the placement you are happy with.  Apply small amount of Mod Podge or Glossy Accents to front side of wings, and adhere to your image.  You may need to hold briefly while adhesive dries.
HANDY HINT: If you are not confident with the placement, turn image over and trace a line with pencil on the back of image to know where to adhere.
14. Create a small bow from the 3mm silk ribbon and attach to central area of pleated lace.
15. Charms can be added, as in photographs below.


Have Fun!!
Sandie