Showing posts with label Tutorial. Show all posts

Monday, July 23, 2018

Remember, Moments Like This Mini Album Tutorial...

Earlier this month, I created a tutorial for The Scrapbook Store for the 'Remember, Moments Like This mini album.  You can find the step-by-step with oodles of photographs 'HERE'... and all products can be found 'HERE' to complete the tutorial. 


Materials:
Mintay 7th Heaven 12X12 (Tags) Paper, Product Code MT-7TH-06
Mintay 7th Heaven 12X12 Paper, Product Code MT-7TH-02 
Mintay 7th Heaven 12x12 Paper, Product Code MT-7TH-04 
Mintay 7th Heaven 6X6 Paper Pad
2Crafty Chipboard 'Remember, Moments Like this'
Seam Binding 'Lace Blue
Petaloo 'Botanical Collection' Flowers
Green Tara 2cm leaves 
Green Tara 18mm White Lace 
Tim Holtz Distress Paint 'Tarnished Brass'
Spellbinders A2 Scalloped Borders One
The Robins Nest Dew Srops 'Mocha Trail'
Gold Book, Corner Pieces
Paper Bags X 6
Repositionable Tape/OR Washi Tape
Die Cutting Machine


Tuesday, April 17, 2018

You make my heart smile Card and Tag - The Scrapbook Store


This month for The Scrapbook Store, I created a card tutorial, you can find all the full details 'here'. The card is simplistic, and can be used for many occasions by changing the journaling note card, or simply by adding a sentiment. 

Also, using the left over elements from my DT kit, I created the tag card below.  Its amazing how you can put together bits and pieces, and still manage to create something pretty.  Left over elements from the 2Crafty Frame piece from my layout, and the border elements left over from the card and album. The background paper is gorgeous by Prima Marketing, called 'Transformation' in the Cherry Blossom Collection - I wanted to match the top panel of my tag, so covered the cardstock with the matching decorative tape, with butterflies.  A bit fiddly matching the lines up, but with a bit of patience, looks so pretty.  I had a little snippet of the Green Tara 30mm lace left, and added this and the left over flowers from the packs.  The Kaisercraft 'Wooden Flourishes' and 'Alphabet' are from my stash from a few years ago.

I don't like things being perfectly straight, so after completing the 'happy' title, I realised how straight it was and made the 'birthday' slightly uneven.  Keeping these little alphabet stickers (or other types of stickers) on your creations can be difficult as over time the adhesive doesn't hold and they fall off!  I applied a smear of Scotch Quick Dry adhesive onto the wooden flourish after painting it, and then added while wet the alphabet.  Then, when dry, I wiped another layer of adhesive over the top to seal it.

Recently I went through a lot of my older layouts from 4-5 years ago, most were still in the same condition as when I created them.  However, there were some layouts with elements that literally were in the bottom of the packaging I had them stored in. It took me many hours to replace and fix with the correct adhesive.  So, now when anything has its own adhesive backing, I never use it - I apply a good reliable adhesive to ensure it will be there in years to come.


Materials:
-Card-
American Crafts - Textured Cardstock - White and Black
Kaisercraft - Kaisercard - Musk
Kaisercraft - Rhinestones - Soft Pink
2 Crafty - Lacey Border Set 1
Prima Marketing - Cherry Blossom - Cherry Blossom Garden
Prima Marketing - Cherry Blossom - Journaling Note Cards
Prima Marketing - Cherry Blossom - Transformation
Prima Marketing - Cherry Blossom - Flowers #631116
Prima Marketing - Cherry Blossom - Flowers # 631062
3D Foam Mounts
Adirondack - Acrylic Paint - Gold
Stickles - Diamond
Scotch Quick Dry Adhesive
Scoretape
Tim Holtz - Distress Ink - Black Soot

-Tag-
American Crafts - Textured Cardstock - White and Black
Prima Marketing - Cherry Blossom - Transformation
Prima Marketing - Cherry Blossom - Flowers #631116
Prima Marketing - Cherry Blossom - Flowers # 631062
Prima Marketing - Cherry Blossom - Decorative Tape
2Crafty - Doodled Frames (fr0884)
2Crafty - Lacey Border Set 1
Green Tara - 30mm Lace - White
I am Roses - Small Leaves
Kaisercraft - Wooden Flourishes - Banners
Kaisercraft - Rhinestones - Soft Pink
Kaisercraft - Alphabet Stickers
Adirondack - Acrylic Paint - Gold
Ranger - Emboss It - Daber
Stampendous - Frantage Embossing Enamel - Aged Shabby Pink
Heat Tool
Scotch Quick Dry Adhesive
Scoretape
3D Foam Mounts

Wednesday, October 9, 2013

Do More with Less - Guest Design - Altered Mouse Trap Tutorial and Challenge

Hello Everyone,

I am guest designer for ‘Do More With Less’ this month. Thank you Yvonne for inviting me.  

Today, I want to share with you a quick, and easy tutorial on how to create a note or photo holder fridge magnet, using a mouse trap. Now, I do not think I need to stress how important it is to use new mouse-traps (LOL).  Recycling is wonderful, but perhaps not with mouse-traps!  These little note holders would be perfect little gifts with Christmas around the corner, and are something unique and certainly an entertaining, conversation piece. 


Altered Mouse Trap
Materials: Mouse Trap, Pliers, Paint, Misc. Paper Scraps, Quick Dry Adhesive, Lace Remnants, Silk Ribbon, Small Roses, Buds and Leaves, Distress Ink, Magnetic Strip, and Wording.

1. Remove wire catch with pliers.

2. Paint trap white as in Photograph 1.  I find it best to use spray paint, as this adheres to the metal elements of the trap perfectly, and gets into all grooves and crevices.
Photograph 1


3. Insert a small paper piece as shown in Photograph 2. This eliminates a gap of white in the centre when completed. I find it best to use a quick dry adhesive rather than tape, as glue allows for manipulation to get the paper into the correct position.

Photograph 2
4. Measure and cut 2 pieces of pattern paper to fit both the top and bottom portion of the trap, as shown in Photograph 3. Ink paper edges, and adhere into place on the trap.

Photograph 3

5. Affix wording of some sort across the top part of the trap - part without latch across it.
 6. Arrange flowers, buds and leaves and adhere into place, around wording.  Use Photograph 4  as a guide for placement.

Photograph 4

7. Create a bow from ribbon, and adhere to middle trap mechanism.

8. To complete, affix lace to outer edge, on back of trap, and adhere magnetic strip.  
See Photograph 5.
Photograph 5
I do hope that my tutorial has been inspiring and an appealing idea to some of you to make simple, adorable gifts for Christmas.  My challenge for you, is to get creative with something unusual laying around the house.  Examples:  Coffee jars, boxes, containers, old tins, plant pot, paper towel cylinder, paint brush (all the rage at the moment), chipped tea cup, anything that you can revamp, that would normally end up in the bin.  Bring new life to the piece you have picked, create up a storm and give the item a new place in your home..... I cannot wait to see what you come up with!
Upload your project to the correct post at the Do More With Less Blog to be in the running to win a RAK of a Shadow Box from Imaginarium Designs

Friday, September 27, 2013

Precious Memories Mini Album Tutorial - The Scrapbook Store

This month for The Scrapbook Store, I created a tutorial using the Shabbylicious paper collection, by FabScraps.  The tutorial can be found 'HERE' on The Scrapbook Store's Blog.

The album has hinged pages added in, for extra journaling or photograph areas. Further details of this process, and photographs, can be found at the above link.
Some closer photographs to show detail...
Lots of pink, and oodles of my favourite things - including brass charms, flowers, ribbons, and of course, pink. 
Thanks for calling in for a visit...

Sandie


Materials list:
Fab Scraps, Shabbylicious Paper Collection
- Chic Chairs
- Shabby Birds
- Shabby Mix
- Little Darlings
- Chic Mix
- Shabby Birds
- Chic Pinks
- Chipboard Gate Album
- Martha Stewart – Doily Lace Punch
- Kaisercraft, Metal Treasures, Door Knobs – Silver
- Scor- Tape 1/4″
- Helmar 450 Quick Dry Adhesive
- Lindy’s Stamp Gang – Starburst Mist – Alpine Ice Rose
- Adirondack, Snow Cap Acrylic Paint Dabber
- Adirondack – Gold Acrylic Paint Dabber
- Basic Grey – Magnetic Disks – Small
- Ranger – Diamond Stickles
- Vintage Charms – Key Ornate
- Vintage Charms – Clock
- Ribbon
- The Scrapbook Store – Flowers, and buds
- Green Tara – Roses and buds
- Scrap FX – Wordlet – Midi Precious
- Scrap FX – Wordlet – Midi Memories
Corner punch, Braid, Butterfly Printable, Crop-O-Dile,  Leaf Trim, Eyelets

Monday, July 22, 2013

Adorable LO, and How to Colour Flower Blooms Technique - Basecoat II - Kaisercraft


I absolutely loved the first Base Coat Collection, and now Kaisercraft has released a second version, Basecoat II.

Today I have a layout and a handy tip to share on colouring flowers, which can be found below.  It was easy to create a shabby chic layout using the pale papers in this Basecoat II, paper collection.  The whole collection has so much in the creative side, I am looking forwards to finding some time to create 'more'.... 

I applied the colouring technique to all flowers, and then added a white wash to petal edges. I did not use the white Blooms on the layout, but the pink and the mist I used (Lindy's Stamp Gang) just deepened the colour, in variegated hues. 
Punched and SVG files were used for the foliage.
 ...and oodles of layers, including papers, lace, and paper lace.

Colouring Flower Blooms

Firstly, you will need to gather some flowers. I used pale pink and white for my project. You will also need to get some pink Glimmer Mist.
 Spray mist onto a protective mat so that it pools, as shown in the photograph below.
 Hold the flower by the wire stem and gently lower into the pooled mist.
 Add as much or as little mist as you desire.  I concentrate on the centre of the flower, as I adore the variegated appearance that can be achieved by simply colouring the centre of the bloom.
 Dry flowers using a heat-gun or allow to dry completely overnight.
 The finished flowers will all differ in colour from one to the next.  Do not be afraid to play with this technique using a variety of colours and paint/mist mediums. It also works well on other colours and even darker blooms.
 I hope you have enjoyed my tip for ‘today’, very simple, yet very effective.
 Have fun exploring the many options this simple technique holds for the creative scrapbook-er!!
 All Kaisercraft paper collections can be purchased from The Scrapbook Store...
for further inspiration, you can find the Kaisercraft Blog, 'HERE'....
Sandie

Monday, July 1, 2013

History Layout - The Scrapbook Store - July Sketch

It is July!!  Where has this year gone?  The new sketch for The Scrapbook Store has just been released, and this is my interpretation of the sketch below.  The sketch is by Page Maps, and the prize is for one random drawn winner consisting of a $40 voucher to spend in 'Store', with free postage - so please come and join us by uploading your take on the July sketch, over in the Gallery.
I used an older Kaisercraft paper collection that a friend had sent me some time ago. Thank you Mrs K!!  I so loved the papers, and just had to use them... perfect for my love of vintage!  I must admit, I did find it very hard to leave a space at the top of the layout to match with the sketch. The Scrapbook Store stock all of Kaisercraft's paper collections and many of the elements too - you can find them 'HERE'.
I also used some of The Scrapbook Store's own brand roses, flowers and also chipboard elements.  The chipboard elements can be found 'HERE' and the flowers 'HERE'.  I used the new in stock Inca Gold Guilders Paste, on my chipboard elements - and my what a wonderful product. I am in love, love, love!!  Very much looking forwards to exploring more so with this medium, the sky is the limit where this product is concerned and there are a vast many colours available.

A lot of my layouts hold my own fussy cut leaves, which are so simple to create, and can be made to fit and suit any sized flower.  I have a quick tutorial 'HERE', if ever you need to make your own.
The Inca Gold can be seen a little better in the below photograph....and the pinky/orange tinge on the chipboard was painted on using the Fire Opal, Luninarte Silks, Acrylic Glaze.
Thanks for popping into visit and for taking the time to leave a comment.. I'll be back throughout the month with some more creations for The Scrapbook Store..
Sandie

Materials:
Kaisercraft, These Days, Paper Collection & Collectables
, Silhouette Silver, Lindy's Stamp Gang, Moonshadow Mist
Punch Bunch, Stamen, Punch
Misc: Paper Lace Doilys, Butterflies

Thursday, June 13, 2013

Beary Cute Layout Tutorial - The Scrapbook Store

 photo DSCF5123_zps3e0f1aa8.jpg
This month for The Scrapbook Store, I have created a layout tutorial.  You can find the full tutorial, 'HERE'.  The Fab Scraps, 'Baby Bear' paper collection was used, and various elements were cut from the papers to highlight. 

The little fellow in the photograph is just adorable, a downloaded image from Etsy - not a family member. I often wonder what he would think if he knew I'd scrapped him, all these many years later.  On the back of the layout, I have added all of my son, Jesse's favourite nursery rhymes as a memento.
 photo DSCF5124_zps7e8d3174.jpg
A range of flowers were used, however, I did dissect the larger roses into layers and used in a different manner as seen in the below image. The Scrapbook Store, has a large range of their own brand of flowers, which can all be found 'HERE'.
 photo DSCF5126_zpsd825ba90.jpg
Prima Marketing flowers, and several small Green Tara flowers were also used.
 photo DSCF5126_zpsd825ba90.jpg
The bow was created using Seam Binding, though I hand-painted the ribbon using Lindy's Stamp Gang Sprays, to achieve a colour which suited my layouts colour pallet - along with the flowers.
 photo DSCF5128_zpsf434b9b0.jpg
Lace was used as a border, to create dimension, and several die-cut doily elements. 
The title was painted in Juniper acrylic paint.
 photo DSCF5127_zpsc31f1edc.jpg
There is still plenty of time to join in the June challenge, all details can be found 'HERE', and loaded to the 'GALLERY' - come join in the fun, and have a chance of winning a $40 shop voucher, along with free postage!
I will be back soon, with another layout created using this pretty paper range.
Happy Creating
Sandie

Materials:
Kraft, Corrugated Board
Misc Lace
Whale Watch Blue, and Sea Grass Green, Lindy's Stamp Gang, Starburst Sprays

Tuesday, April 16, 2013

Beaded Cabochon Tutorial - Tag - Zeus and Zoe

The kits available through Zeus and Zoe host a beautiful array of vintage and beyond items.  Often, cabochon's of some description can be found in the kits.  Actually, Marivic the owner of Zeus and Zoe custom makes many of the kits to suit each customers taste.  If this of interest to you, do drop her an email to discuss.  The Zeus and Zoe Etsy store can be found 'HERE'.

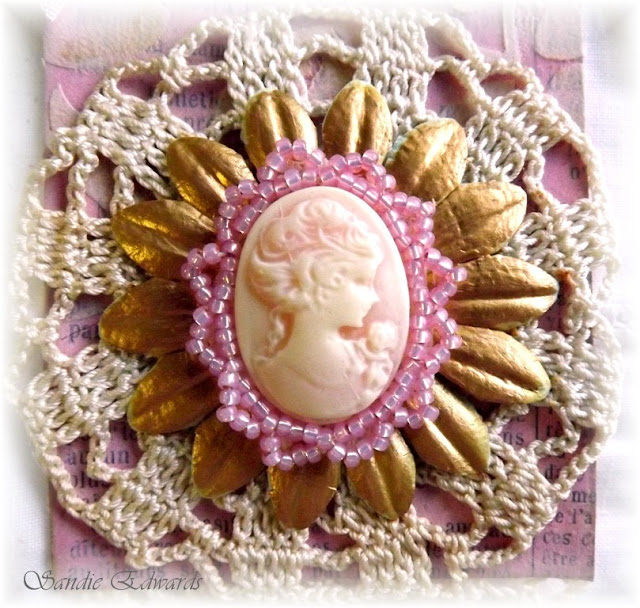
I created a tag from items in my DT kit, including - old book paper, buttons, charms, lace, an old doily, and cabochon. I love cabochon's and have a lovely collection of them.  In previous crafting ventures I have beaded around the outside rim, to decorate and give a more finished appearance.
Today, I am sharing with you a tutorial on how to complete the beading.


Materials:
Cabochon
Tiny seed beads
Beading needle
Fray Stoppa or adhesive
Adhesive
Felt or calico
Thread - either beading or quilting thread

**Please read through all instructions before commencing**

1. Cut a small piece of fabric, a little larger than the cabochon.  Adhere cabochon to fabric using a strong adhesive, and allow to dry.
2. Turn cabochon over, and cover fabric with fray stoppa, allow to dry fully.  This eliminates the fabric from fraying whilst beading, and also when fabric is cut away when beading is completed.

3. Double thread needle with a long length of beading thread or quilting thread, knot well.

4. Take threaded needle and come up from the bottom of the fabric, at top, and as close to cabochon base as you are able. Thread 5 beads onto needle, and pull beads down thread. Lay the row of beads along the edge of the cabochon, and insert needle close to end of where beads lay and pull through to the back.
5. Come back up with your needle half way through previously sewn beads, with the needle being between the cabochon base and the beads. Thread needle through the 3 last beads as seen in photographs above.

6. Continue steps 4 and 5, till the whole outside rim has been beaded, as shown below.
7. Tie off thread onto back of cabochon.  DO NOT CUT THREAD

8. Bring needle and thread back up between cameo base and beaded rim, at top of cameo once more, as pictured below.
 9. Add 5 beads, count 3 beads, and thread needle straight through the 4th bead, as shown in below photograph.
10. Add another 5 beads, count 3 beads, and thread needle through the 4th - keep repeating this pattern, until you have returned to where you started, see above and below photographs.
11. To secure, go down next to last bead placement, come back up and over 'a' thread, and back to the back again.  Tie off, using small knots.  Apply a light application of adhesive over the knot to totally secure, as shown.
12. Carefully trim off excess fabric - be careful not to snip too close and catch a thread - that would mean starting all over again, so do be careful!!
13. Your cameo/cabochon is now ready to use on a project.... 

...and before I sign off, don't forget this months challenge over on the Zeus and Zoe Blog, you can find all the details 'HERE'.  There are some fabulous prizes to be won, including a Zeus and Zoe kit, and also some wonderful trims from May Arts.

enjoy your day and thanks for visiting....
Sandie