Showing posts with label Texture. Show all posts

Saturday, October 12, 2013

Tiny Fingers Tiny Toes LO - The Scrapbook Store

 An arty layout, created using the Graphic 45, Mother Goose, Humpty Dumpty paper.  My DT pack from The Scrapbook Store this month included some of the lovely blooms by Peetaloo, so thought I would design a layout around the moss green colour.

I've enclosed 2 photographs of the layout, the 2nd one shows off the gorgeous shimmer and shine in the  Lindy's Stamp Gang Mists.   I used the Random Star's Stencil by WOW as the background and highlighted some of the stars using a black pen (I hate doodling as I always muck them up and if I could, I would remove the black LOL).
 The title is a gorgeous chipboard piece by Scrap FX called Tiny Fingers and Tiny Toes, it was perfect for this LO - I have an envelope stuck to the reverse side of the LO, and enclosed is a series of photographs of Jesse's hands and feet as a baby. I used various mediums to paint the title, and then highlighted with Lindy's Stamp Gang Mists.   
 One of the larger Prima Marketing, Mechanical  Washers was cut in half, and used to edge the photograph.

Jesse looks so adorable in this photograph, so tiny... where have those years gone?

Enjoy your day and thanks for visiting..
Sandie

Materials:
8 X 8 Paper Pad
Ranger - Distress Ink - Peeled Paint and Vintage Photo
Tattered Angels Chalkboard Mist - Firefly and Cornflower Daze
- Treasure Island Turquoise
- Silhouette Silver
- Landlubber Green
Printable Butterflies
Misc Leaves
Black Pen

Monday, August 12, 2013

A Perfect Day - Forever LO - The Scrapbook Store

 ...and another LO featuring Classic Elegance papers from Melissa Frances, for The Scrapbook Store.  The paper elements were cut using the Silhouette Cameo, and the background was created using texture paste, and the Flourish Prima Stencil.  Edges have been embossed using the Stampendous, Aged Ivory embossing powder.

The photograph is of my Uncle Malcom and Aunt Pam on their wedding day.
 The title was created using The Scrapbook Store's own chipboard line - Scrap Words, in Burnt Cream.  Prima flowers, Peetaloo, velvet Hydrangeas and leaves, along with Green Tara, Heirloom Blooms flowers.... and some printable butterflies, to decorate.
....and, added in some extra visual elements using Kaisercrafts, Grid Stamp.
 Happy Creating
Sandie

Materials:
Melissa Frances - Classic Elegance Paper Collection, - Bits of Paper, and Strictly Business

Thursday, August 8, 2013

Together LO - The Scrapbook Store - Scrap Around the World Challenge

 ...loving my DT pack from The Scrapbook Store, with the Melissa Frances, Classic Elegance papers and elements. Lots of texture in this layout, using the Kaisercraft 'Bubbles' Template, along with texture paste - coloured using a mixture of Perfect Pearls, and Mists from Lindy's Stamp Gang.

Also this month, I have joined in the new challenge site, Scrap Around the World - I have been itching to join in with the fun of this new challenge sit,e and finally 'completed' a layout using the Inspirational Mood board and Sketch below. You can find the current challenge 'HERE'.  I adore the sketch, by Julianne!!

I was inspired by the top two images in Eila's Mood board, the softness of the gold/white/pink colour hue's. I love charms of all types, so added in a key which is available in TSS 'HERE' ...
These photographs are just precious!  Three best friends, having the time of their life (no doubt) on the beach - where I have no idea, who they are .... no idea sadly, but are in my photo collection.  Hopefully one day I will find out the story behind these photographs.
Cheery Lynn Design dies were used behind each of the photographs and also mini dies beneath the other flowers. A complete list of dies with links can be found below in the materials list. I grouped together flowers in an arrangement - some flowers were from my stash basket and others from TSS.
Of course, I embossed the title 'Together'...... using Stampendous embossing powder - Aged Silver - which really looks like a light golden colour, beautiful actually.
Well, that is it for me today ... thanks for visiting!!
Sandie

Materials:

Thursday, June 13, 2013

Beary Cute Layout Tutorial - The Scrapbook Store

 photo DSCF5123_zps3e0f1aa8.jpg
This month for The Scrapbook Store, I have created a layout tutorial.  You can find the full tutorial, 'HERE'.  The Fab Scraps, 'Baby Bear' paper collection was used, and various elements were cut from the papers to highlight. 

The little fellow in the photograph is just adorable, a downloaded image from Etsy - not a family member. I often wonder what he would think if he knew I'd scrapped him, all these many years later.  On the back of the layout, I have added all of my son, Jesse's favourite nursery rhymes as a memento.
 photo DSCF5124_zps7e8d3174.jpg
A range of flowers were used, however, I did dissect the larger roses into layers and used in a different manner as seen in the below image. The Scrapbook Store, has a large range of their own brand of flowers, which can all be found 'HERE'.
 photo DSCF5126_zpsd825ba90.jpg
Prima Marketing flowers, and several small Green Tara flowers were also used.
 photo DSCF5126_zpsd825ba90.jpg
The bow was created using Seam Binding, though I hand-painted the ribbon using Lindy's Stamp Gang Sprays, to achieve a colour which suited my layouts colour pallet - along with the flowers.
 photo DSCF5128_zpsf434b9b0.jpg
Lace was used as a border, to create dimension, and several die-cut doily elements. 
The title was painted in Juniper acrylic paint.
 photo DSCF5127_zpsc31f1edc.jpg
There is still plenty of time to join in the June challenge, all details can be found 'HERE', and loaded to the 'GALLERY' - come join in the fun, and have a chance of winning a $40 shop voucher, along with free postage!
I will be back soon, with another layout created using this pretty paper range.
Happy Creating
Sandie

Materials:
Kraft, Corrugated Board
Misc Lace
Whale Watch Blue, and Sea Grass Green, Lindy's Stamp Gang, Starburst Sprays

Tuesday, May 7, 2013

You 2 - Layout - The Scrapbook Store & Once Upon A Sketch

This month for The Scrapbook Store I am working with the beautiful Fairy Rhymes papers, and elements from Prima Marketing.  I also used the sketch from Once Upon a Sketch, and entered into their challenge this month - its a lovely sketch created by Nadia.  The sketch this month is to include 'numbers' and this is my interpretation....details of the May challenge, can be found 'HERE'.
The photograph is not one of my relatives, it is just one I really wanted to scrap - this era really fascinates me, and I would dearly love this photo to be able to talk - telling me how the two girls lives were, and how different it is from today.  I done a little research and added information to the back of the layout on this particular era, and what young girls lives may have been like.

Papers were aged using water, to distress the edges, and tear them up slightly  The Scrapbook Store have a lovely selection of their own products, and I have used one of the chipboard butterflies.  The butterfly elements were inked, and then gold paint stippled onto them, to age each piece.
TSS stock a lovely variety of Green Tara products, and in my layout I used some burlap trim, vintage type lace, and a flower.  You can find Green Tara items in the store 'HERE'.
 Have a wonderful and happy day...don't forget to come and join the fun of The Scrapbook Store, May Challenge, all details can be found in this 'POST'...

Sandie

Materials:
Flower Song
Fairy Collage
Papillon
Canvas Resist
Fabric Alpha Stickers Large
Say It In Crystals
Metal Paperclips
Alpha Stickers/Words
Prima Marketing - 12 X 12 Clock Stencil
Ivory - Bazzill - Smooth Cardstock
The Scrapbook Store - Butterflies (TSSCB1015)
Kaisercraft - Mini Blooms
Vintage Photo - Tim Holtz - Distress Ink
Raw Sienna - Liquitex - Ink


Friday, April 26, 2013

Treasure - Layout - The Scrapbook Store

My last layout for The Scrapbook Store this month is a photo of a past relative - as far as I have worked out to date, she is from my Maternal side of the family.  Her name was Mary Genders (Westbrook) and was born in 1860 in Hobart, Tasmania, and died 3rd of June, 1950.  She looks rather sour, but I guess that is the era the photograph was taken. I'm looking forwards to learning more about this lady and writing her 'story'.

The Carta Bella 'So Noted' - Script and Scribbles paper was perfect for the background, and I aged further by applying Liquitex Glass Beads, mixed with gold paint, mists, crackle stamp, and inks  -
The Glass Bead medium is an amazing medium and leaves the most glorious texture of tiny glass beads.  
Burlap Hessian was added beneath the photograph and papers.... and a range of Green Tara flowers, lace, and roses were used to decorate.

There is still time to take part in this months challenge sketch, details can be found 'HERE', and loaded into The Scrapbook Store 'Gallery' - come join in the fun of the challenge, with a chance to win a fabulous prize of a $40 store voucher, with free postage.
Hope to see some familiar faces in the challenge...
Sandie

Materials:
Carta Bella 'So Noted' - Script and Scribbles, Tiny Lace, Dear Jane, Note Cards, Element Stickers, and Journaling and Accent Cards, Alpha Stickers.
Suede and Gumdrop - My Tattered Angels Glimmer Mist
Burlap Hessian
Paper Lace Doily
Green Tara Roses, Lace, Leaves and Flower
Honey - Kaisercraft Mini Flower Blooms
Dusky Pink - Kaisercraft Flower Blooms
Kaisercraft - Clear Stamp - Crackle
Key Charm
Walnut Stain and Vintage Photo - Tim Holtz Distress Ink
Liquitex Glass Beads
Gold - Kaisercraft Paint

Tuesday, April 16, 2013

Beaded Cabochon Tutorial - Tag - Zeus and Zoe

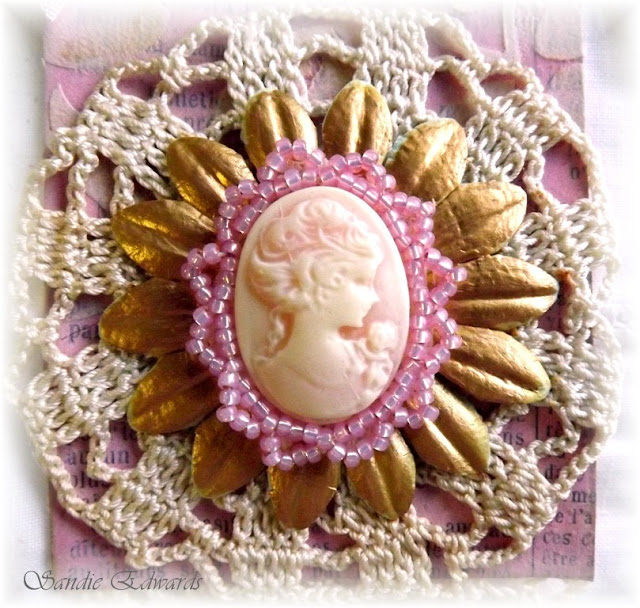
The kits available through Zeus and Zoe host a beautiful array of vintage and beyond items.  Often, cabochon's of some description can be found in the kits.  Actually, Marivic the owner of Zeus and Zoe custom makes many of the kits to suit each customers taste.  If this of interest to you, do drop her an email to discuss.  The Zeus and Zoe Etsy store can be found 'HERE'.

I created a tag from items in my DT kit, including - old book paper, buttons, charms, lace, an old doily, and cabochon. I love cabochon's and have a lovely collection of them.  In previous crafting ventures I have beaded around the outside rim, to decorate and give a more finished appearance.
Today, I am sharing with you a tutorial on how to complete the beading.


Materials:
Cabochon
Tiny seed beads
Beading needle
Fray Stoppa or adhesive
Adhesive
Felt or calico
Thread - either beading or quilting thread

**Please read through all instructions before commencing**

1. Cut a small piece of fabric, a little larger than the cabochon.  Adhere cabochon to fabric using a strong adhesive, and allow to dry.
2. Turn cabochon over, and cover fabric with fray stoppa, allow to dry fully.  This eliminates the fabric from fraying whilst beading, and also when fabric is cut away when beading is completed.

3. Double thread needle with a long length of beading thread or quilting thread, knot well.

4. Take threaded needle and come up from the bottom of the fabric, at top, and as close to cabochon base as you are able. Thread 5 beads onto needle, and pull beads down thread. Lay the row of beads along the edge of the cabochon, and insert needle close to end of where beads lay and pull through to the back.
5. Come back up with your needle half way through previously sewn beads, with the needle being between the cabochon base and the beads. Thread needle through the 3 last beads as seen in photographs above.

6. Continue steps 4 and 5, till the whole outside rim has been beaded, as shown below.
7. Tie off thread onto back of cabochon.  DO NOT CUT THREAD

8. Bring needle and thread back up between cameo base and beaded rim, at top of cameo once more, as pictured below.
 9. Add 5 beads, count 3 beads, and thread needle straight through the 4th bead, as shown in below photograph.
10. Add another 5 beads, count 3 beads, and thread needle through the 4th - keep repeating this pattern, until you have returned to where you started, see above and below photographs.
11. To secure, go down next to last bead placement, come back up and over 'a' thread, and back to the back again.  Tie off, using small knots.  Apply a light application of adhesive over the knot to totally secure, as shown.
12. Carefully trim off excess fabric - be careful not to snip too close and catch a thread - that would mean starting all over again, so do be careful!!
13. Your cameo/cabochon is now ready to use on a project.... 

...and before I sign off, don't forget this months challenge over on the Zeus and Zoe Blog, you can find all the details 'HERE'.  There are some fabulous prizes to be won, including a Zeus and Zoe kit, and also some wonderful trims from May Arts.

enjoy your day and thanks for visiting....
Sandie  


Wednesday, April 3, 2013

Memories - April Sketch - The Scrapbook Store

The April sketch challenge is up on The Scrapbook Store Gallery!  Come join in the fun of being creative with this fabulous sketch....all you have to do is enter the Gallery, upload for a chance of winning a fabulous prize of a $40 shop voucher with free postage.

I used the Kaisercraft, 75 cents Paper Collection and sticker elements for my layout.  Texture was created using a Prima stencil and texture paste, along with  texture stamps from Bo Bunny.


Green Tara flowers, and foliage from my lace stash.  
 Just love the above butterflies which was fussy cut from the paper collection..
 The photograph is of my Mum on her wedding day, with my Great Grandma giving her blessings for the marriage. Not sure where that piece of fluff came from in the photo LOL
 Thanks for calling into visit...
Enjoy your day
Sandie

Materials:
Kaisercraft  - 75c Paper Collection - Dollar, Penny, Sovereign, Sixpence and Sticker Sheet
We R Memory Keepers - Eyelets
Green Tara Flowers 
Silk Ribbon, Hand-Dyed Lace, Guipure Lace
Vintage Photo - Tim Holtz Distress Ink
Prima Marketing Stencil - Circular

Monday, March 18, 2013

Remember LO - The Scrapbook Store

 I'm back with another layout created for The Scrapbook Store, again using the Prima Marketing - Hello Pastel paper collection and elements.  Lots of texture and colour to the base paper, using various mediums such as Gesso, Glimmer Mist, Distressed Textures Stamp, and ink. 
 I curled paper edges up slightly using  Magic Mount, and added in some die-cuts including the Ankara Doily, and Mini Fanciful Flourish.        
 Snow Cap acrylic paint was applied to edges of every paper element, and flowers brushed over to give that worn appearance. 
 The photograph is of my daughter, with yet another beloved animal - one of many.  As the journaling states, animals gravitate to her, and her to them - it just seemed a natural journey for her.
The title and fern were created using the Silhouette
 Loved playing with these papers and elements
Sandie

Materials:
Prima Marketing - Hello Pastel - Pastry Shoppe - Cream Puff - Pastry Shoppe - Powdered Petals
-Large Flowers
Silhouette - Fern and Title
Bo Bunny - Distressed Textures Stamp 
 Manor House Creations - Fairy Floss Lemon
 Cheery Lynn Designs - Mini Fanciful Flourish - Ankara Doily
Gesso
Kaisercraft Ink - Grey
Tattered Angels - Glimmer Mist - Mustard Seed - Riptide
Snow Cap - Adirondack Acrylic Paint Dauber
Magic Mount
Pigma Micron Pen - Brown