Saturday, May 26, 2012

Altered Box of Helmar - Tutorial

What a fun week of creating I have had!  My project for the Helmar Altered Art/Mixed Media week is the rejuvenation of a box that was just too charming, and sturdy to throw out. More often than not, gift boxes are the perfect item to 'alter' or 're-create', and using Helmar products makes the task so much easier!  It is amazing once you start altering items (no matter what they are) how your eyes seem to scan everything in sight, in a totally different light. I might possibly have to live till I'm 302 to get through all the projects I have currently stashed in my mind...
Firstly, I noted all measurements of  the box, adding 1/4" to each side edge, which allows for scoring and folding over for a neater appearance/finish. This box was where I discovered the idea to use hair elastics for clasping of my memory books and other altered projects. When the 1/4" edges have been scored, cut out the little square corner piece of each and every corner.

My adhesive of choice is Helmar 450 Quick Dry for adhering the paper to the box - why, because it is a fast drying adhesive, that still allows for manipulation while drying to ensure all edges are in place with only one glue-session.  Gentle persuasion of the paper/glue as drying, allows for a perfect finish.  This is the first adhesive I have been able to do this with, and I cannot express how excited I am to come across a product which cuts my 'waiting' time down to next to nothing, does not buckle paper, and gives a perfect finish.
Apply Helmar 450 Quick Dry adhesive to the side pieces first, making sure to take the adhesive right up to the very edges of your paper.  Without delay, apply paper to box sides one at a time and gently manipulate folds into place.  Repeat process with all sides.  The reason I apply paper to sides first, is so that no joins are obvious on the front.  Also, my reason for using a striped paper, joins are less obvious than a pattern.
Measure and cut base paper, slightly smaller (a few mm's) and again apply using Helmar 450 Quick Dry, and the same for the top of the box, using a more decorative paper of your choice.
Use a Crop-O-Dile to punch a hole through the centre of the lid of the box, and directly below on front of the box, and insert an eyelet into each hole.  Weave a hair-tie from inside through the eyelet hole of the top of the box, adhere using Helmar 450 Quick Dry Adhesive, and allow to dry.
I have been a button collector for many years, so I had oodles of fun seeing which button looked 'right' on my project.  To attach the button, a wire-tie from a garbage bag was threaded through the button shank. 
Buttons with shanks are most appropriate for this project, as they allow a gap that the hair-tie can wind over and around with ease.  To finish the inside, twist tie around and then spread both ties out across the inside of the box on either side of the button - adhere in place with a smearing of Helmar Silicone Adhesive Sealant.  Works a treat! 
Time to decorate!  I have a love of lace, so I found a nice piece which could be cut up, and gave the lace a swipe over with Walnut Stain Distress Ink, giving a more vintage appearance. Also, any areas where the lace may fray when cut, an application of Helmar Fray Stoppa, was applied before cutting into pieces.
Helmar Silicone Adhesive Sealant was used to attach the Tim Holts Ideology Foundations (legs), and there is no way they will ever budge!  The Helmar Silicone Adhesive Sealant is superb for metal objects, and very little is required to do the perfect job.
I won't go into detail on each and every part of my 'decorating', as I am sure those that wish to replicate will do so, adding their own flair to the project. Decorating was a lot of fun, using a variety of mediums and adhesives to 'match'.  Layers of paper, flowers, lace, leaves, and butterflies were adhered using Helmar 450 Quick Dry which allowed me to continue working without having any delays waiting for glue to dry. A light coat of Helmar Professional Acid Free Glue was applied to back of ballerina cut out, and adhered gently pressing with a make-up sponge to remove any small air-bubbles beneath the paper. No buckling of the paper, soooo loveeeee this glue!
Metal charms were added using the Helmar Silicone Adhesive Sealant - this adhesive is a must have for anything metal, though can be used on most surfaces, including concrete.  Gemstone Glue was applied to the areas where beads were reuqired, and there is no way those beads will ever come loose.

The Prima Marketing flowers 'Camille Almanac' edges were painted with Creative Inspirations Paint - 'Gold'

Thanks for visiting today, and don't forget to visit the Helmar Design Team Blog for further 'adhesive' inspiration!

Helmar Products Used:
 Helmar Fray Stoppa

Other:
Gift Box
Papers: Prima Marketing 'Fairy Belle Collection' - 'En Pointe' and 'Marcelle', Glitz 'Pretty in Pink'
Flowers: Manor House 'Nikita', Prima Marketing 'Camille Almanac'
 Creative Inspirations Paint - 'Gold'
Misc Craft: Lace, Hair Elastic, Eyelet & Crop-O-Dile, Button
Zutter 'Distress It All'
Ink: Ranger Distress Ink - 'Walnut Stain'
Tim Holtz Idea-ology - 'Foundations'

Monday, May 21, 2012

Hand-Dyed Seam Binding/Ribbon Tutorial - Cardmaking Online

Please read through all instructions before commencing.

Seam binding is becoming a 'must have' for card makers, with its beautiful shimmer, and creates the most heavenly bows, and flowers. 

In this step by step tutorial, I am attempting to show how versatile seam binding is to create your own favourite colour schemes, in just a few simple steps, using a variety of products.  The sky is the limit really, with so many fantastic products out there on the market for colouring, in some form or another.

Please Note: When first venturing into hand-dying, it is probably best to attempt test runs with small strips of Seam Binding, writing down what you have 'done' in each step to get the results of each.  If you like something in particular, you can repeat the process.
Photograph 1
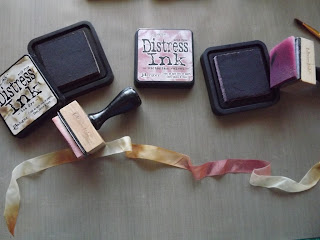
1. Firstly, if using Distress Ink Pads, it is important to dampen the seam binding previous to colouring - this allows for the colour to penetrate evenly, and you can successfully meld two colours (or more) with wonderful success to achieve a glorious variegated appearance. Simply dab your ink onto the moist Seam Binding in areas along the ribbon, making sure to leave blank areas for another colour if you wish to have a variegated ribbon - Photograph 1.

2. If using Distress Ink Re-inkers, painting straight from the bottle onto the seam binding will give extremely vibrant/strong colours.  Remember you can water down re-inkers.  
*See Photograph 8: The 'brown' ribbon on bottom - Walnut Stain Re-Inker was applied straight, then the ribbon was scrunched up in my fingers and allowed to dry outside on a tray in the sun.  This gave a beautiful vintage appeal which I personally adore.

3. The drying process can be completed through a quick zap in the microwave.  However, Seam Binding does tend to 'burn' easily, so care is needed here!  I highly suggest natural drying out on the line or scrunched up on a tray, then ironed.  If you prefer the scrunched crinkled look, then by all means wet ribbon again and scrunch up!  It is important to apply heat via ironing, as this 'sets' the ink into the Seam Binding.

Photograph 2
4. In Photograph 2 I have applied Glimmer Mist, firstly moistening the ribbon with water, scrunching up before applying Glimmer Mist with dabs straight from bottle using a paintbrush. I dried this particular ribbon hanging on the line, and not scrunched up on a tray in the sun.  The effect on the ribbon can vary dramatically via various drying methods. *Results can be seen in Photograph 7, third ribbon down for this particular method.

Photograph 3
5. In Photograph 3, Glimmer Mist was applied, though only randomly - not all the Seam Binding was covered.  Ribbon was dried scrunched up on a tray and the results can be seen in Photograph 8, the top ribbon.

Photograph 4
6. In Photograph 4, Perfect Pearls was added straight to the ribbon, and also a brush of Glimmer Mist onto dry seam binding, in an even manner, and line dried.  This gave a total block of colour to the ribbon with no variegation.

Photograph 5
7. Photograph 5, was firstly coloured using Glimmer Mist, and then line dried.  To add a bit more character to the Seam Binding, I then added along the edges Black Glimmer Mist, and allowed to dry in the sun as pictured above.  Very nice results with this one, which can be seen in Photograph 7, second ribbon down.

Photograph 6 (not ironed)

Photograph 7 (Ironed)
Photograph 8


Example of finished Seam Binding Ribbon Rose/Bud and Leaves
Another fantastic way of dying Seam Binding is by using Spectrum Noir Alcohol Markers, especially for creating depth on ribbon edges!   OR, markers could be applied to ribbon rose (as above) to add depth of colour to the centre of the rose.

Products can be purchased from Cardmaking Online!

Supplies:
Glimmer Mist
Seam Binding
Paint Brush Or Two

Wednesday, May 16, 2012

Make a Wish, They Do Come True - Creative Inspiration Paint

This fortnights card, was created for a very special friend, about to embark on the venture of a lifetime, with moving to USA to broaden her areas of study.  I wanted to make a card which is my interpretation of dreams coming true for her - an of course a splatter and coat of Creative Inspiration Paints was a 'must'.  

The beautiful Prima Marketing 'Fairy Belle' 6' X 6" pad was used to create this card, and every component was covered in a generous coat of Creative Inspiration Paint. The ballerina fairy, and butterflies were painted with Fairy Dust - seemed most appropriate and left the most glorious touch to the image/s. 'Mellow Yellow' was applied to the 'yellow' butterfly on the right.
The base of the card was created using the Cheery Lynn Designs, French Flair Classic Series, and then topped with the Mini Pearl French Flair.  Also, the foliage (Dimensional Leaves and Olive Branches) were painted with several coats of 'Green Olive' Paint, as well as, 'Evergreen' to create a depth of shadow on one edge.

Each of the flowers was touched with 'Gold', just highlighting each of the petals.
The Imaginarium Designs Chipboard - 3" X 2" Swirly Frame (IDFR0004) was painted using Antique Gold, in a haphazard manner, leaving patches with no paint.  A light sponge of 'Gold' Creative Inspirations Paint was applied over the entire frame leaving a gorgeous, two-toned -gold, with amazing shimmer.

The challenge theme on the Creative Inspirations Blog is Mother's Day this week, and can be found 'Here'. Each month, one person will win 5 jars of paint in the colors of their choice. There is a top 3 each week, and a winner chosen randomly from all those who have participated that month, so make sure to join in on our challenges each week!

Supplies:
Gold
Green Olive
Evergreen
Mellow Yellow
Antique Gold
Fairy Dust
Beige
Imaginarium Designs: Chipboard - 3" X 2" Swirly Frame (IDFR0004)
Helmar 450 Quick Dry Adhesive
Paper/Cardstock: Prima Marketing 6 X 6" Fairy Belle Paper Pad, Shimmer Cardstock, Core'dinations Cardstock
Dies: Cheery Lynn Designs: Olive Branches, Dimensional Leaves, Mini Pearl French Flair, French Flair Series.  Martha Stewart: Pine Needle Punch

Monday, May 14, 2012

Discover the Journey Sketch Layout - Helmar

The month of May brings a fantastic sketch for Helmar, by Lydell Quinn.  To be in the running to win a fabulous prize package of Helmar products, all you have to do is create a layout, card, canvas using the below sketch, and upload to the Helmar Facebook Page


My layout, based upon the sketch, is a beach scene, consisting of my handsome son, Jesse-James.  We live across the road from the beach, but Jesse has a tendency not to like the waves - the noise mostly, as it really terrifies him.  On this particular day, the waves were extremely placid, so off we went to the beach.  Jesse had a wonderful time collecting in his bucket; shells, bits of bark, seaweed, rocks, mermaid tears, and even a dead crab! It really was a journey of discovery, and a beautiful experience for him.

The story of this venture I have typed up and adhered to the back of the layout.  I have a tendency to waffle on and be extremely detailed, so my journaling never 'fits' the front of a layout.


I used Helmar 450 Quick Dry Adhesive for nearly the entire layout!  The only place I did not, was the actual photographs and some of the Imaginarium Designs Chipboard pieces, which I wanted to add height to.  Applying Helmar 450 Quick Dry to the banner paper, allowed me to lift edges slightly when dry - which I might add did not take that long at all.  That is one of the best attributes of this adhesive, it is fast drying and you do not have any lengthy delays, waiting for adhesive to dry. 

Even beach shells, plastic fish, metal type seahorses, fibres, chipboard and more - all adhered beautifully with Helmar 450 Quick Dry.


 Materials Used:
Imaginarium Designs Chipboard Elements
Basic Grey - Pyrus Paper
Gauze
Various Fibres from my Stash
Fish/Seahorse Embellishments
Shells from the Beach
Tattered Angels Glimmer Glaze 'Champagne'
Ranger Distress Ink 'Walnut Stain'
Printer for Journaling

Sunday, May 13, 2012

Cup Kitties Birthday Card - Joanna Sheen Challenge

This month for the Joanna Sheen brings another learning experience for myself, in the art of decoupage. The challenge theme this fortnight  is "Happy Birthday" - you can find all the challenge details 'HERE'.  The prize is a £15 Joanna Sheen gift voucher for a random winner, as well as a new Top 3 and new Guest Designer position, so be sure to enter!
So, my new learning experience is in 'Cup Kitties Decoupage Sheets'.  I really have not played around in this area much, though I could not get my scissors around those eenie weenie antenna! LOL   The design I chose this month just tugged my heart-strings, those great big blue eyes. 
  To go along with the theme of the decoupage, I used foam dots to create layers throughout the paper layers of the whole card, and of course added some glitter stickles to highlight certain areas of the card. 

 Now these images are totally adorable, and each packet contains 20 sheets of Cup Kitties
in 10 varying designs.
Also, please call on over to the Joanna Sheen Challenge Blog and check out the 'blog candy' on offer this week (pictured below), and can be found 'HERE'.All you have to do to be in the running to win this lovely set of Letraset Pens is leave a comment on the post.  Simple!  I have this set of pens and they are the most gorgeous colours!

Friday, May 11, 2012

Mothers Day Card - Imaginarium Designs


The months are quickly vanishing, I cannot believe we are now in May - that is nearly half way through yet another year!  May brings Mothers day, and what a perfect excuse to create a card for my Mother in law, as part of my Imaginarium Designs design team creation for May.

My Mother in law is 91 this year, and has not had the best year health-wise, so I am hoping this card will raise a smile, and let her know that she is loved and missed.

The "Mum for Cards" (IDW0021) chipboard piece was coated with texture paste, which left a lovely uneven surface, and then a covering of white Gesso was applied to prime the piece for the distress inks,  'Stormy Sky' and 'Walnut Stain'.  The distress inks seep into the crevices and give off various colour hues.

The Small Butterflies (IDT0014) were painted in the same manner, minus the texture paste. All surfaces received a generous coat of Glossy Accents.


You can purchase all chipboard pieces in my projects from Seriously Scrapbooking, and this includes International customers.  Also, please call over to the Imaginarium Designs Blog and check out the other Design Team members and their beautiful creations.  You also have the chance to WIN a chipboard pack by leaving a comment on the blog.
Till next time
Sandie
Supplies:
Papers: The Scrap Cake, American Craft Cardstock
Flowers: I am Roses
General Craft: Double Sided Tape, Velvet Ribbon, Guipure Lace, Sewing Machine, Thread, Texture Paste and White Gesso
Ranger: Distress Ink 'Walnut Stain', and 'Stormy Sky', and Glossy Accents.

IDT0014

IDW0021

Tuesday, May 8, 2012

Helmar - Altered Vintage Inspired Frame - Sketch Challenge


Size 5" X 7"
Today, I am here with my first creation as part of the Helmar Design Team - very exciting to be working with these amazing products. This week the focus for the Design Team is the Helmar 450 Quick Dry, a fantastic product with unlimited uses. Helmar 450 Quick Dry is especially fabulous to use in altered art creations - the time to dry is fast, no holding onto embellishments, and guaranteed not to budge once adhered.


Recently a friend and I were rummaging through a local second hand shop, and came across a pile of old, well worn, chipped and scratched frames.  At the bargain price of $2, they all came home with me!  
The process of altering began with a light sanding of the frame, and then two coats of Gesso, giving a light sanding after each application to attain a smooth surface.  Craft Glue was applied over the entire frame, and then  'Music Note' tissue paper, by Tim Holtz was placed over the frame - a damp paint brush was used to gently push the tissue paper into the crevices of the frame, and to remove any air-bubbles.  This step is not as daunting as it may seem, and I urge anyone who has not attempted to use this method to do so - lots of fun!


To achieve an aged appearance, 'Walnut Stain' distress ink was applied lightly over the entire frame. All embellishments, flowers, leaves, and die cuts were adhered using Helmar 450 Quick Dry.  It does not matter the size of the embellishment, or the material substance of the embellishment, Helmar 450 Quick Dry will adhere without any issues at all. 


The May challenge is up on the Helmar Facebook Page, with a delightful sketch courtesy of Lydell Quinn. There is a great Helmar prize up for grabs this month, and to be in the running to win, all you have to do is create a project on this particular sketch.  It does not have to be a layout, it can be 'anything' from a canvas to a card. Just remember to state what Helmar product/s you used on your creation, and tag your photograph with your details.  I hope to see some familiar names join in, and have some sticky fun!   

Thanks for looking at my project, and I look forwards to sharing with you again soon...
Sandie


Sunday, May 6, 2012

'Floral' Best Wishes Card - Cardmaking Online

My card creation for Cardmaking Online is inspired on the beautiful memory of my Grandmother, Margaret (no longer with us).  Grandma loved flowers, and she loved all shades of blue.  


The large flower in the centre of the card is a Petaloo Flower, they come in a wide variety of shapes and sizes - ready to colour with products such as distress inks, or glimmer mists.  The petals are shape-able, so lots of creative scope with these flowers.
I had a wonderful time playing with the Fairy Dust, but have a feeling I will be finding the prettiest, finest glitter through the whole house!  The shimmer of the glitter is beautiful upon the Italian Flourish and Flowers.
Call on over to the Cardmaking Online Blog to see the other cards created by the Design Team Members.


Supplies:
Cardstock 'White'
Sentiment Stamp
Carl Craft Mini Flower Punch
Kitchen Skewer

Friday, May 4, 2012

Happy Mothers Day Card - Scrap For Help 'Old Envelopes'

This months challenge theme for Scrap For Help is using 'Old Envelopes'. 

Scrap for Help is a community blog - promoting friendship and the use of recycled products around the globe.  Each month there is a challenge, with the theme's each being related to using something that is able to be recycled.  There are a number of wonderful sponsors who support in generous prizes, so please call on over and check the challenge out, grab some inspiration from the International design team members, and perhaps take the time to participate.

You can find all the current challenge details 'HERE'
I created my card using My Minds Eye 'Market Place' 6 X 6 collection - layering the various papers and sewing around the edges. Beautiful guipure lace, seam binding and a floral arrangement are highlighted around the envelope, which would be perfect for hiding a personal note to the receiver.

Wishing all the Mum's out there, a wonderful Mothers Day
Sandie

Supplies:
Papers/Cardstock:  My Minds Eye 'Market Street'  and American Craft Cardstock
Kaisercraft: Wooden Flourish
Ranger: Distress Ink 'Walnut Stain'
Misc Craft: Seam Binding, Sewing Machine, Thread, Guipure Lace, Decorative Pins, 
Pearl Beads, Old Envelope, and Computer Generated Sentiment.
Flowers:  I am Roses
Dies: Cheery Lynn Designs - French Flair Nesting Dies, Spellbinders - Foliage, Martha Stewart - Butterfly Punch