Showing posts with label Cardmaking Online. Show all posts

Thursday, June 21, 2012

Vintage Dressmaker Embossed Card - Cardmaking Online

It has been a real busy time with the house move, but I have been so happy to still have my time to create - what a blessing to have a creative outlet to enjoy!

Today, I am showing you a card I created for Cardmaking Online, highlighting the use of a really gorgeous embossing folder by Couture Creations, called 'Vintage Dressmaker'.  I really have not dabbled a great deal in embossing previously..so yet another wonderful journey in 'learning'...

I used Bright White, and Pastel Pink Cardstock, and added dimension to the card using Liquid Scrap Dots and Foam Pads. The edge of the card is actual Pink Ribbon Lace, which was adhered using Helmar's 450 Quick Dry Adhesive - fantastic adhesive which is fast drying.  You can find a range of Helmar products on the Cardmaking Online Website...
The wings of the Vintage Dressmaker were coloured using Acid Free Glue, then sprinkled with Fairy Dust Glitter, as were the flourishes around the Rose/Flower.  Also, certain area's were painted using Autumn Gold, Rub and Buff, and tiny Pink Jewel's applied in several places, and to each outside corner
of the card.
Marianne Designs has this gorgeous White Rose Ribbon.  I simply applied a light application of glue to the back before cutting, painted the edges with Rub and Buff and adhered with a flourish or two to the embossed surface.
 The card is surrounded by the ever so pretty, Pink Ribbon Lace, which is available in a variety of colours.  The Ribbon Lace is very similar to Guipure Lace, and can be easily hand-dyed.

Cardmaking Online is a leading Australian and international retailer specialising in card making and paper craft supplies and accessories.  Also, Cardmaking Online has a blog, which can be found 'HERE', with the design team creating up a variety of cards from Parchment Craft to Decoupage.

Till next time...
Sandie

Supplies:
Paintbrush
Cardstock: Pink, and Bright White

Friday, June 8, 2012

Marianne Craftable 'Butterfly' Thank You Card - Cardmaking Online

Photograph One
Please Read Through All Instructions Before Commencing.

1. Create a 3 ¾" X 4 ½" card-base from Pink Color-Core Cardstock

2. Apply every 2nd oval from the Transparent Glitter/Silver Ovals peel offs, and carefully apply centrally upon card-base front.

3. Leave a 3mm gap from outer edge of card and add Holographic Lines to card.  *Please click on Photograph One for a larger view of card, for easier placement. To ensure all edges match up perfectly, any cuts made in the Holographic Lines, need to be made with sharp scissors.
Photograph Two
4. Apply to each corner of the card a Peel Off Mini Ornament. Using tweezers guarantees perfect placement of each of the corners.

5.  Again using Craft Tweezers, apply the Thank You sentiment, just slightly above Holographic Line on the bottom of the card.  Use the Holographic Line as a guide to make sure sentiment it straight. 

6. Die-cut two Marianne Craftables Butterfly Die's from the left over Pink Color-Core Cardstock using Big Shot.  Apply Embossing Mats to Big Shot and again run your die-cuts through Big Shot  to emboss both butterflies. The embossing mats allow all the finer detail of your die to come through, and with the most magnificent results.

7. Adhere one of the die-cut butterflies to the middle of your card, slightly on an angle, using Helmar 450 Quick Dry Adhesive. *See Photograph One.
Photograph Three
8. Apply a small amount of Helmar 450 to middle of the second butterflies body, and antenna only, and adhere right on top of previous butterfly.  Drying time with Helmar 450 is very quick - no waiting time! 

9. Affix Clear Adhesive Stones to butterfly, using Photograph Three as a guide for placement.

10. On the raised/embossed area of your butterfly die-cut, apply a very small amount of Helmar Acid Free Adhesive using a toothpick.  

11. Place card on top of an A4 piece of paper, and lightly shake over Donna Salazar Fairy Dust Glitter.  Shake excess Glitter off card onto paper beneath, and gently gather paper edges and fold so that the excess glitter, can be poured back into container. No waste!

12. Adhere Pink Lace Ribbon using Helmar 450 Quick Dry Adhesive to the inside of the card.  Measurements of the top and bottom lace are 3 ¾", and 4 ¼", and it is advisable to cut the lace ribbon with sharp scissors, carefully between the pattern of the lace.  Please click on photographs for a closer image view of where lace is cut.

13.  Gently lift the top butterfly wings to give a beautiful 3D appearance.

Your card is now complete!
Supplies:

Monday, May 21, 2012

Hand-Dyed Seam Binding/Ribbon Tutorial - Cardmaking Online

Please read through all instructions before commencing.

Seam binding is becoming a 'must have' for card makers, with its beautiful shimmer, and creates the most heavenly bows, and flowers. 

In this step by step tutorial, I am attempting to show how versatile seam binding is to create your own favourite colour schemes, in just a few simple steps, using a variety of products.  The sky is the limit really, with so many fantastic products out there on the market for colouring, in some form or another.

Please Note: When first venturing into hand-dying, it is probably best to attempt test runs with small strips of Seam Binding, writing down what you have 'done' in each step to get the results of each.  If you like something in particular, you can repeat the process.
Photograph 1
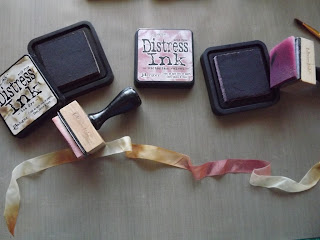
1. Firstly, if using Distress Ink Pads, it is important to dampen the seam binding previous to colouring - this allows for the colour to penetrate evenly, and you can successfully meld two colours (or more) with wonderful success to achieve a glorious variegated appearance. Simply dab your ink onto the moist Seam Binding in areas along the ribbon, making sure to leave blank areas for another colour if you wish to have a variegated ribbon - Photograph 1.

2. If using Distress Ink Re-inkers, painting straight from the bottle onto the seam binding will give extremely vibrant/strong colours.  Remember you can water down re-inkers.  
*See Photograph 8: The 'brown' ribbon on bottom - Walnut Stain Re-Inker was applied straight, then the ribbon was scrunched up in my fingers and allowed to dry outside on a tray in the sun.  This gave a beautiful vintage appeal which I personally adore.

3. The drying process can be completed through a quick zap in the microwave.  However, Seam Binding does tend to 'burn' easily, so care is needed here!  I highly suggest natural drying out on the line or scrunched up on a tray, then ironed.  If you prefer the scrunched crinkled look, then by all means wet ribbon again and scrunch up!  It is important to apply heat via ironing, as this 'sets' the ink into the Seam Binding.

Photograph 2
4. In Photograph 2 I have applied Glimmer Mist, firstly moistening the ribbon with water, scrunching up before applying Glimmer Mist with dabs straight from bottle using a paintbrush. I dried this particular ribbon hanging on the line, and not scrunched up on a tray in the sun.  The effect on the ribbon can vary dramatically via various drying methods. *Results can be seen in Photograph 7, third ribbon down for this particular method.

Photograph 3
5. In Photograph 3, Glimmer Mist was applied, though only randomly - not all the Seam Binding was covered.  Ribbon was dried scrunched up on a tray and the results can be seen in Photograph 8, the top ribbon.

Photograph 4
6. In Photograph 4, Perfect Pearls was added straight to the ribbon, and also a brush of Glimmer Mist onto dry seam binding, in an even manner, and line dried.  This gave a total block of colour to the ribbon with no variegation.

Photograph 5
7. Photograph 5, was firstly coloured using Glimmer Mist, and then line dried.  To add a bit more character to the Seam Binding, I then added along the edges Black Glimmer Mist, and allowed to dry in the sun as pictured above.  Very nice results with this one, which can be seen in Photograph 7, second ribbon down.

Photograph 6 (not ironed)

Photograph 7 (Ironed)
Photograph 8


Example of finished Seam Binding Ribbon Rose/Bud and Leaves
Another fantastic way of dying Seam Binding is by using Spectrum Noir Alcohol Markers, especially for creating depth on ribbon edges!   OR, markers could be applied to ribbon rose (as above) to add depth of colour to the centre of the rose.

Products can be purchased from Cardmaking Online!

Supplies:
Glimmer Mist
Seam Binding
Paint Brush Or Two

Sunday, May 6, 2012

'Floral' Best Wishes Card - Cardmaking Online

My card creation for Cardmaking Online is inspired on the beautiful memory of my Grandmother, Margaret (no longer with us).  Grandma loved flowers, and she loved all shades of blue.  


The large flower in the centre of the card is a Petaloo Flower, they come in a wide variety of shapes and sizes - ready to colour with products such as distress inks, or glimmer mists.  The petals are shape-able, so lots of creative scope with these flowers.
I had a wonderful time playing with the Fairy Dust, but have a feeling I will be finding the prettiest, finest glitter through the whole house!  The shimmer of the glitter is beautiful upon the Italian Flourish and Flowers.
Call on over to the Cardmaking Online Blog to see the other cards created by the Design Team Members.


Supplies:
Cardstock 'White'
Sentiment Stamp
Carl Craft Mini Flower Punch
Kitchen Skewer

Thursday, April 26, 2012

Luxury Layers - Vintage Card - Cardmaking Online

My creation for Cardmaking Online highlights the use of Luxury Card Layers, which are a fantastic product for those who do not have a Bigshot or other die-cutting machine.  Of course they are available in a range of shapes, sizes, and designs.  I must say I was impressed with the quality, with each of the designs I purchased, and I just adore the way the cut-out pattern actually becomes part of the edge of the card. You can see all the varies types available "HERE".

Do visit the Cardmaking Online Blog to see the other DT members projects - vastly different from my own style.  I adore the beading and stitching, looks amazing.
Supplies

Tuesday, April 17, 2012

Vintage Inspired Card - Cardmaking Online

This week I have created a 'Vintage Inspired' Card, using products from Cardmaking Online. The base of the card consists of the Cheery Lynn Designs, Italian Flourish. This die-cut is so detailed and very intricate..  The leaves were cut from the Marianne Designs Creatables (LR0133), and the flower and buds from the Marianne Designs Creatables (LR0145).  Instructions on how to create this particular flower are on the back of the LR0145 packaging!

The flower buds were created using the smallest of the flower die-cuts from the LR0145 die set.  All I did to create was cut from the outside of the die-cut to the centre and roll up, and then added a stamen to the centre of each flower bud.
The butterfly is from the Embossing Folder 'Flutterby' - simply emboss a piece of cardstock, ink slightly to raised surface and carefully cut out.     
 The vintage image is from the StudioLight Romantic Pictures 1, pictured below!  Each of the images are gorgeous!

Supplies:

Monday, April 2, 2012

Cart-Us Lacé Die Card - Cardmaking Online

Photograph One
This card was different to create as I have never played before with Cart-Us Lacé Dies, and they are quite unique in themselves. The dies are available in a range of patterns, all beautiful, and a lot of fun to work with.
The design team for Cardmaking Online have created a variety of wonderful cards, using many techniques I have never seen before.  Call on over to the Cardmaking Online Blog and see for yourself!
Instructions:
1. Create a card base measuring 6" X 6" in white cardstock.
2. Cover base of card with 6" X 6" decorative paper.
3. Using a different patterned paper, cut a piece 5 1/4" X 5 1/4" and adhere to base of card using double sided tape.
4. With yet another different pattern paper, cut a piece measuring 4 1/2" X 4 1/2", and adhere to card base using Foam Squares to give dimension to the card.
 

5. Using a coordinating shade of double sided paper, cut your Lacé Die using a Bigshot or Cuttlebug.  Please Note:  It is important to use double sided paper when using this particular die, as both sides will show on your card.
6. Following pattern on die cut, fold back each triangle area.  It is easiest to use a bone scoring tool and ruler, but you have to take care as it is a small area you are working on.  If you use a good quality paper, you will not have issues with tearing.  It is possible to fold using your fingers only, and still get a very neat fold.
7
7. Create your flower for centre using the Marianne Design Craftables - CR1202. All I did to create this particular flower was cut one each of the die-cuts and gently roll each petal using a skewer.  The two largest petals were rolled downwards and the top, slightly upwards.
8. Ink Edges of your flower, and Lacé Die if to your liking.
9. Assemble flower by using a tiny amount of Helmar 450 Quick Dry Adhesive to the centre top of largest flower, and adding the middle sized flower on top.  Add further adhesive to middle flower and attach smallest flower to centre.  Please Note:  It is important to stagger the flower petals, and not have them directly over the top of one another.  This allows for a much prettier flower.
10. Using very small amounts of Helmar 450 Quick Dry Adhesive, adhere your Lacé Die to your card base.  Please Note:  Take care with the glue, as using too much can leave unsightly marks on your card. Also, adhere flower to centre of Lacé Die, and allow to dry.

11. Add a single large 'Clear' Adhesive Jewel to the centre of the flower, and 3 Jewells to each corner of the inside card layer.  See Photograph One for placement.

12. Create a sentiment of your choice using a strip of paper.  For this card, all I did was bend slightly to form a banner look, and adhered using a small amount of Double-Sided Tape to hold in position.

Your card is completed!


Supplies:
Other: Ranger distress ink- 'Walnut Stain'
Paper - My Minds Eye

Monday, March 26, 2012

Vintage Themed Easel Card - Cardmaking Online


I created this Vintage themed card using a variety of products from Cardmaking Online, the supplies list can be found at the bottom of this post.

The flowers are by Petaloo - they are different, as they come in the pack as pure white, so they can be coloured using a medium of your choice. The pack contains a variety of different flowers,  of vairous sizes.  The Flowers colour beautifully, and I am looking forwards to playing with them in further projects.


Cardmaking Online Products:
Other:
Bazzil Cardstock - Old Gold, White & Pink
Shimmer Paper - Dark Brown
Cheery Lynn Design 'Leaf Die'
Glue Dots
Scor Pal
Glimmer Mist
Distress Ink

Thursday, March 22, 2012

Marianne Designs Craftables - Flower Tutorial

Photo 1
I created this flower tutorial for Cardmaking Online, using a range of the products sent out in our design team packs.  Cardmaking Online is a leading Australian and International retailer of card making and paper craft supplies, with parchment craft being one of the specialities.  The Cardmaking Online Blog is new online and consists of designers from all aspects of card-making - including many I have never seen or heard of before.  Well worth popping over for a visit and 'seeing' for yourself what the design team have and will be creating.

The Kars Adhesive Jewells are some of the best quality 'bling' I have ever used - am very impressed and the shine off each is amazing!


***Please read through all instructions before commencing***
Photo 2
Products Required:
Shimmer Paper
Scissors
Kitchen Skewer
Martha Stewart - Frond Punch
Big Shot Die Cutting Machine
Cardstock
Sentiment Stamp

Photo 3
1. Using the Marianne Design Craftables - CR1202, die-cut 3 of the largest flowers, and 2 small flowers from shimmer paper.  Cut 1 middle sized flower using A4 Glitter Card 'Old Pink'. Slightly cut with scissors into each petal of the large and medium flowers - *Please see photograph 3 and the top right hand side flower.  

Photo 4

2. Using the kitchen skewer, roll the edges of the large flower petals upwards, and for the middle sized flower, the petals are rolled along the petal length. ***See Photograph 4***

3. The smallest flowers are shaped using the mouse mat, and embossing tool.  Place your flower onto the mouse mat, and gently roll the embossing tool around each petal shaping them.  Work your way into the centre so that the petal curls upwards. ***See Photograph 5 and 8***
Photo 5
4. When all petals have been shaped, begin by assembling your flower using Helmar 450 Quick Dry Glue between each layer of petals you add.  The base of your flower should have 3 large flowers adhered one to the other. ***Please Note*** Stagger the petals apart, do not adhere petals one on top of the other. *** See photograph 6***

Photo 6
5. Adhere your middle shaped flower into the flower base.  ***See photograph 7***
Photo 7
6. Adhere both small petals together as in photograph 8.  Please remember to stagger your flower petals from the petals beneath.  This allows for a more realistic appearance.  Adhere your now adhered middle flowers to the already assembled flower base, add a bling piece from the Kars Adhesive Jewells 'Transparent Pink' to complete your flower.  See photograph 1 for finished flower.
Photo 8
7. Using the Big Shot, die cut the Cheery Lynn Designs - Italian Flourish using the A4 Glitter Card 'Old Pink'. Adhere to card base using Helmar 450 Quick Dry Glue.  Assemble your flower, leaves/fronds, to your liking and add sentiment to complete.

Photo 9