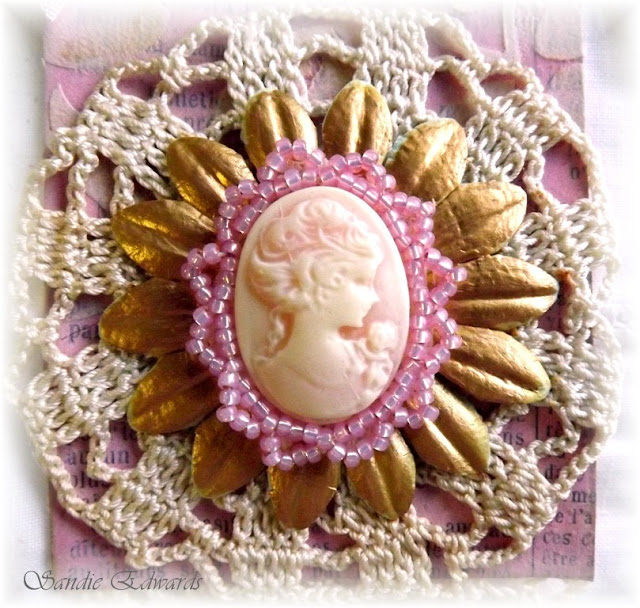
The kits available through Zeus and Zoe host a beautiful array of vintage and beyond items. Often, cabochon's of some description can be found in the kits. Actually, Marivic the owner of Zeus and Zoe custom makes many of the kits to suit each customers taste. If this of interest to you, do drop her an email to discuss. The Zeus and Zoe Etsy store can be found 'HERE'.
I created a tag from items in my DT kit, including - old book paper, buttons, charms, lace, an old doily, and cabochon. I love cabochon's and have a lovely collection of them. In previous crafting ventures I have beaded around the outside rim, to decorate and give a more finished appearance.
Today, I am sharing with you a tutorial on how to complete the beading.

Materials:
Cabochon
Tiny seed beads
Beading needle
Fray Stoppa or adhesive
Adhesive
Felt or calico
Thread - either beading or quilting thread
Cabochon
Tiny seed beads
Beading needle
Fray Stoppa or adhesive
Adhesive
Felt or calico
Thread - either beading or quilting thread
**Please read through all instructions before commencing**
1. Cut a small piece of fabric, a little larger than the cabochon. Adhere cabochon to fabric using a strong adhesive, and allow to dry.
2. Turn cabochon over, and cover fabric with fray stoppa, allow to dry fully. This eliminates the fabric from fraying whilst beading, and also when fabric is cut away when beading is completed.
3. Double thread needle with a long length of beading thread or quilting thread, knot well.
4. Take threaded needle and come up from the bottom of the fabric, at top, and as close to cabochon base as you are able. Thread 5 beads onto needle, and pull beads down thread. Lay the row of beads along the edge of the cabochon, and insert needle close to end of where beads lay and pull through to the back.
5. Come back up with your needle half way through previously sewn beads, with the needle being between the cabochon base and the beads. Thread needle through the 3 last beads as seen in photographs above.
6. Continue steps 4 and 5, till the whole outside rim has been beaded, as shown below.
7. Tie off thread onto back of cabochon. DO NOT CUT THREAD
8. Bring needle and thread back up between cameo base and beaded rim, at top of cameo once more, as pictured below.
9. Add 5 beads, count 3 beads, and thread needle straight through the 4th bead, as shown in below photograph.
10. Add another 5 beads, count 3 beads, and thread needle through the 4th - keep repeating this pattern, until you have returned to where you started, see above and below photographs.
11. To secure, go down next to last bead placement, come back up and over 'a' thread, and back to the back again. Tie off, using small knots. Apply a light application of adhesive over the knot to totally secure, as shown.
12. Carefully trim off excess fabric - be careful not to snip too close and catch a thread - that would mean starting all over again, so do be careful!!
13. Your cameo/cabochon is now ready to use on a project....
...and before I sign off, don't forget this months challenge over on the Zeus and Zoe Blog, you can find all the details 'HERE'. There are some fabulous prizes to be won, including a Zeus and Zoe kit, and also some wonderful trims from May Arts.
enjoy your day and thanks for visiting....
Sandie


10 comments:
That cameo looks amazing, and thanks for sharing the steps on creating the beading around it...
A beautiful tag, Sandie. I love the little crocheted doily. Did you make that yourself? It's gorgeous. I also love the beading and the great tutorial you did on it. Totally fabulous!! ox Marg
wow this looks awesome Sandie, clever girl and TFS how you did it.
Your tag is stunning Sandie and I LOVE the beading around the cabochon.
Thank you for such a clear, easy to follow tutorial.
hugs Sue xx
Sandie great tutorial, this would have taken a long time to make with all the beading.... you have done a fabulous job :)
Wowwww,Fantastic work^_^
Thanks for this elegant tutorial^_^
Big hug my friend^_^
Sonia
Wow! Sandie...just LOVE what you've done but I simply wouldn't have the patience to do it...hat's off to you for doing so!!!! And it looks amazing...LOVE Marivic's 'goodies':):):)
Wow! What a beautiful tag! Wonderful tutorial as well!
Wow Sandie, I love your tag and the tutorial you shared is wonderful. You are such a creative lady!
You are so clever Sandie! Your cameo looks amazing. Thanks for sharing. :)
Post a Comment