Wednesday, November 30, 2011

Christmas Book Card, Inspired by Megs Garden

It’s been a busy week!!  I have finished my book card tutorial, here are the pictures below.  The tutorial itself will go up once it is on the Megs Garden blog... so those waiting please be patient...
There is so much scope to creating these book cards.  Welcoming a new baby, and filling the shadow-box area with baby trinkets, etc.... endless possibilities.
Have a brilliant day all, I’m off to deal with my dear, darling son who is pounding on his cot wanting ‘out’....


I’m entering my book card into the following challenges:  Please call over and check each cchallenge out, some really inspiring DT creations and you may even want to enter yourself!

Tuesday, November 29, 2011

Cheery Lynn Designs - Sending my Love Card


Wow, I am so impressed with the entries to the challenges Cheery Lynn Designs has been hosting each week!  I just love visiting each of the blogs and seeing what each person has created, what a wonderful inspiration!    Do not forget this weeks challenge – the theme is “Shaped Card – anything but square”... give it a go, you could just win yourself a $20 voucher to spend on some Cheery Lynn Designs dies...
This week, I have created a card with the most inspiring and beautiful die, Heartland America XL & L. For some time now I have wanted to play with these dies, they really are elegant! However, I did not want to lose the intricate details of each die-cut piece, so I opted to make a card to showcase the dies.

I used the base of the Heartland America XL die (the die comes with two pieces) to cut my pink cardstock base from.  I carefully aligned the die on folded cardstock so that it would not cut through, but leave a fold line.  The 2nd part of the die set is the detailed die, which I cut out of white cardstock, and detached all removable components.  Secondly, I used the HeartlandAmerica L die, and cut two pink cardstock pieces with the base die.  The first piece is used inside the card, the other on the outside.  After inking all edges with Tim Holtz distress ink, Spun Sugar, I placed the layers of the card together which is pretty self explanatory by looking at the photos.


I just adore the little pieces which are a-top the card, that are a part of the middle of the die set. There would be so many ways you could incorporate these into so many creations/projects...

As this card is an unusual shape, and would not sit as a normal card would on display, I added a piece of ribbon on the back to hang the card...


Dies Used:
HeartlandAmerica L

I am entering my project into the following challenges, please do call over and check each out, may even be something you wish to enter!
The Ribbon Reel - Challenge #16, Anything Goes "Ribbon"
The Cutie Pie Challenge #6 Pastel Christmas
The Ribbon Girl Blog, Challenge "Pink & White"
Have a wonderful and inspiring week.....
Sandie

Monday, November 28, 2011

Megs Garden - "Summer Rose Garden, Book Card"


I loved creating this... “Summer Rose Garden, Book Card” for Megs Garden, as part of the November, ‘summer challenge’.  For some time now I have wanted to make something from an old book, but just cannot fathom the idea of cutting into one of my old books.  Any book to me is a treasure!  So, I created one instead.  It’s only a basic book card, with a few ‘pages’ so to speak, but it is a book nonetheless.
Of course the beautiful products from Megs Garden’swebsite just brought the whole creation together beautifully.  The products I used are listed below...
I will not explain how I created this card book, as I am in the middle of writing up a tutorial for Megs Garden.  As soon as it has been completed, I will let everyone know via my blog. 


German Scrap – French Flourish, Key Hole Lge, and Corner Decorative.
Embossed Silk and Satin 12 X 12 Paper
Lace L28970 and L29220
Paper Lace Doily
Time Zones 12 X 12 Paper
Travel Mini Paper Pack
Tim Holtz Journaling Tickets
Other Products:
Prima Rose and Leaves
Hand-dyed Silk Ribbon/s
Cheery Lynn Designs die “Spider-web”
White Cardstock
Gold charm “spider” & Key
Pearl String
Tim Holtz Distress Ink, Walnut Stain

Megs Garden - "Best WIshes, Easel Card"

From my Megs Garden, November, summer challenge stash, I had some pretties left over to play with, so I whipped up yet another card....
For my Summer Roses, Best Wishes card I used several of Megs Garden’s charming paper doilies. The doilies come in a range of sizes and you can even purchase in long strips which resemble lace!! You can see the range over at the Megs Garden website, scroll along the top menu and find ‘paper lace doilies’....
The papers are from the “Travel Mini Paper Pack”, especially for cards.... the intricate details on the papers are amazing.... just so beautiful.  The scope of creativity with these paper packs is unlimited. 
Megs Garden Products
Travel Mini Paper Pack
Doilies: Square & Circle
Other:
Cardstock
Sheer Cream Ribbon & Pearl String – Spotlight
Cheery Lynn Designs die: Border Carnival
Tim Holts Distress Ink: Walnut Stain

Sunday, November 27, 2011

Megs Garden - "Summer Memories Layout"


My next project for Megs Garden is my “Summer Memories” Layout.  The papers are so nice to work with, do call on over and check out the various collections that are available “here”, there are plenty to oogle over. 
This photograph is of my younger brother (Paul – now deceased) and me - a memory I still very much treasure.  I can still remember the day the photograph was taken; it was so hot my hair kept sticking to my head!!  I of course, did not mind the attention of the photographer fussing about over my hair!  I do vividly remember the both of us fidgeting a lot, and alas, why we have toys in the photo with us....
I remember, that pretty pink dress – it was something my Pop brought for me, though I never wore it again.  I also remember after the photo session was over, Paul and I both jumped into our paddling pool to cool off...somewhere in my photo collection there is even a photograph of that..... LOL


Sadly, my photographs (no matter how I tried) would not show some of the detail.  Around the edge of this layout is a gathered ruffle of tulle, and also beneath the photogrpah - it looks so pretty, and certainly compliments the papers I’ve used.  The edges of the paper were distressed/inked, and torn in places - hand-dyed laces were placed beneath each tear.
German Scrap border originally arrived in my DT package as white – I used distress inks to colour the border, placing it on 3-dimensional foam pads around the outer edge to add a different element of dimension. 
Megs Garden has a wonderful, large collection of paper doilies and I just had to add one beneath my photograph.  Again, the square doily was coloured with distress inks.  Some Cheery Lynn Designs die-cut flourishes, leaves and borders were added, with more coloured lace poking out beneath the borders.   
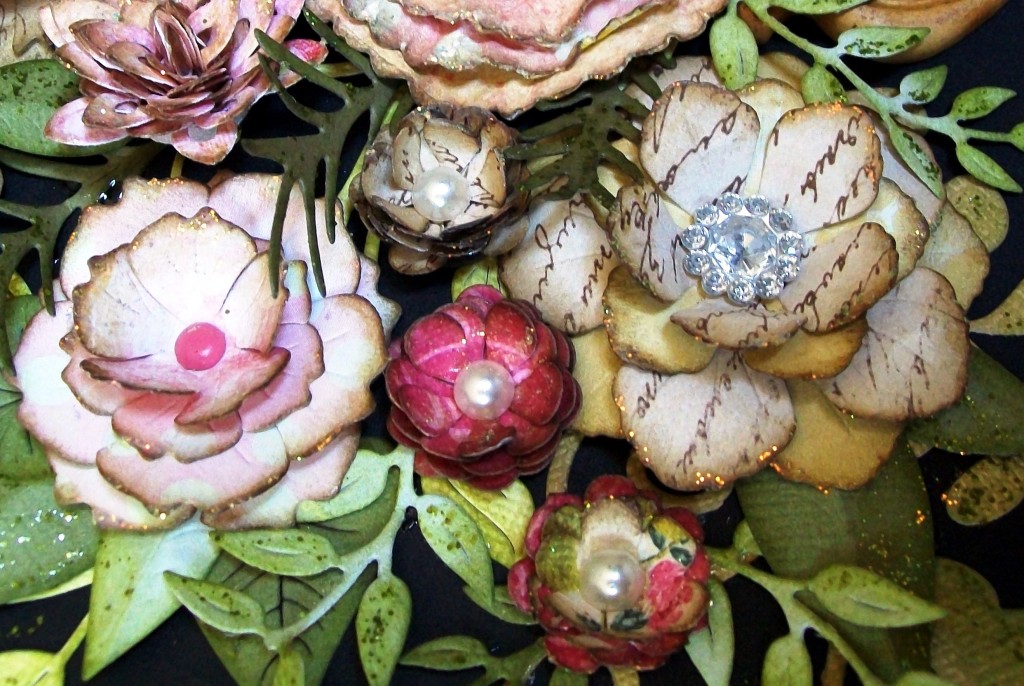
The papers I used – Embossed Silk & Saturn, and Time Zones, I fussy cut different flowers and elements from each paper, inked and curled up edges, before adding the cut elements using dimensional foam, to the flowers on the original paper.  Megs Garden roses were scattered ‘here and there’ and a pile of die cut leaves were added.  I did not adhere the leaves totally down, but left areas that curled upwards.  Pins of Jewels were added to the large MegsGarden rose, which I added some stamens too, and coloured using glimmer mist.


Do call over to Megs Garden and check out the huge range of delightful products there are on offer... and also to the Megs GardenBlog, to see what the other Design Team members have come up with for their challenge of “summer’....
Megs Garden Products
Time zones 12 X 12 Paper
Embossed Silk & Satin 12 X 12 Paper
German Scrap - Fleur border
Off White Open Rose
Ivory Paper Roses
Time Zones A4 Paper
Travel Labels A4 Paper
Pins of Jewels
Lace L28970 & L29220
Paper Lace Doilies: Square & Circle
Other:
Tim Holts Distress Inks: Forest Moss, Victorian Velvet, Walnut Stain
Cheery Lynn Designs dies: Olive Leaves, Lace Rose & Flourishes, Border Carnival.
Tim Holts Alterations: Vintage Market Alphabet
Tulle & Stamens – Spotlight
Tattered Angels glimmer mist: Pink Bubblegum & Suede
Cardstock

Saturday, November 26, 2011

Megs Garden - "Summer Fairy Garden, Shadow Box"


For November, I have been busy creating up a storm for Megs Garden!  The theme is summer – the design team all allowing their own interpretation of each project completed.  As there are several projects, I will be posting them on different days to showcase each.
Firstly, is my “Summer Fairy Garden Shadowbox”...a group of fairies, all relaxing in various positions upon the mushrooms, after the heat of a summer’s day.   When I was a little girl, I used to look each morning, and late evening for the fairies in the garden... I was so convinced they were there ‘somewhere’ – you have to believe to see, apparently!!  AND, when their was a rainbow, they were sure to be about... I nearly 'spied' one that I am sure, especially in my Grandmothers garden, which was just the most beautiful garden I’d ever saw......


I have dressed up a 4 inch, chipboard shadowbox, by Scrapware.  I used a range of the beautifully designed papers by Megs Garden ( listed below), including 12 X 12, and also papers from the card-making series.  All the intricate details were carefully removed from each paper, and added to the shadow box to form a three dimensional aspect, using dimensional glue dots.  Megs Garden has some absolutely gorgeous transparencies; of course I used the “watercolour fairies” for this project. 


If you do not know a great deal about using transparencies in your projects, pop on over to Megs Garden Blog. Meg has written up some fantastic information on transparencies, and also shows some examples. Also, till the end of the year – Megs Garden is offering a free transparency to play with, in each order placed!!!
I further decorated the shadow box using a range of products: Cheery Lynn Designs dies, stickles, and distress stains.


Megs Garden Products
Watercolour Fairies transparency
Summer Couture 12 X 12 Paper
Embossed Silk & Satin 12 X 12 Paper
Lace 1.6cmL28970
Travel Mini Paper Pack
Other:
Tim Holts Distress Inks: Walnut Stain, Forest Moss.
 Mini Shadow Box
Cheery Lynn Designs dies: Olive Leaf, Lace Light Deco Border & Grass Border
White Tissue Paper
Ranger Stickles: Crystal
Cardstock

Challenges I am entering:
Please call on over and perhaps even join in a few yourself!


Friday, November 25, 2011

Cheery Lynn Designs - WINNER of Fanciful Flourish die...

Winner of the Cheery Lynn Designs die, “Give Away” is #5 – Adriana B!!!
Hope you have lots of fun with your new Fanciful Flourish Adriana, will certainly look forwards to seeing what you create....
My apologies, I cannot for the life of me work out how to get the Random. Org widget to apply with the “winner”.  It keeps coming up blank, but original number is #5!  If anyone knows what I am doing wrong with the widget, please put me out of my misery and let me know!!


Wednesday, November 23, 2011

Christmas is almost upon us...


Each year I tell myself I’m going to make my own Christmas cards.... hmmmm, if I am lucky I will get one or two completed.  So, here I am again at that time of the year, and I’m guessing I may get half a dozen made if I am lucky...
Seriously, where has this year gone?
This-morning I was tinkering about with some colours, and created this centre step card.  The image of the gorgeous little snowman is from Sassy Cheryls DigiStamps, and....  Over at the Sassy CherylsChallenge blog, they have a challenge on at the moment, “anything goes”....so call on over and ‘enter’!!

I’m also entering this card into the following challenges:
Please pop on over and visit each, some really wonderful inspiration to be found, as well as a prize here and there!!

Whoopsi Daisy Challenge


Today, I stumbled over some absolutely gorgeous digital stamps by Whoopsi Daisy , and of course had to purchase a few.  After checking out the challenge, “Anything Goes”, along with a Christmas Blog Hop..... I just had to give it a go with using a new colouring technique I have been itching to try out.
To colour my image, I used Tim Holtz distress inks and a water colour pen. Even though it’s not perfect, I’m pretty proud of my first effort.  I see some amazing colouring out there in blog land ... oh and in the latest Magnolia magazine, that is to drool over!!  Just a shame I did not have any blending paper, as my colour kept weeping out of the edges....
I’ll be ordering some ‘blending paper’ tonight ... as I certainly cannot wait to play some more!!

I’m going to send this card to a friend of mine, Robyn, back in South Australia... she is a wonderful friend, and I miss her dearly! I also know, she will love my first attempt at colouring LOL and not be critical....
Thanks Woopsi Daisy for the encouragement to try something new!!

Tuesday, November 22, 2011

Floral Arrangement

(completed project measures 11" X 9")

Hi Everyone,
This week’s creation was inspired by the wonderful dies at Cheery Lynn Designs, and the beautiful, spring weather we are experiencing at the moment in Australia, though it won’t be long and our summer will arrive...  those blooms will soon wilt, but not my flower arrangement!!

For my project, I have used a lot of dies, and created an arrangement which has a three-dimensional appearance.  I have tried to photograph the arrangement so that this can be seen clearly.  There are leaves, flowers, flourishes, pine branches, etc popping up all over the place.
It seriously is not that hard to put together, just time consuming, so do not be afraid to give it a go.  My ‘handy hint’ would be to lay die cuts where you think they should go, when happy with the arrangement, take a photograph to refer back to.  You can then pull apart your temporary arrangement, and use your photograph as a guide.

Firstly, I made all my flowers, inking and rounding edges – the flowers I used are: Sweet Williams, Judy’s Blooms, Flower Chain Border, Cuties 1, Miniature Rose, Cherry Blooms and the ScallopedWindow Stackers.  The Scalloped WindowStackers flower was created by inking the edges, and then spraying the die-cuts with glimmer mist.  While the die-cuts are wet, just crinkle into balls, before gently folding back out – when still wet, add a pearl/crystal brad centre, then place flower aside to dry, making sure your petals are the way you want them.  Easy!
The “Flower Chain Border” I simply cut the flowers from the border, placed on a mouse mat, and curled with a pop-stick edge!!  Yes, I do have the fancy tools, but I prefer the more simple – they work better for me!  J

The leaves and flourishes I used are:  Tropical Flourish, Pair of Ferns, StackerFlower 1 Leaf, Fanciful Flourish, Tropical Leaves, SM Leaves 2, Pine Branches and Olive Branches.  The Olive Branches played a large part in the 3D appearance.  I adhered the small end of the branch and when dry, curled the leaves upwards (or wherever I wanted them to go).   All the leaves edges were inked, some glimmer misted and others have distress stickles as well.
Border Carnival was added as the ‘tablecloth’ – and of course, I just had to add a couple of butterflies, and a dragonfly.
The urn or vase is an item I have had in my ‘stash’ for quite some years, but I am sure a google search (gosh I love google!!!) would bring up a mountain of sources to buy from. OR, perhaps create your own out of some clay!
Dies Used:


The theme this week is "Red& Green"

The rules are:

1.You must follow the ‘theme’ in place, and use at least ONE Cheery Lynn Designs die, though of course we would love to see more!! J

2.You must add a link to your blog post (not just your blog) using the Inlinkz, found at the end of this post.No back posting, only new projects please.

3.You must link to our blog in your post.
I am entering my creation into My Craft Spot's, Challenge #34 - "Handmade Flower Power".... please call over and have a look at the lovely DT creations, and perhaps, even enter yourself!! 


Also, I'm entering Challenge #6, over at Crafty Ribbons Challenge, #6, where the challenge is "anything but a card"!  You have to see the DT's creations, some really unique and unusal items... I especially love the cake - wow!!!
and
Fussy and Fancy Friday, also have a challenge taking place "Making a Gift/Anything but a Card".

Well I hope you have enjoyed my creation this week!  I wish all those celebrating “Thanksgiving” on the 25th, a special time with family and loved ones....

And to everyone, happiness always, no matter where you are on the globe!!

Friday, November 18, 2011

Give Away, Cheery Lynn Designs - Fanciful Flourish


Hi Everyone,
I have a Cheery Lynn Designs “Give Away” – which consists of the most popular die “Fanciful Flourish”!  It is a beautiful die, which can be used in so many ways...
As an example, here is a layout of mine, which I used the "Fanciful Flourish" on.  For this layout, I cut numerous die cuts of the "Fanciful Flourish" out, and chopped and shaped them around the page..... 

To be in the running for this lovely flourish, all you have to do is a leave a comment on this post.....
Worldwide entries are welcomed. 
The winner will be drawn.....by random generator on Friday 25th of November!!
Don't forget the "Challenge" on at the moment over at the Cheery Lynn Designs Blog, you can check the challenge out "here".


I’m also entering my “Four” layout into Frosted Designs – Fabulous FridayChallenge, “Diecuts”. Please call on over to the Frosted Designs Blog, and check out the wonderful challenges they hold!
Now I’m off to be creative if my little ‘sweetheart’ will allow ... the ‘big’ sweetheart is sleeping and back on nightshift... J
Have a fantastic day ...
Sandie

Thursday, November 17, 2011

Vintage Friendship Card


I just absolutely adore “Vintage” ....anything Vintage, so creating something in this theme just flows for me, so easily....
The hardest part, after many years of collecting vintage images was deciding on which one I would use!!


I’m so delighted to be able to enter this card into a couple of challenges:
 Totally Papercrafts Blog – Week 52 “Vintage” 

and the PaperPlay Challenge Week 46 - "Shaped Card" challenge
All worth check out, with some gorgeous DT examples!


The products I used in this card are:
Cardstock
Prima “bling”
Tim Holtz Distress Ink – “Victorian Velvet”
Sheer Ribbon, Guipure Laces (hand-dyed by myself), and fancy ribbon – many years old and I have no idea of brands...

Well I hope everyone has a totally wonderful weekend, beautiful weather here at the moment...and I am going to be spending some time finishing off a few pretty projects I've been working on for my DT at Megs Garden!!  Gosh, her products fit so much into "Vintage" and if you have not checked out the website, you can find it "here".  Also, don't forget the blog, which is "here"....
From now till the new year, Meg is offering 2 free transperancies with each order that is placed.  Transparencies are so much fun, as I have recently been playing/learning all about them in my DT pack ....

Okay, off to create, while peace reins in the house ...and as I speak those words, I hear Jesse garble-gooking in his cot!! LOL