Showing posts with label Stackers. Show all posts

Tuesday, February 28, 2012

Decorative Purse Container - Cheery Lynn Designs

Hi Everyone,  this weeks Cheery Lynn Designs project is a creation I can use on my work desk for all my pens, rulers, and odds and ends.  The purse is a wood kit  made by Kaisercraft, and stands at 6 inches tall.  I adhered gorgeous My Minds Eye papers to the inside and outside.   As this project is going to be used I did not decorate any of the sides or back - just highlighted the front.   

I have many favourite Cheery Lynn Design dies.... but the Lace Rose and Flourish has the most adorable swirls, leaves and curls.  This die can be cut into smaller pieces to decorate, or used in one long flourish.  As you can see with my project I cut my pieces to 'fit' my project.

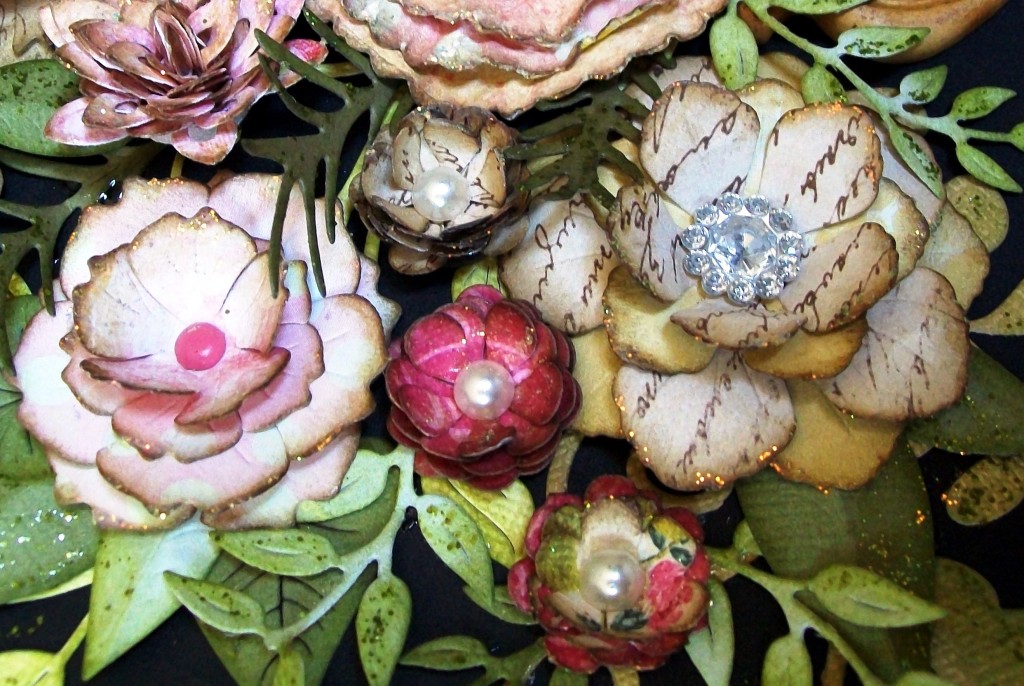
The flowers were created from tissue paper, and the Scalloped Window Stackers. You can create a variety of flower sizes using the Scalloped Window Stacker dies and various paper mediums.  All I did to create the two on my project was cut multiple layers of tissue paper, from the varying sizes of each die.  Each layer was crunched up in my hands to 'crinkle' and a brad put through the middle to hold each layer together.  I separated some of the layers to give a little more dimension.  On the smaller flower, I wet a few petal edges with water lightly and curled the edges in slightly.

The leaves I used for this project are the Judy's Blooms die set, which comes with the flower and leaves. Also, Pine Branches were added to give a little more character to the flower.  AND, I just had to place a Small Exotic Butterfly onto the project .... I so love them!

To complete the project, a small amount of stickles was applied to highlight the die cuts.

Dies Used:

This weeks challenge at the Cheery Lynn Designs Blog is "Lots of Layers" - call on over to see what Bonnie and Sandy have created as examples for the challenge, they are both cute!  You can find all the challenge information "HERE".

Till next week
Sandie

Sunday, January 15, 2012

Cheery Lynn Designs - New Release and "Easle Card"


Cheery Lynn Designs has some great new release dies for January ,and have now been released to the public!  Please call on over to the Cheery Lynn Designs Blog and check out all the wonderful projects the Design Team have put together for the new release.  

*See below for a complete view of all the new release dies....

My parcel of new release dies has not arrived as yet, no doubt due to the influx of mail over Christmas.  However, I still created a card using some of Novembers new release dies, and other favourite dies of mine.  


The above flowers consist of Cuties 1, Cuties 2, & Cuties 3.  I have teamed them with a pile of dies to create a floral arrangement, including: Olive Branches, Sm Leaves 2, Pair of Ferns, Pine Branches, Fanciful Flourish, Japanese Garden Lace Oval (I used the greenery only from inside of the main die). 

There is a great tutorial on how to assemble the Cuties range of dies, which can be found "here".

The card itself was created using the French Flair Classic dies, XL-12 and L-12.  I also used the French Flair Classic XM-12 and M-12 to create the sentiment base. The Nautical Wheeler Doily was used to decorate the base of the card, and the middle die cut of the Nautical Wheeler Doily die-cut was used on the base of the card, over the top of the Border Carnival die.

Dies Used for my project:

And, here are the January new release dies!! Click on the images to enlarge for more clearer detail. 
I am looking forwards to my parcel arriving, so I can 'play' with the new dies!!

Happy Creating Everyone
Sandie

Tuesday, January 3, 2012

Best Friends Circle Card - Cheery Lynn Designs

This last week I have been playing with the CheeryLynn Designs, Circle Classic and Circle Scalloped Stacker Series and created this card...

I used the various circle stacker series, including the small window stacker series to create the card, building up the base of the card, and inside, with layers of circles – also using the L-4 Circle ClassicSeries to cut out the centre of the card.  The round sentiment is a free digital stamp, by Scrap-A-Licious- Times.  The XMC-5 Scalloped Window Stacker Series fits these sentiments perfectly to cut out, saving a lot of guess work!! 
 
A handy hint: remember when making round cards; if you use a scalloped circle as the base of your card, your card will stand with no issues...


To decorate, I created some open petal flowers using the Large and Medium Rose and then added foliage using the OliveBranches. The flower buds were created by cutting 3 petals from the Large Rose die cut, and rolling one up tightly, then adhering the other two petals over the top and bottom.  Just make sure you pinch tightly at the base of your newly formed bud, so you do not see the flower beneath the leaves.  To form the sheath over the flower bud, I cut a small section from the Olive Branch and adhered around the bud, looks quite affective!


And, don’t forget this week’s challenge on the Cheery Lynn Designs Blog, ‘WinterBlues’.  Challenge details can be found by clicking ‘here’.  You have a chance of winning some great prizes – I look forwards to seeing everyone’s creations....
Sandie
Dies Used:

Tuesday, December 27, 2011

Large Oval Vintage Tag - Cheery Lynn Designs

Tag measures 7 X 9 inches

Christmas is over for another year, and I do hope you all had a wonderful time with loved ones.  Now, New Years is just around the corner....

Today, I want to show you a vintage, oval tag I created for Cheery Lynn Designs. This oval shaped tag could easily be transformed into a photo/memory booklet, or made to hang on a wall, showing off precious photographs.  

The base for the tag was cut from the XL-8 Oval Scalloped Stacker Series, and my actual photograph was cut from the L-7 Classic Oval Silver Series, and then framed in the most intricately beautiful, DL136 Japanese Garden Lace Oval Frame.  The largest backing piece was embossed using the PS107 Stitcher Plate, then lightly sanded for that distressed look, using Core-dinations cardstock.
To decorate, I used the inside greenery from the Japanese Garden Lace Oval Frame, and teamed it with the B147 OliveBranches.  The Olive Branches were cut into various sizes and weaved in and amongst the roses, and upwards to frame the photograph. 

I formed three B155 Large Roses, curling the petals up tightly and adhering for the centre and then built the petals little by little around the centre of the rose.  Some of the petals were curled inwards, and others outwards.  There are certainly ‘many’ ways to create roses, from these beautiful dies, and of course are available in three various sizes.  

To complete the tag, I used Creative Inspirations paint to highlight different areas, especially the roses, as well as Tim Holtz distress inks on edges.  Prima porcelain roses and pearls were adhered, and some of my vintage guipure lace and silk ribbon which I hand-dyed in variegated colours to match, were used to complete my project.
Mike has completed a great video, do check it out on the Cheery Lynn Designs Website“Detailed Dies Cutting Workshop”, well worth viewing, especially when dealing with the beautiful and intricate detail of the dies available through Cheery Lynn Designs... And do not forget this weeks challenge also, which can be found by clicking “here” – the theme this week is ‘Celebrate’.  Just remember, you can create anything you wish, but you have to use at least one Cheery Lynn Designs die in your creation, though more is welcomed for your chance to win a $20 voucher, and Mo's Digital Pencil also has some great prizes for several winners!

I want to take this opportunity to wish everyone a Happy New Years, may 2012 bring much joy, lots of laughter, and good health to all... till next year ...

Dies Used:


I am entering my Victorian Tag into the Creative Inspirations, “anything goes” challenge this week.  Please call over and check out the beautiful creations by DT members and join in the fun of the challenge.  The colours of Creative Inspirations paint used in my creation are beige, green olive, and winter frost.

Tuesday, December 13, 2011

Cheery Lynn Designs - Christmas Card

These last few weeks I have been busy creating Christmas cards... I seriously do not think I will get them all completed, but it is certainly fun trying!
For Cheery Lynn Designs this week, I have created a Christmas card using the French Flair Classic & Silver Stackers (largest in series), and used the Piercing Plate to emboss the cardstock.  I have had-stitched around the outer edge of the image, and also in each corner.... though, I have to admit, I cheated and drew the rest of the stitching lines in place around outer edges!
The Victorian Romance Flourish is a stunning die-cut, and I used this as a main focal point and then furthered my layers with Pine Branches, and the Miniature Rose.
The base of the card was built up using the Lace Light Deco Border, along with the Ribbon Eyelet Border w/piercing.
The sentiment on the card front is from an older Kaiser Paper range I had in my stash, and the Christmas Greetings, is from the gorgeous Graphic 45, Christmas Emporium range.  
Dies Used:

Well, till next week.... happy creating....
Sandie

Tuesday, December 6, 2011

Memory Album - Cheery Lynn Designs


I had a wonderful time creating this week for Cheery Lynn Designs, with a die series I had not used previously.  With the “Special Moments” A2 Scallops and Rings die, I created a memory book.   These books are quite simple to put together, and would make delightful Christmas presents for those of all ages.  The best part is more pages can simply be added at a later time, depending on how you embellish the book; you could easily fit up to 10 pages (including the front and back cover), if not more. 

The paper collection I used is called “English Rose” by Kaisercraft, the 6X6 paper pad, and of course an assortment of cardstock in various colours.  All edges are inked with Tim Holtz distress ink, in the colour of “Walnut Stain”... my favourite for a more vintage appeal.
 For my creation, I left the pages blank. However, there is plenty of room for journaling, and adding in photographs or memorabilia. 

 
Each page is decorated with a variety of die-cuts – the front page being the fancy one with an array of doily dies (English Tea Party & French Pastry), flowers and foliage.


On page “Four”, I have created a flower using the Anastasia Border die, by cutting the die and placing on my Scor-pal, scoring every ¼”. Next, I folded the scored area like a fan, and used a strong adhesive to hold in place – I adhered the newly created flower onto a 1 inch cardstock circle, added a pretty bling piece to the centre, and voila - one flower created.

 Page 4...above

 
On page “Six”, the flower is created from the Heartland America die pieces left over from last weeks, “sending my love” card.  All I did was add dimensional tape between the layers, so simple and yet, so effective.  Its wonderful being able to create something ‘pretty’ with left over die cuts...
  Page 6...above


The back cover is a pocket, which I have placed half a dozen tags – though, this could also be used to store/hold letters, notes, photographs and other memorabilia. 


I do hope my project has been inspirational, and some individuals will be encouraged to create a Cheery Lynn Designs “memory book”...
...and before I sign off till next week, please don't forget the Cheery Lynn Designs challenge taking place each week at the moment.  This coming week the theme is "silver & gold", all you have to do is get creative and use at least one Cheery Lynn Designs die to be in the running to win a $20 shopping voucher... Look forwards to seeing what everyone creates!!
Till next week
Dies Used:

Tuesday, November 22, 2011

Floral Arrangement

(completed project measures 11" X 9")

Hi Everyone,
This week’s creation was inspired by the wonderful dies at Cheery Lynn Designs, and the beautiful, spring weather we are experiencing at the moment in Australia, though it won’t be long and our summer will arrive...  those blooms will soon wilt, but not my flower arrangement!!

For my project, I have used a lot of dies, and created an arrangement which has a three-dimensional appearance.  I have tried to photograph the arrangement so that this can be seen clearly.  There are leaves, flowers, flourishes, pine branches, etc popping up all over the place.
It seriously is not that hard to put together, just time consuming, so do not be afraid to give it a go.  My ‘handy hint’ would be to lay die cuts where you think they should go, when happy with the arrangement, take a photograph to refer back to.  You can then pull apart your temporary arrangement, and use your photograph as a guide.

Firstly, I made all my flowers, inking and rounding edges – the flowers I used are: Sweet Williams, Judy’s Blooms, Flower Chain Border, Cuties 1, Miniature Rose, Cherry Blooms and the ScallopedWindow Stackers.  The Scalloped WindowStackers flower was created by inking the edges, and then spraying the die-cuts with glimmer mist.  While the die-cuts are wet, just crinkle into balls, before gently folding back out – when still wet, add a pearl/crystal brad centre, then place flower aside to dry, making sure your petals are the way you want them.  Easy!
The “Flower Chain Border” I simply cut the flowers from the border, placed on a mouse mat, and curled with a pop-stick edge!!  Yes, I do have the fancy tools, but I prefer the more simple – they work better for me!  J

The leaves and flourishes I used are:  Tropical Flourish, Pair of Ferns, StackerFlower 1 Leaf, Fanciful Flourish, Tropical Leaves, SM Leaves 2, Pine Branches and Olive Branches.  The Olive Branches played a large part in the 3D appearance.  I adhered the small end of the branch and when dry, curled the leaves upwards (or wherever I wanted them to go).   All the leaves edges were inked, some glimmer misted and others have distress stickles as well.
Border Carnival was added as the ‘tablecloth’ – and of course, I just had to add a couple of butterflies, and a dragonfly.
The urn or vase is an item I have had in my ‘stash’ for quite some years, but I am sure a google search (gosh I love google!!!) would bring up a mountain of sources to buy from. OR, perhaps create your own out of some clay!
Dies Used:


The theme this week is "Red& Green"

The rules are:

1.You must follow the ‘theme’ in place, and use at least ONE Cheery Lynn Designs die, though of course we would love to see more!! J

2.You must add a link to your blog post (not just your blog) using the Inlinkz, found at the end of this post.No back posting, only new projects please.

3.You must link to our blog in your post.
I am entering my creation into My Craft Spot's, Challenge #34 - "Handmade Flower Power".... please call over and have a look at the lovely DT creations, and perhaps, even enter yourself!! 


Also, I'm entering Challenge #6, over at Crafty Ribbons Challenge, #6, where the challenge is "anything but a card"!  You have to see the DT's creations, some really unique and unusal items... I especially love the cake - wow!!!
and
Fussy and Fancy Friday, also have a challenge taking place "Making a Gift/Anything but a Card".

Well I hope you have enjoyed my creation this week!  I wish all those celebrating “Thanksgiving” on the 25th, a special time with family and loved ones....

And to everyone, happiness always, no matter where you are on the globe!!

Tuesday, November 1, 2011

Cheery Lynn Designs - Christmas Lantern, Tag & Friendship Card


Christmas is just around the corner, I’m not totally sure where this year has gone, which is a little scary!! 

Cheery Lynn Designs has some stunning Christmas dies, and this week I have created a Christmas Lantern and matching tag.  


A tutorial which can be found “here” in the ‘resources’ section of SplitcoastStampers that will give you a guide to making a lantern.

(smallest) to cut the shape from the four sides of my lantern, and backed each cut out, with vellum. The Elegant Evergreen Christmas Tree (DL144) is so detailed and appealing, though a smaller version was required, so I removed the lower edge of the die cut to make the tree the right size to apply to the lantern.   I also adore the new release Snowflake 2, and knew it would look so pretty against the velum when the candle was lit.
It is not recommended to use tea-light candles in a paper-project. However, you can purchase battery operated candles which are perfect with no fire risk.  These battery operated candles are so realistic; they even flicker like a real candle!

The Christmas tag was made with the left over cut-outs from the lantern.  The CoveredRectangle Classic (2nd smallest) was used to back the tag so the Elegant Evergreen ChristmasTree would fit nicely.

These lanterns would look gorgeous on a Christmas table, and could even be adapted to hang with the use of eyelets and some ribbon!


The below ‘friendship’ card, I created for last weeks post, but sadly my internet connection refused to allow me to upload the photographs.  So thought I would sneak it in with this weeks...

I love the way the Lace Light Deco Border interlocks on the front of the card...


Dies used for Friendship Card:

Hope everyone has a wonderful Halloween!!
 till next week, Sandie