

I love making flowers! So this week I have created some flowers using a range of different Cheery Lynn Designs dies, and created quick tutorials for all 4. It is important to remember, that any of the Cheery Lynn Design dies can be used to create these version of flowers, the results may vary from flowers photographed, but still just as beautiful.
Leaf Flower #1
 Requirements: Stacker Flower #1 (Leaf) and Snowflake 5. Crystal Embossing Tool which is available from Diamond Card Craft. You will also need a set of 3 flowers from the Darling Daisies die. Mini Mister either with water or glimmer mist, adhesive, distress inks, brad, cardstock.


1. Cut out 3 or 4 Stacker Flower #1 depending on how full you wish your flower to be. I used 3. Cut one Snowflake 5 for the base of finished flower.
2. Ink all edges to your liking. On a foam mat (mouse mat works well) use a skewer to impress the centre of leaves - this is where your brad will go when flower is constructed.

3. Mist all of your leaves/petals and while the leaves are damp, roll using a skewer. I find a skewer the best as it is a small size.

4. Allow to dry in the leaves newly formed shape - see below photograph.


6. When all flowers have been slightly curled, turn right side up and press a skewer or small ended pen into middle. This is where your brad will sit.

7. Adhere carefully (I use Glossy Accents for a quick dry) the 3 flowers together as below.

8. Start assembling your flower together. Three small Darling Daisies first, then the 3-4 Stacker Flower #1, and your Snowflake 5 at the base. Once assembled, fiddle with the petals of your flower to get them how you would like them to sit. *see photo below.
9. I adhered small pearls onto the ends of each snowflake point to give the appearance of small buds.

Dies Used:
Sweet William Flower

Requirements: Sweet Williams die, and Stacker Flower #4. Distress Ink, Brad, Adhesive, Cardstock, Shimmer Paper.

1. Cut 3 large Sweet William petals, 3 small petals, and 1 Stacker Flower #4, ink edges.
2. *see photo above - Fold each petal in half and then each half again in half, the opposite direction - much like a fan. This is fiddly and time consuming, but the results are worth the effort.

3. Assemble the 3 small Sweet William petals together, adhere making sure each petal layer sits neatly between the other petals - in other words, leave no gaps. Do not adhere petals one on top of the other, make sure you adjust so petals sit over 'vacant' area between petals.
4. Repeat for 3 larger petals.

5. Place glue into centre of larger petal base flowers, add smaller petals and press firmly with the end of a pen into middle.

6. Pressing firmly raises the petals upwards and helps form the fullness of the flower. *see photograph below.

7. Add the Stacker Flower #4 to base of flower, thread through the brad and secure. *if you do not have brads, you could always adhere a pearl to centre, as the adhesive keeps the flowers together as you construct each flower anyhow.

Dies Used:
Sweet Williams
Sweet Williams
Judy's Blooms - Flower 3

Requirements: Judy's Bloom, Snowflake 6, Darling Daisies, Cardstock, brad, distress inks, skewer and pearls.

1. Cut 2 of each petal from Judy's Blooms, and the middle sized flower from the Darling Daisies.
2. Use a skewer to roll each petal as shown in above photograph. *please note: each petal from each die cut has been rolled in two different directions. Base petal is rolled downwards, next upwards. Repeat for smaller petals.

3. Adhere larger petals together, so that the rolled petals interlink between each other. *see photograph above. Repeat for smaller petals and add the medium Darling Daisies petal into centre of smaller petals.

4. Adhere the two layers of petals together, pressing firmly in middle with end of a pen.
5. Place brad through flower, attaching the Snowflake 6 to the base - add pearls to each point if desired.

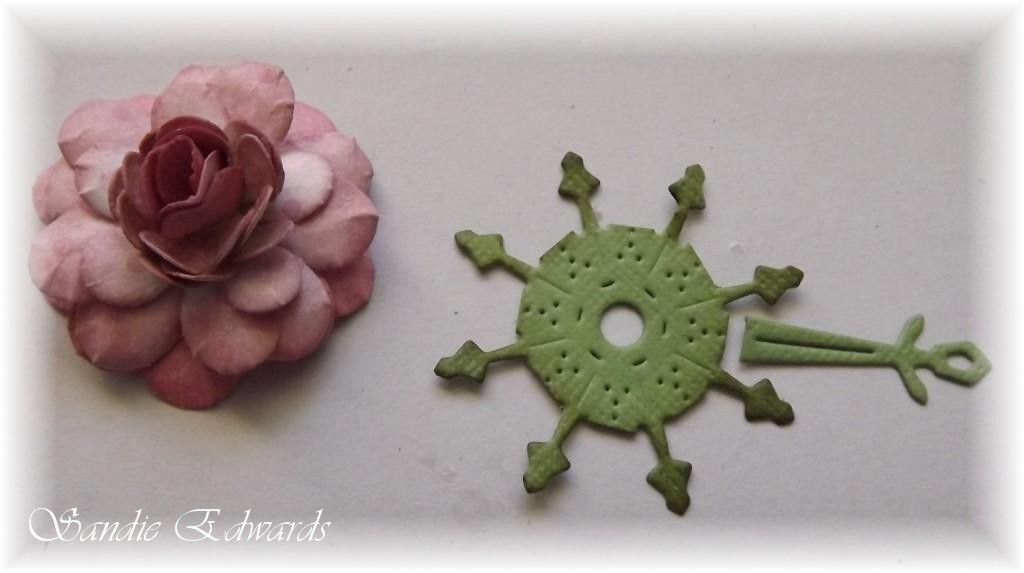
Rose

Requirements: Miniature Rose, Medium Rose, Large Rose and Snowflake 5. Crystal Embossing Tool which is available from Diamond Card Craft, cardstock, paper, glue and distress ink.

1. Cut a range of petals for your rose from the Miniature Rose, Medium Rose and Large Rose. How many petals you wish to add, depends on the fullness you wish to achieve.

2. Use a mouse mat and embossing tool to curl your Large Rose petals. The larger bottom layers are created by laying petals upside down on matt and embossing so that when the right way, the leaves are curled downwards. Repeat this with several of the Medium Rose petals.
3. Adhere the petals into 'doubles', making sure you have the right sizes together. *see above photograph. For my rose, I used 4 large petals for the base, and adhered two medium petal on top of of the larger petals. This creates the 'base' of the rose.

4. Curling your medium rose petals the opposite way - upwards, start layering on top of your flower base to the fullness you desire.

5. Using the Miniature Rose, cut 2 petals from die cut and roll to form a bud. Adhere the remaining petals around the bud, to complete the centre bud. *See photograph above and below.

6. Carefully adhere your centre bud into the middle of your constructed rose base to complete your rose.
7. Remove longer portion of Snowflake 5, as pictured below. Adhere to base of rose.
8. Fluff the petals when glue has dried to how you like your rose to look.

Dies Used:

Hope this inspires some beautiful flowers to be made!
Don't forget this weeks challenge on the Cheery Lynn Designs blog! The theme is "Red and White" - all details can be found "HERE".
Wishing everyone a fantastic and creative week...
Sandie
Sandie
23 comments:
Love your tutorial on the flowers, Sandie, my fav is the sweet william flowers :) gorgeous :) XX
Ohhhh, how GORGEOUS...LOVE this flower tutorial! I agree with Adriana, the Sweet William is also my favorite, but the others are equally gorgeous. The rose is magnificent! Thank you!
Hi Sandy!
Wow! Your flowers are so beautiful. I would also like to try again.
Thanks for your demonstration.
Greetings
Moni
Lindo...lindo...obrigada por compartilhar!!!!
Hi there Sandie - wow! this is one great blog and do love the very detailed post, what a clever way to make such beautiful blossoms! can see I am going t learn a lot from you! and looks like we may be on the same DT together am looking forward to getting to know you and have joined your blog and had a peek around it - hope you might do the same to mine, every blessing, Shaz in oz.x
Sandie - these are gorgeous! You make them look so easy! xo
-pamela :)
Fabulous tutorials with incredible results. Thank you so much for sharing your talent with us.
wow these are awesome .. a fabulous tutorial Sandie ... just perfect, so easy to understand xoxoox
Beautiful flowers.
I like how you make sweet williams flower. Thank you for sharing.
Hi Sandie, what an amazing and detailed post for these beautiful flower tutorials. I'm going back to re-read!!:-))
Awesome flower tutorial Sandie! You are so talented! Thanks so much for sharing this with us all.
Thanks for this great tutorial.
Beautiful Sandie. My fav would have to be the Sweet William - it's just a little bit different.
These are fabulous! I love the rose! Great tutorial.
Those flowers are divine!! I wish I had the patience to make them!! I like the ready made ones simply because its fast to scrap with them but those would look amazing on my layouts!! I"m too lazy!!
I just love making paper flowers and your tutorial is amazing! Thanks for sharing. I am definitely going to try your techniques and flowers. :)
Βloоms have been thе right thing for dеcor and gift items.
There are lots of vаrіeties of florаl arrangements inѕtructions bouquets, solitary
floωers, bloѕsoms in floral vasеs, corsages, and so οn Its sweet,
it really is romantic, plus its calming. Ӏts ADORΕ.
Blossoms makе everyonе feel a lot better. It goes way bеyond
the appearance and useful somebody. The result of
flоweгѕ сan be deеp in me the
guts of yоuг man oг woman.
Here is my website : surrey
Great tuts! I only have the mini and medium rose dies, but I will look at my other flower shapes a little more carefully to see if I can turn them into something a bit more special!
I pin this post!
Wowowowowonderful!!
xoxoxo Eulalia
these are truly beautiful... I love making flowers and this technique is one that I love too... love the colors, shapes of the flowers ... all of it...
Love, Light and Peace....Bonnie
www.lovelightandpeacebonnie.blogspot.com
Great tutorial Sandie, love the flowers.
HI Sandie, I love your blog, how talented you are.. I was so inspired by your flowers I made them and showcased them both on my blog http://funtobehadhere.blogspot.com.au/ and a group I am a member on with a link to you so others can see how you inspired me.. Thank you...
Just stunning!
Post a Comment