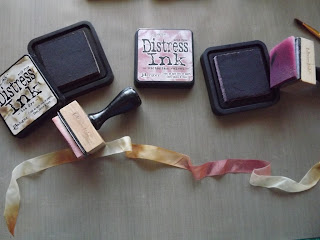
Please read through all instructions before commencing.
Seam binding is becoming a 'must have' for card makers, with its beautiful shimmer, and creates the most heavenly bows, and flowers.
In this step by step tutorial, I am attempting to show how versatile seam binding is to create your own favourite colour schemes, in just a few simple steps, using a variety of products. The sky is the limit really, with so many fantastic products out there on the market for colouring, in some form or another.
Please Note: When first venturing into hand-dying, it is probably best to attempt
test runs with small strips of Seam Binding, writing down what you have
'done' in each step to get the results of each. If you like something
in particular, you can repeat the process.
 |
| Photograph 1 |
1. Firstly, if using Distress Ink Pads, it is important to dampen the seam binding previous to colouring - this allows for the colour to penetrate evenly, and you can successfully meld two colours (or more) with wonderful success to achieve a glorious variegated appearance. Simply dab your ink onto the moist Seam Binding in areas along the ribbon, making sure to leave blank areas for another colour if you wish to have a variegated ribbon - Photograph 1.
2. If using Distress Ink Re-inkers, painting straight from the bottle onto the seam binding will give extremely vibrant/strong colours. Remember you can water down re-inkers.
*See Photograph 8: The 'brown' ribbon on bottom - Walnut Stain Re-Inker was applied straight, then the ribbon was scrunched up in my fingers and allowed to dry outside on a tray in the sun. This gave a beautiful vintage appeal which I personally adore.
3. The drying process can be completed through a quick zap in the microwave. However, Seam Binding does tend to 'burn' easily, so care is needed here! I highly suggest natural drying out on the line or scrunched up on a tray, then ironed. If you prefer the scrunched crinkled look, then by all means wet ribbon again and scrunch up! It is important to apply heat via ironing, as this 'sets' the ink into the Seam Binding.
 |
| Photograph 2 |
4. In Photograph 2 I have applied Glimmer Mist, firstly moistening the ribbon with water, scrunching up before applying Glimmer Mist with dabs straight from bottle using a paintbrush. I dried this particular ribbon hanging on the line, and not scrunched up on a tray in the sun. The effect on the ribbon can vary dramatically via various drying methods. *Results can be seen in Photograph 7, third ribbon down for this particular method.
 |
| Photograph 3 |
5. In Photograph 3, Glimmer Mist was applied, though only randomly - not all the Seam Binding was covered. Ribbon was dried scrunched up on a tray and the results can be seen in Photograph 8, the top ribbon.
 |
| Photograph 4 |
6. In Photograph 4, Perfect Pearls was added straight to the ribbon, and also a brush of Glimmer Mist onto dry seam binding, in an even manner, and line dried. This gave a total block of colour to the ribbon with no variegation.
 |
| Photograph 5 |
7. Photograph 5, was firstly coloured using Glimmer Mist, and then line dried. To add a bit more character to the Seam Binding, I then added along the edges Black Glimmer Mist, and allowed to dry in the sun as pictured above. Very nice results with this one, which can be seen in Photograph 7, second ribbon down.
 |
| Photograph 6 (not ironed) |
 |
| Photograph 7 (Ironed) |
 | ||
| Photograph 8 |
 | |
| Example of finished Seam Binding Ribbon Rose/Bud and Leaves |
Another fantastic way of dying Seam Binding is by using Spectrum Noir Alcohol Markers, especially for creating depth on ribbon edges! OR, markers could be applied to ribbon rose (as above) to add depth of colour to the centre of the rose.
Supplies:


7 comments:
Thanks for this detailed tutorial Sandie. Having tried most of these before, I love the detail in your description lol. Being rather a messy crafter I usually just go for it and often even mix my media, which then of course means I can never repeat what I have done before...
Love the idea of using the Spectrum Noir, never done that before...
wonderful tutorial Sandie, love the finished rose bud at the end :)
Thank you for this tutorial! I just bought some seam binding and not sure how to do this. Great timing!!
Sandie, thanks for sharing this post. You have been most helpful and I can't wait to give this a try.
Hope little Seth is doing well and Grandma too!
You are soooo clever. What a great tutorial Sandie. I sort of vaguely knew some of what you said but you have explained and demonstrated so clearly and precisely what to do that now the techniques are perfectly clear. Thanks so much for sharing. xx
FanTAStic results, Sandie! These are glorious!
Another fab. tutorial Sandie - I love the way you describe everything in such detail, and make it easy to understand.
I loved your Book Card so much that I was inspired to make one for my DIL's birthday - it's now on my blog, and I have added a link to your tutorial in my post. (Hope you don't mind).
Have a happy weekend - Sylvia xx
Post a Comment